Payroll Management
Overview
The Payroll page is a dedicated admin tool for managing technician pay. It brings together flat rate labor tracking, hourly timesheet review, CSV exports, and QuickBooks integration into one workflow.
Access Payroll from the side menu (admin only). The page has three sections:
- Flat Rate — View flagged labor items by technician, mark them as paid, and export to QuickBooks.
- Hourly — Review time clock entries by employee, calculate pay based on hourly rates, and download CSV.
- Export History — View past QuickBooks exports with full details and CSV download.
- Time Clock — Admin view to manage, edit, add, and delete employee time entries.
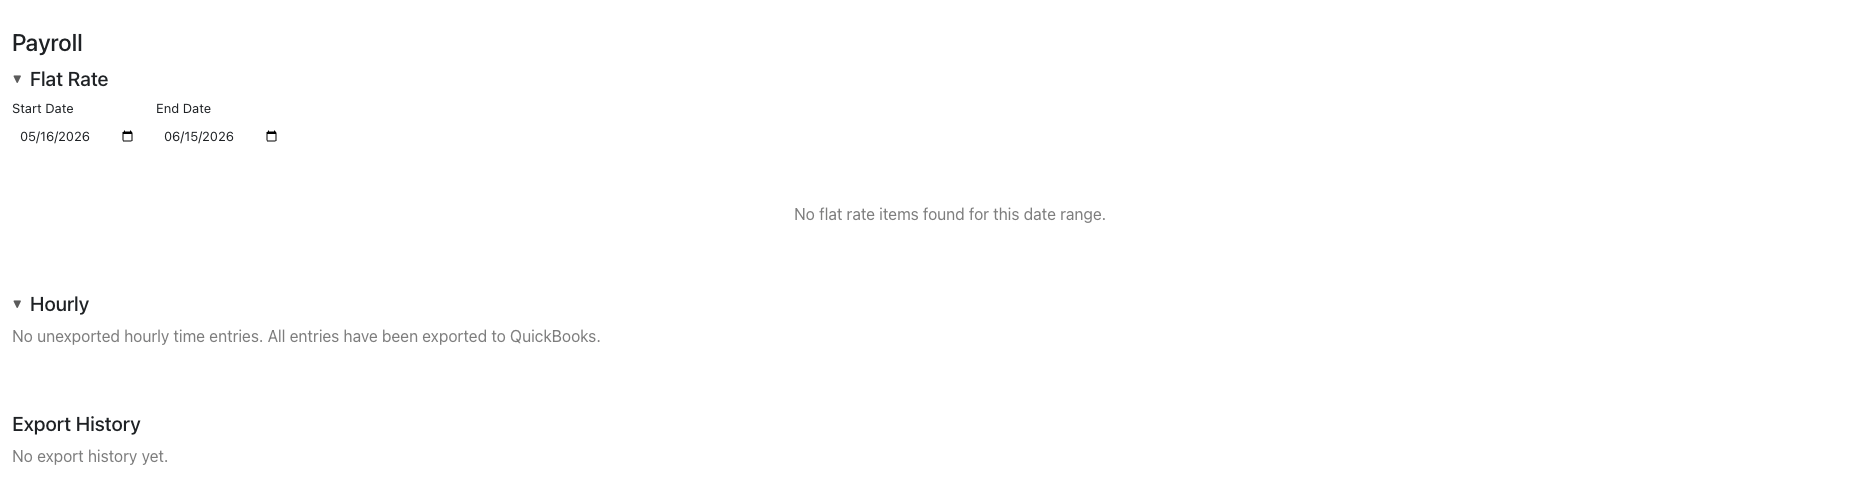
Flat Rate Payroll
Flat rate pay is based on labor hours assigned to a technician on completed jobs — not time clock hours. Technicians get paid for the job regardless of how long it actually took.
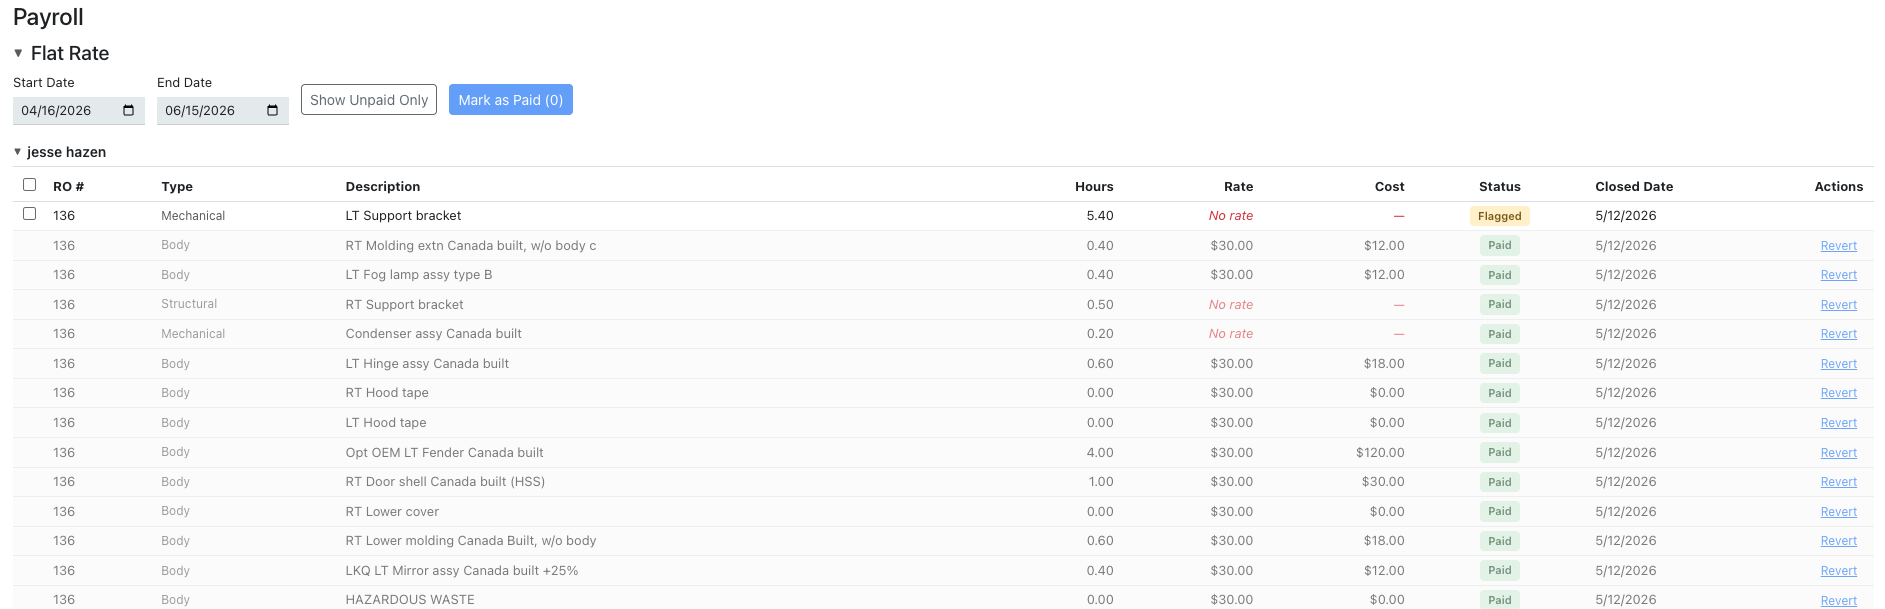
The flat rate section shows all labor items that have been "flagged" for payment, grouped by technician. Each row shows:
- RO # (repair order number)
- Labor type (Body, Frame, Mechanical, Paint, etc.)
- Line description
- Hours (from the line item)
- Pay rate (from the technician's configured rate for that labor type)
- Cost (hours × rate)
- Payment status (Flagged or Paid)
- Closed date (when the job was closed)
Each technician group has a subtotal, and a grand total appears at the bottom.
Flagging & Payment
Labor items go through a simple state machine:
- Unflagged — Default state. The labor exists on a job but hasn't been marked for payment yet.
- Flagged — Marked as ready for payment. Shows up on the Payroll page.
- Paid — Payment has been recorded.
Flag items for payment
Labor items are flagged automatically when a job is closed, or manually from the line items view on a job.
Mark items as paid
- On the Payroll page, select the items you want to mark as paid using the checkboxes.
- Use the "Select All" checkbox on a technician group to select all flagged items for that tech.
- Click "Mark as Paid (N)" where N is the number of selected items.
- Selected items change to "Paid" status.
Revert a paid item
If you marked something as paid by mistake, click "Revert" on the paid row. It returns to "Flagged" status so you can re-process it.
Filter
Use the "Show Unpaid Only" toggle to hide paid items and focus on what still needs to be processed.
Pay Rates
Each technician can have per-category pay rates configured in their employee profile. For example:
- Body labor: $30/hour
- Frame labor: $35/hour
- Mechanical: $28/hour
- Paint: $32/hour
The flat rate cost is calculated as hours × technician's rate for that labor type. If a technician doesn't have a rate configured for a category, it shows "No rate" in red — you'll want to set that up in employee settings before processing payment.
Important: The pay rate is the technician's internal rate, not the customer-facing labor rate on the estimate. These are separate values.
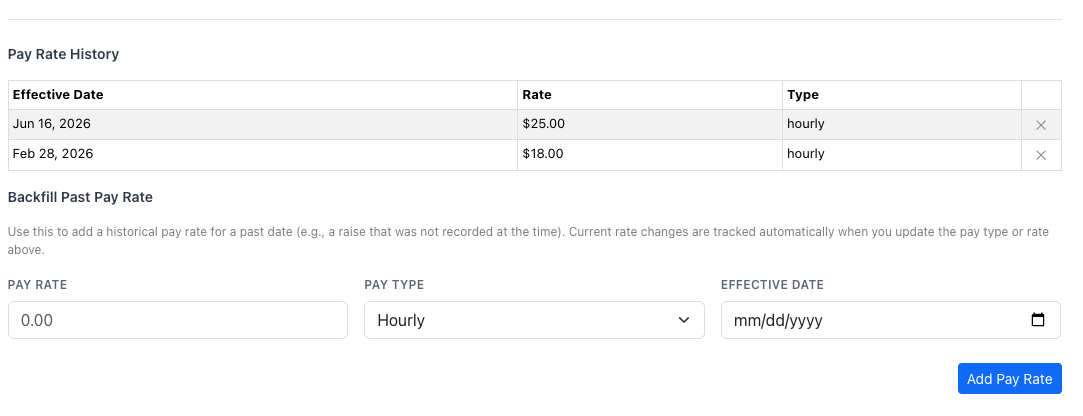
Pay Rate History
Pay rate history tracks every change to an employee's hourly pay rate and pay type over time. This ensures that each time entry is calculated using the rate that was in effect when the employee actually clocked in — not just their current rate.
How It Works
- When an admin changes an employee's pay rate or pay type, a new history record is automatically created with today's effective date.
- Each history record stores the pay rate, pay type (hourly or flat rate), and the effective date when that rate started.
- When calculating payroll, the system finds the most recent history record with an effective date on or before the time entry's clock-in time.
- If no history record exists for a time entry's date, it shows as "no rate available" and is excluded from export.
Viewing Pay Rate History
On the Hourly Payroll section, each time entry displays the rate that was applied based on the employee's pay rate history at the time they clocked in. If rates have changed during the pay period, different entries for the same employee may show different rates.
Creating a Backdated Pay Rate
If you need to add a historical pay rate (for example, if an employee's rate changed last week but wasn't entered until today):
- Go to the employee's profile settings.
- Add a new pay rate entry with the correct effective date in the past.
- The system will recalculate any affected time entries the next time you view the payroll page.
Note: You cannot create two history records with the same effective date for the same employee. If a record already exists for that date, update the existing one instead.
Deleting a Pay Rate History Record
Admins can delete incorrect pay rate history records. Once deleted, the system falls back to the next most recent record when calculating rates for affected time entries.
Hourly Payroll
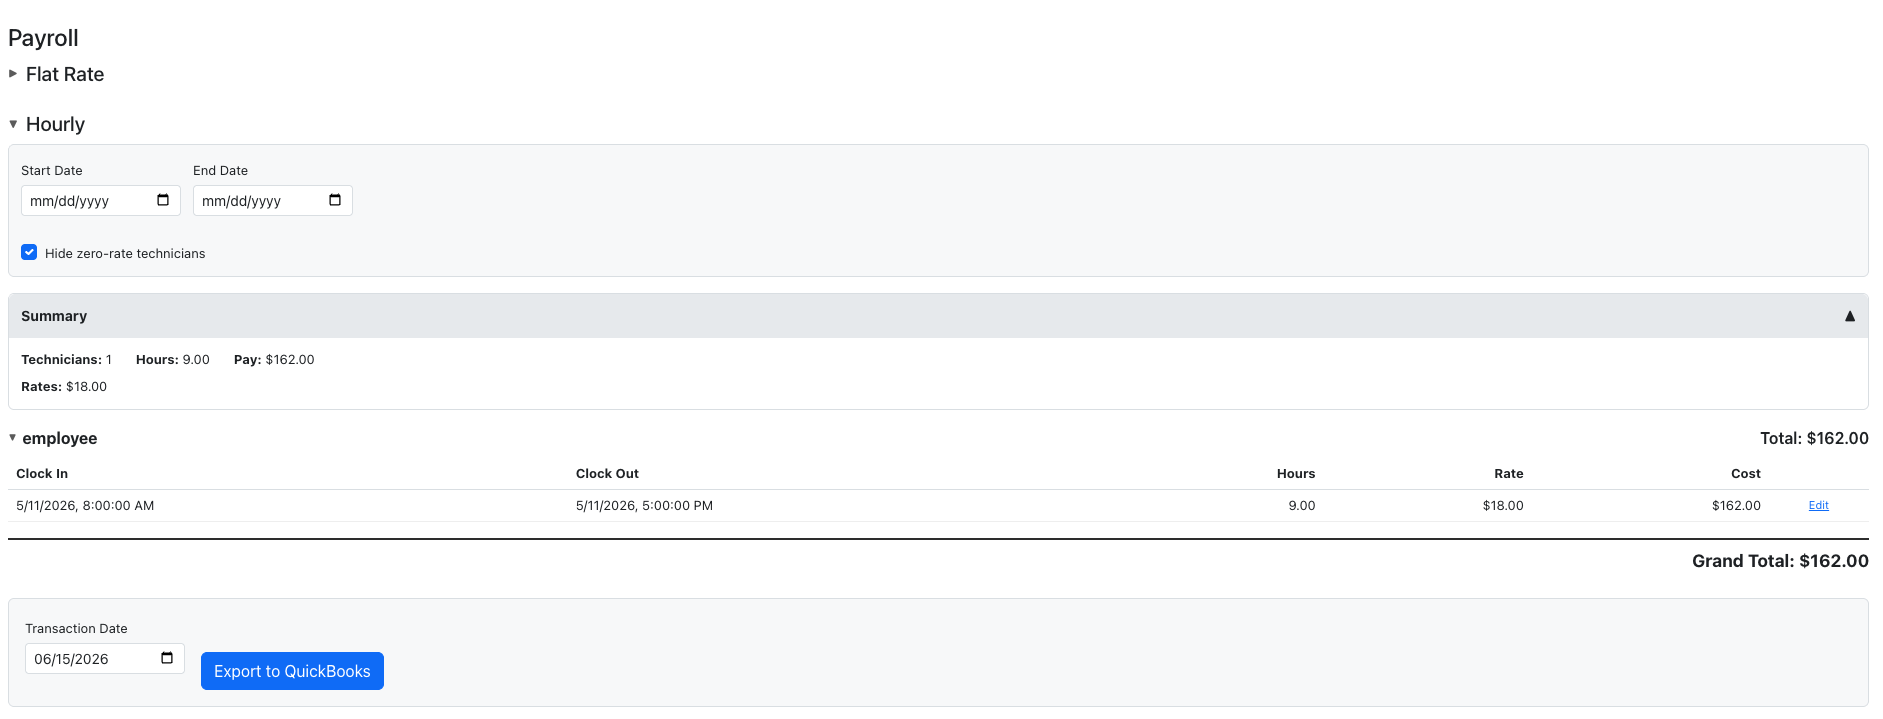
The hourly section shows time clock entries for employees paid by the hour. It pulls from the same time clock data as the reports, but focused on payroll processing.
- Entries are grouped by technician.
- Each entry shows clock in/out times, total hours, the applicable pay rate (looked up from pay rate history), and calculated cost.
- Summary cards at the top show per-tech totals: total hours, rate, and total pay.
- Filter by date range to focus on a specific pay period.
- Use the "Hide zero-rate technicians" toggle to filter out employees without an applicable rate.
- Entries with no applicable pay rate are flagged with a warning and excluded from export.
The current QBO export mode (Expense or Time Activity) is displayed at the top of this section so you know how the data will be sent to QuickBooks before you export.
Editing Time Entries
You can edit clock in/out times directly from this section by clicking on an entry. This is useful for correcting missed punches before exporting.
Exporting to QuickBooks
- Set the transaction date for the QBO entries.
- Review the visible entries and their calculated costs.
- Click "Export to QuickBooks".
- On success, exported entries are removed from this view and appear in Export History.
If some technicians fail during export (e.g., missing QBO mapping), the others still succeed. Failed items can be fixed and re-exported.
Hourly CSV Export
Download hourly payroll data as a CSV for import into your payroll provider or accounting software.
- Set the date range for the pay period.
- Click "Download CSV" for a detailed export (one row per time entry) or "Download Summary CSV" for a per-employee summary.
Detailed CSV columns
Employee, Clock In, Clock Out, Hours, Rate, Cost
Summary CSV columns
Employee, Total Hours, Rate, Total Pay
Files are named payroll-export-YYYY-MM-DD.csv or payroll-summary-YYYY-MM-DD.csv using the current date.
Export to QuickBooks
If you have QuickBooks connected, you can export flat rate payroll directly to QBO instead of (or in addition to) marking items as paid locally.
- Review the flagged items on the flat rate section.
- Click "Export to QuickBooks".
- Set the transaction date (the date that will appear on the QBO entries).
- Confirm the export.
The export groups hours by technician and creates one entry per tech in QuickBooks. The type of entry depends on your export mode setting:
- Expense mode — Creates an expense entry per technician on your mapped expense/bank account.
- Time Activity mode — Creates a time activity per technician, linked to their QBO Employee or Vendor mapping.
If any technician fails to export, the others still go through. Failed items are logged and can be retried.
For full details on the QBO setup and export mode configuration, see the QuickBooks Integration guide.
Export History & CSV
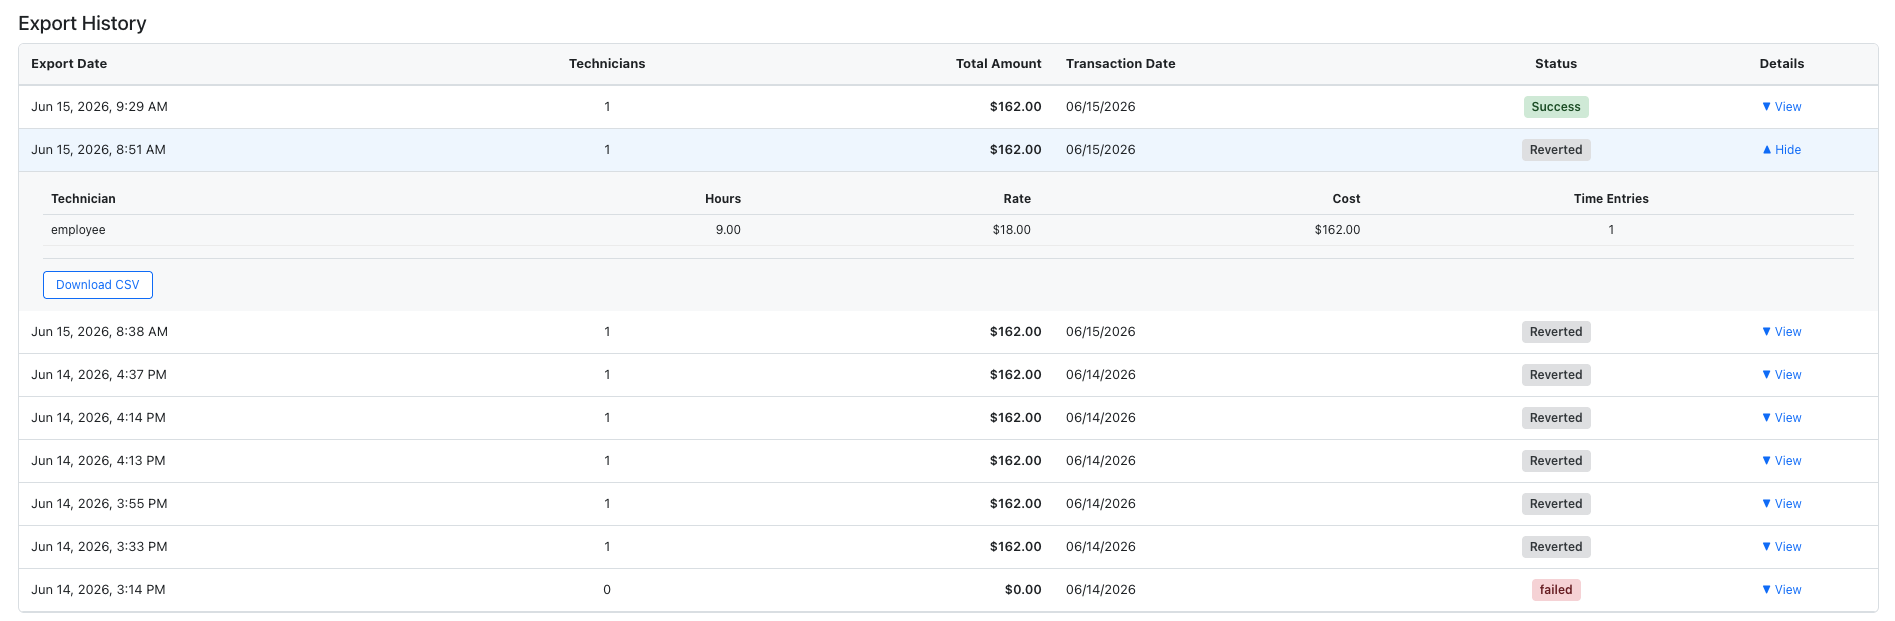
The Export History panel shows all past payroll exports to QuickBooks:
- Export date and transaction date
- Status: success, partial success, failed, or reverted
- Total amount and technician count
- Per-technician breakdown (hours, rate, cost, time entry count)
Download export as CSV
Click the download icon on any export record to get a CSV with columns: Technician, Hours, Rate, Cost, Time Entries, Export Date, Transaction Date, Status.
This is useful for record-keeping or reconciling with your accounting software.
Time Clock
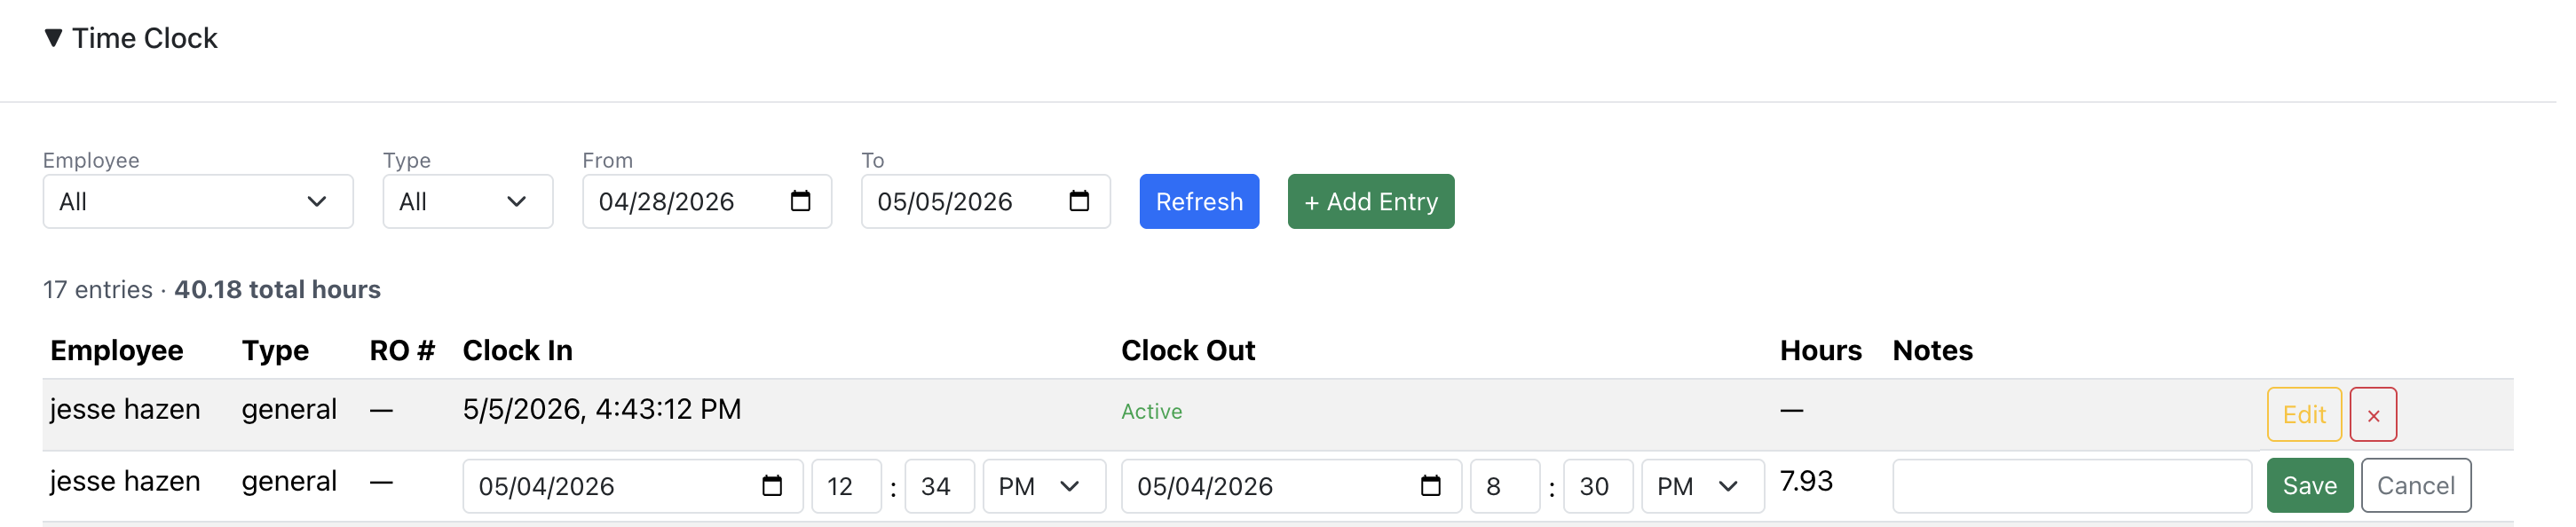
The Time Clock section lets admins view, edit, add, and delete time entries for all employees directly from the Payroll page. For details on how employees clock in/out, see the Time Clock guide.
- Filter by employee, type (general or job), and date range.
- View total hours for the filtered entries.
- Click "Edit" on any entry to adjust clock in/out times and notes.
- Click "+ Add Entry" to manually create a time entry for an employee.
- Click "×" to delete an entry.
Payroll Reports
In addition to the Payroll page, the Reports section has two payroll-specific reports:
- Hourly Payroll Report — View time clock hours by employee with pay type, rate, and amounts. Export to CSV.
- Flat Rate Payroll Report — View labor hours assigned to technicians across jobs with amounts and section breakdowns. Export to CSV.
These reports are read-only views for analysis. Use the Payroll page for processing payments and exports.