Service Templates
Overview
Service Templates (also called canned jobs) let you define reusable service packages containing pre-configured line items with parts and labor. Instead of manually entering the same parts and labor for common jobs, select a service template and its full set of line items is added to the repair order automatically.
Key capabilities include:
- Browse and search available service templates by name or category
- Apply an entire service to a job with one click
- Selectively apply only the portions of a service you need
- Create new services from scratch or from existing job line items
- Edit service templates — update line items, parts, labor, and pricing
- Organize services into categories for easy filtering
Browsing Services
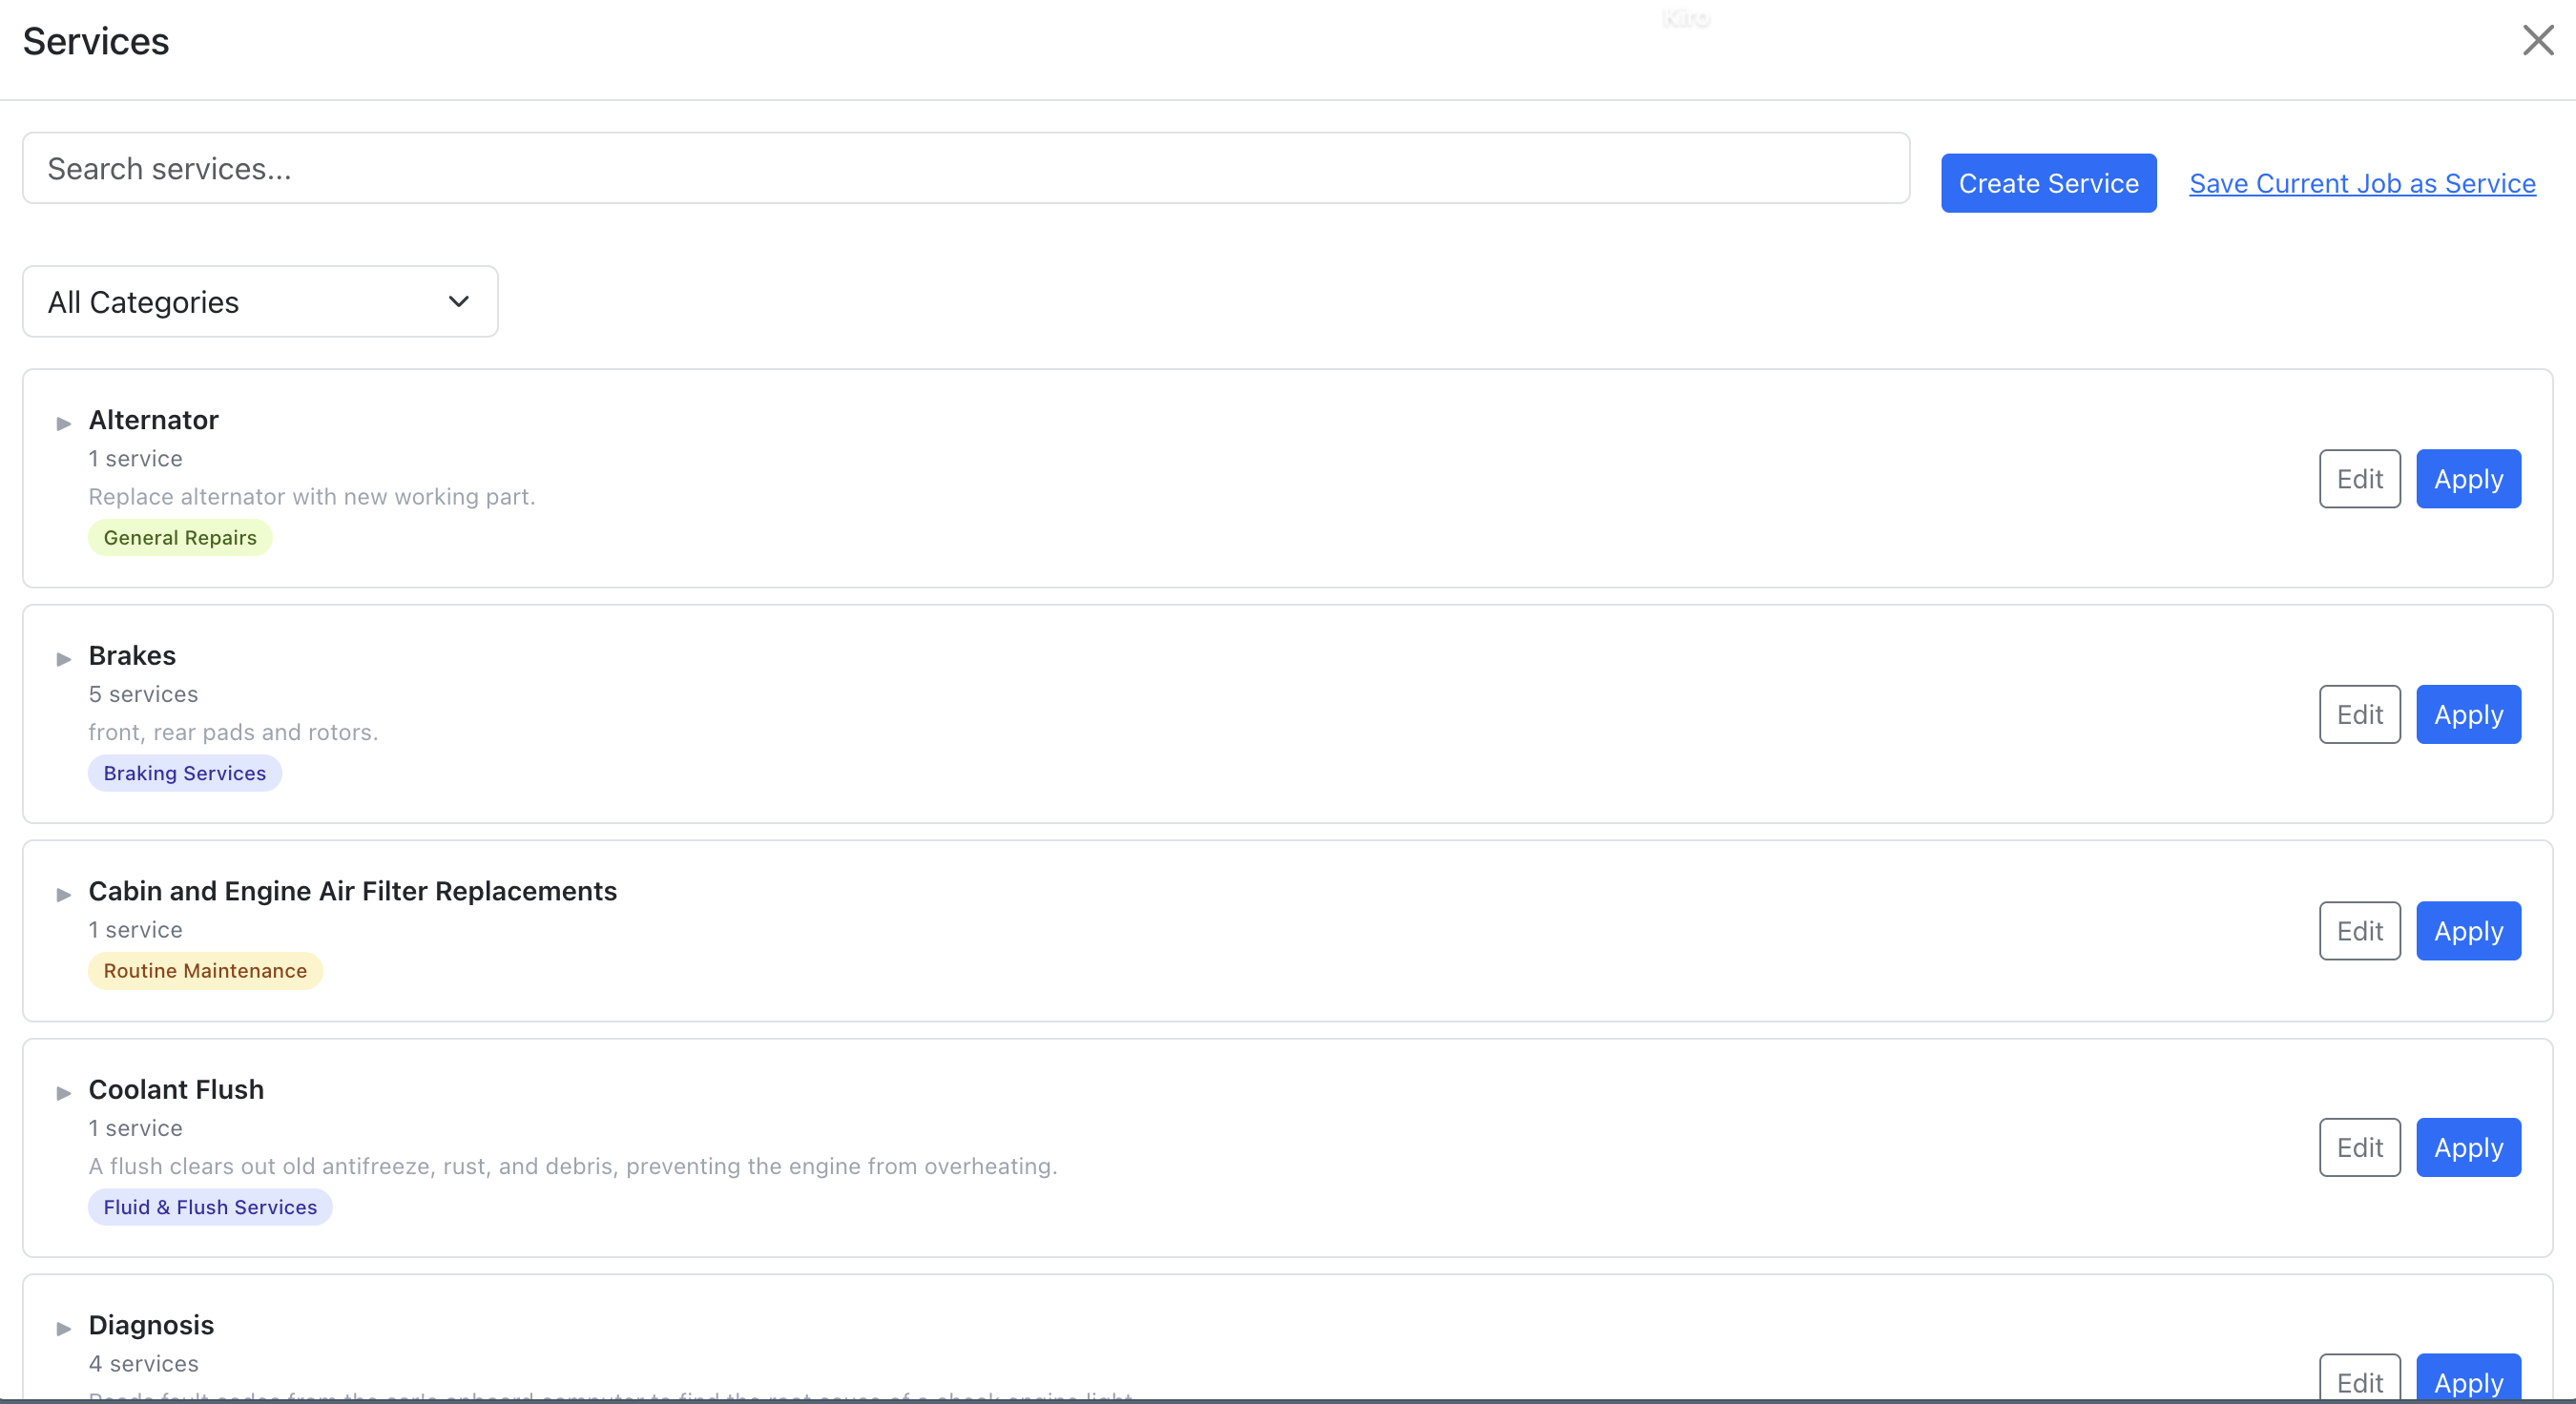
Overview: Access services from the line items section of any job. The services panel shows all available templates for your company, sorted alphabetically.
- Open a job and navigate to the Line Items section.
- Click the "Services" button in the line items toolbar.
- The services modal opens showing all available templates as cards.
- Each card displays the service name, description, and line item count.
Searching
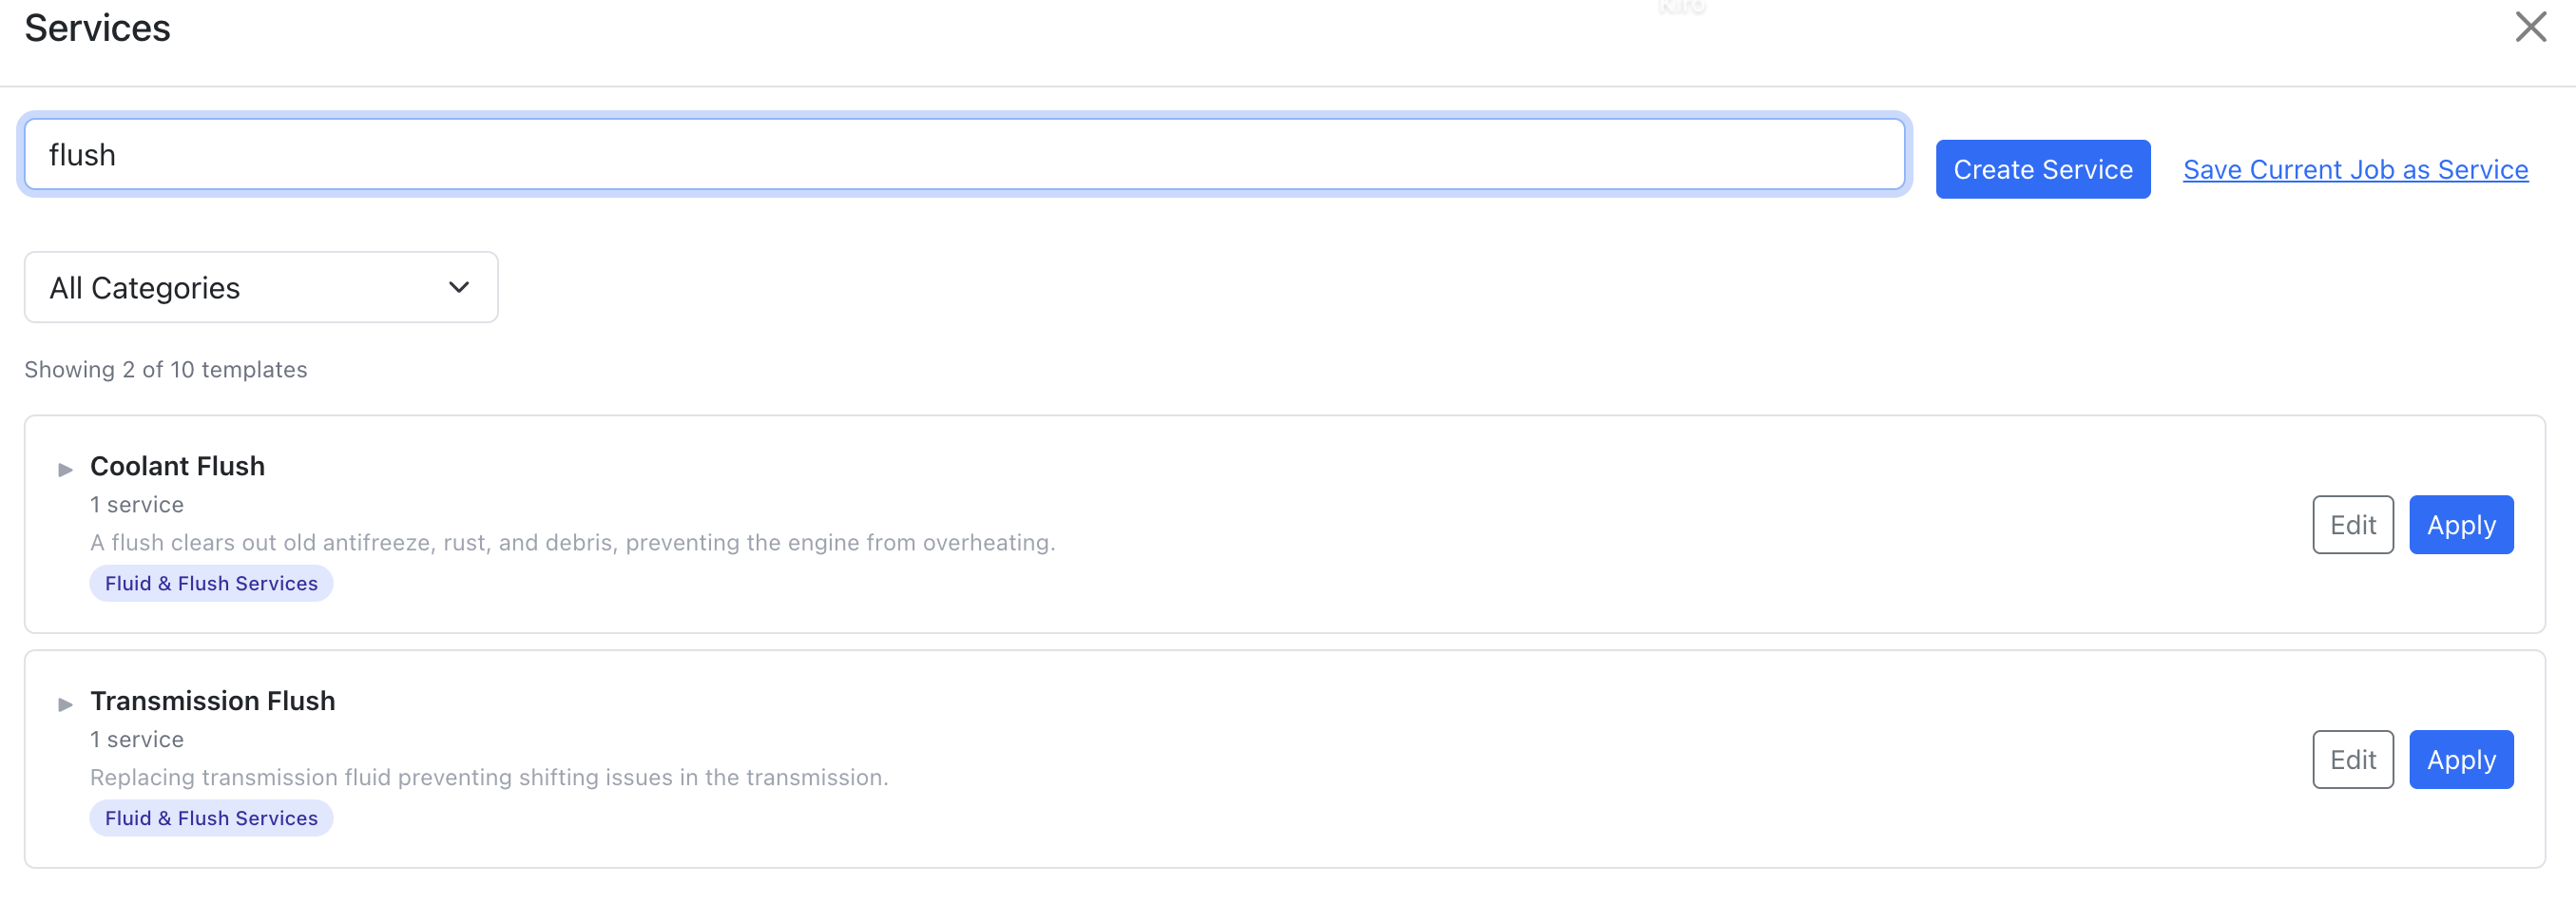
Use the search input at the top of the modal to filter templates by name. The search uses fuzzy matching — it finds results even with minor typos or partial name matches. A counter below the search shows how many templates match your query out of the total.
Filtering by Category
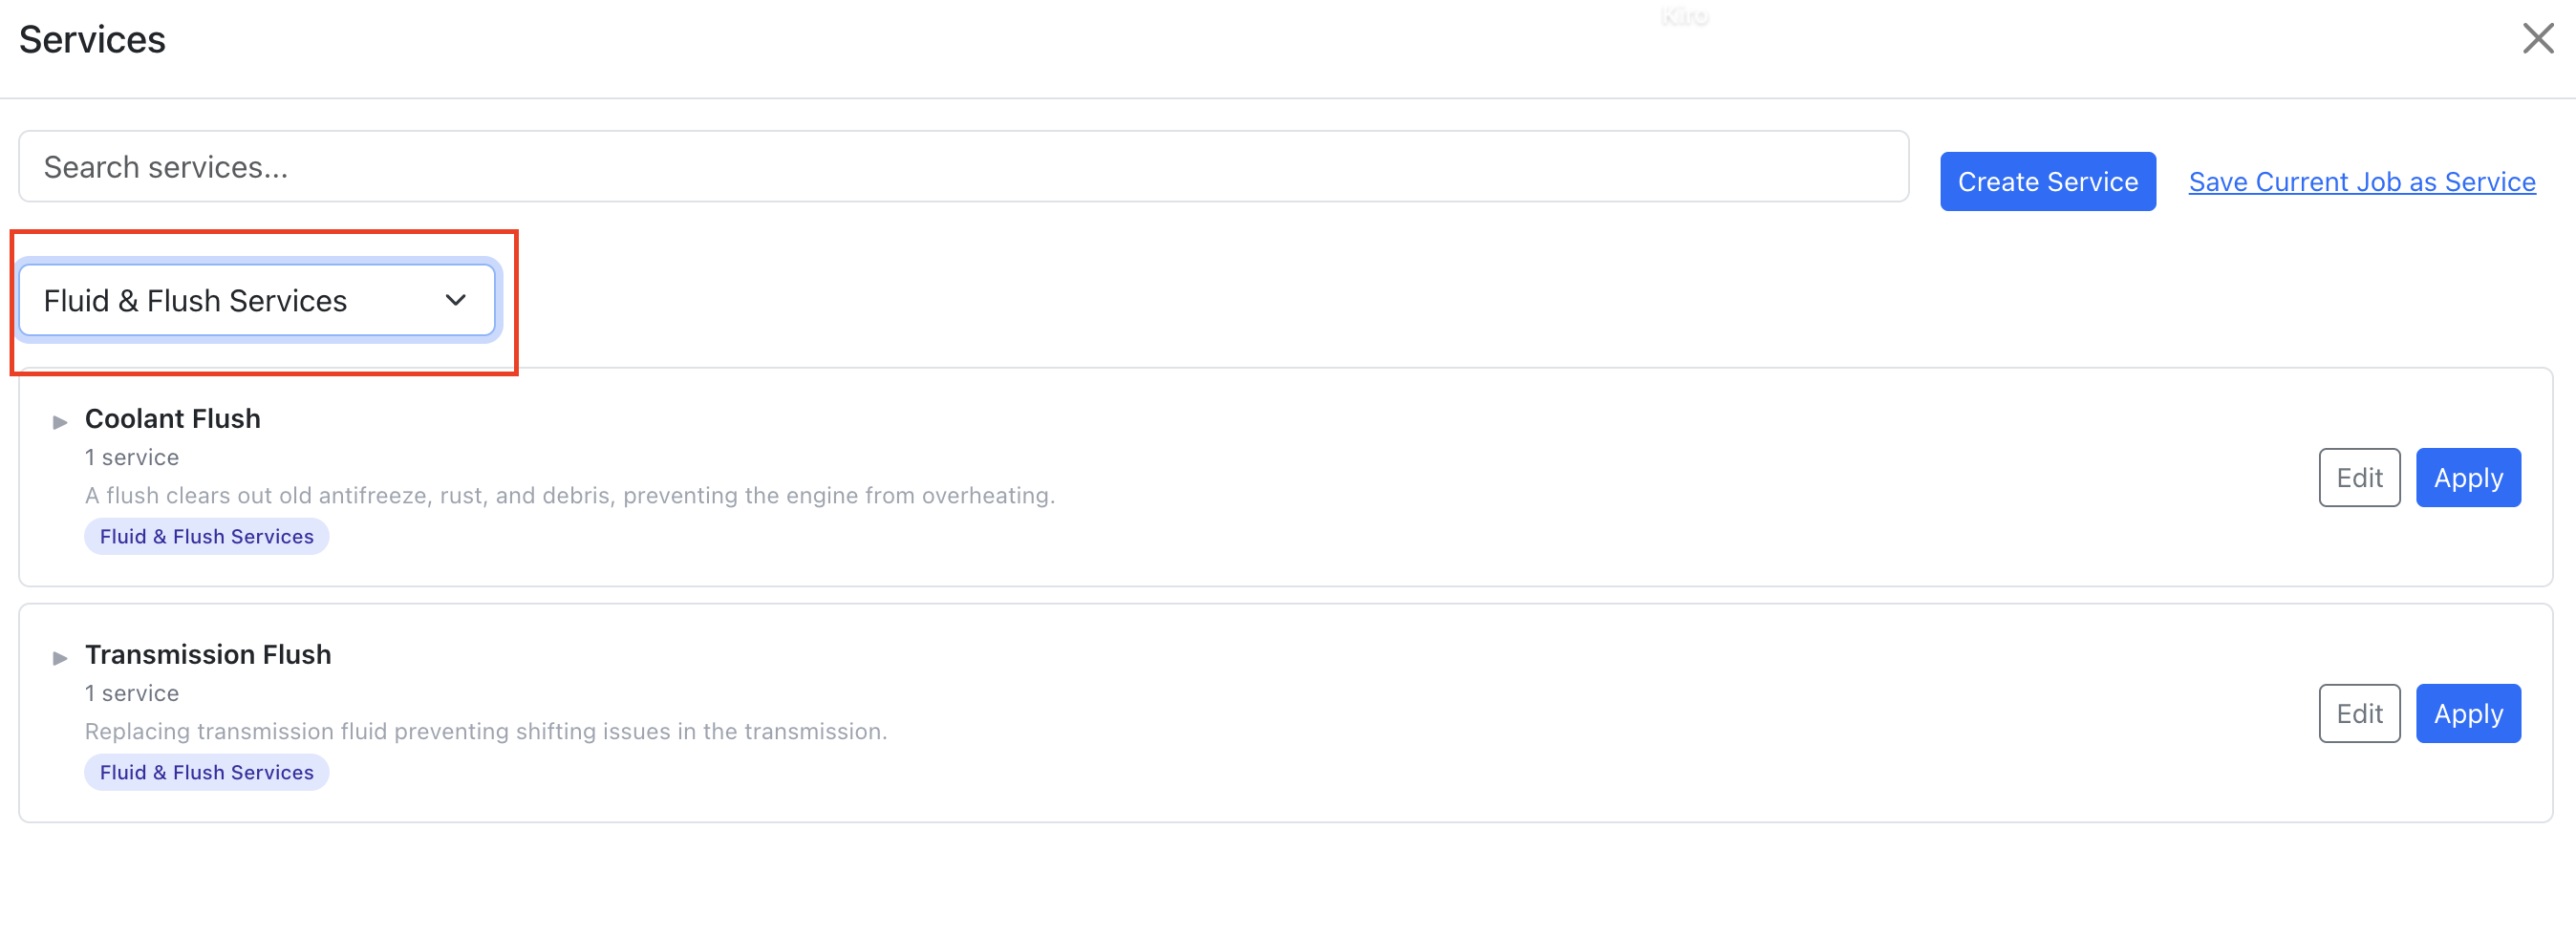
If your company has service categories configured, use the category dropdown to narrow the list to templates in a specific group (e.g., "Oil Changes", "Brake Services", "Body Work").
Applying a Service
Overview: Apply a service template to instantly add all of its line items, parts, and labor to the current repair order.
- Open the services modal from the line items toolbar.
- Find the service you want to apply.
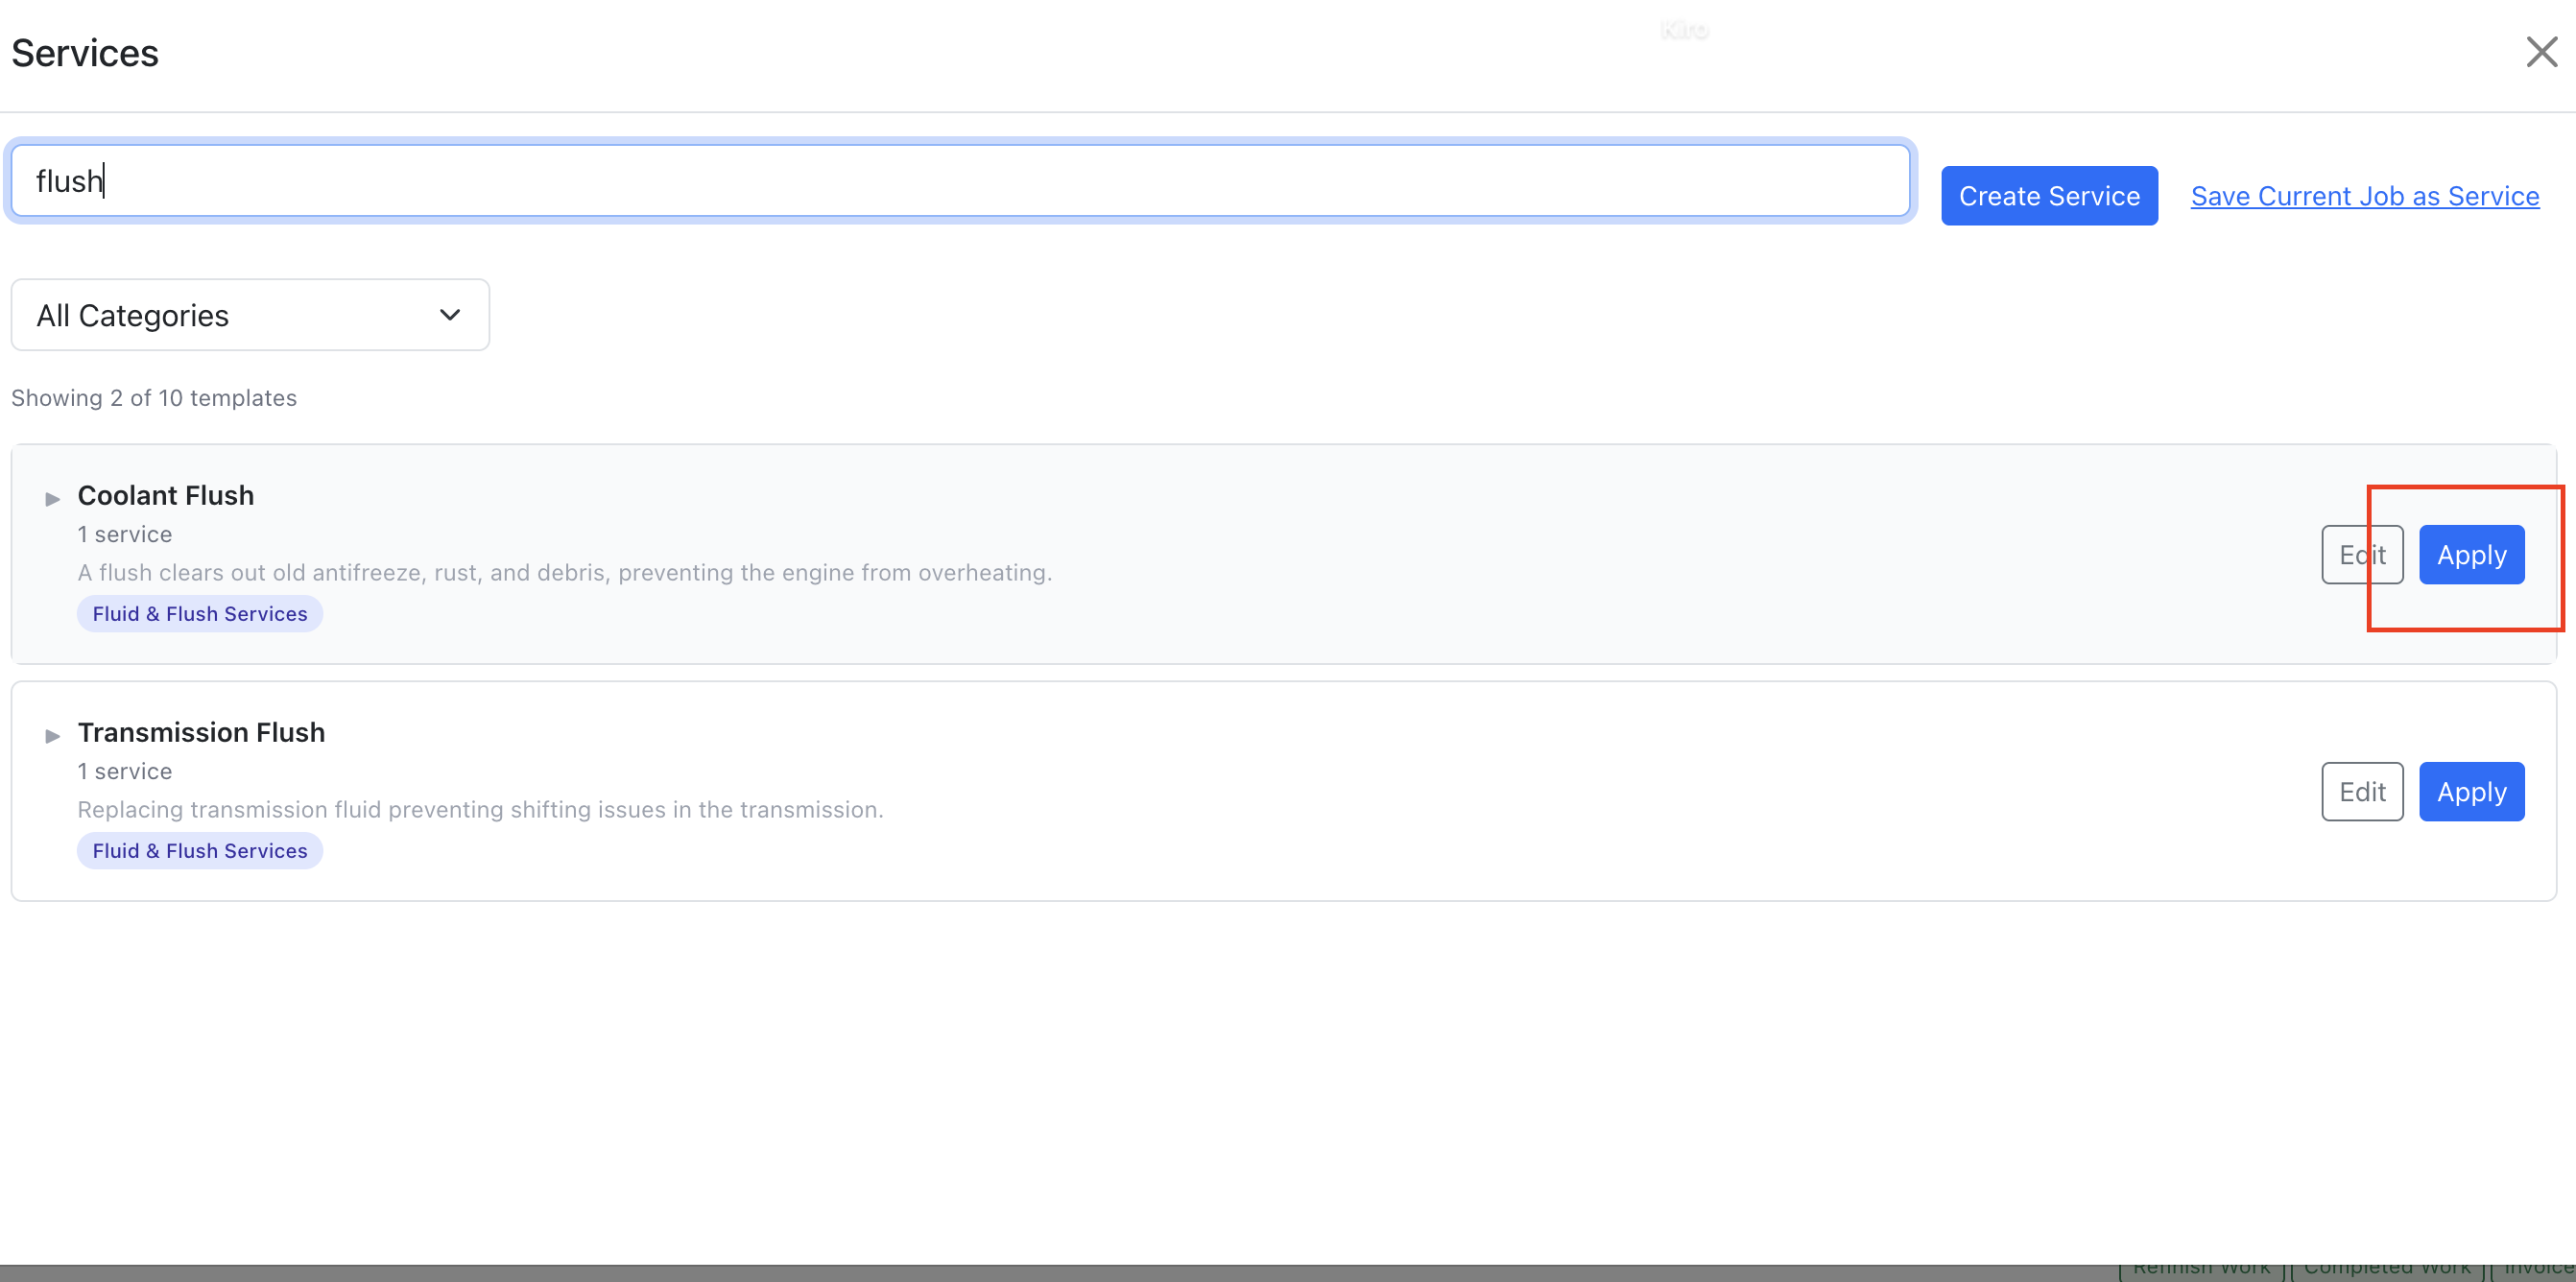
- Click the "Apply" button on the service card.
- All line items from the template are created on the job, including their parts and labor entries.
The template's line item sort order is preserved. New line items are added after any existing items on the job. Parts carry over their description, part number, quantity, and cost. Labor carries over type, hours, and hourly rate.
Applying a service does not modify the template itself — it copies the template data into new line items on the job. You can apply the same service multiple times if needed.
Partial Apply (Selection Panel)
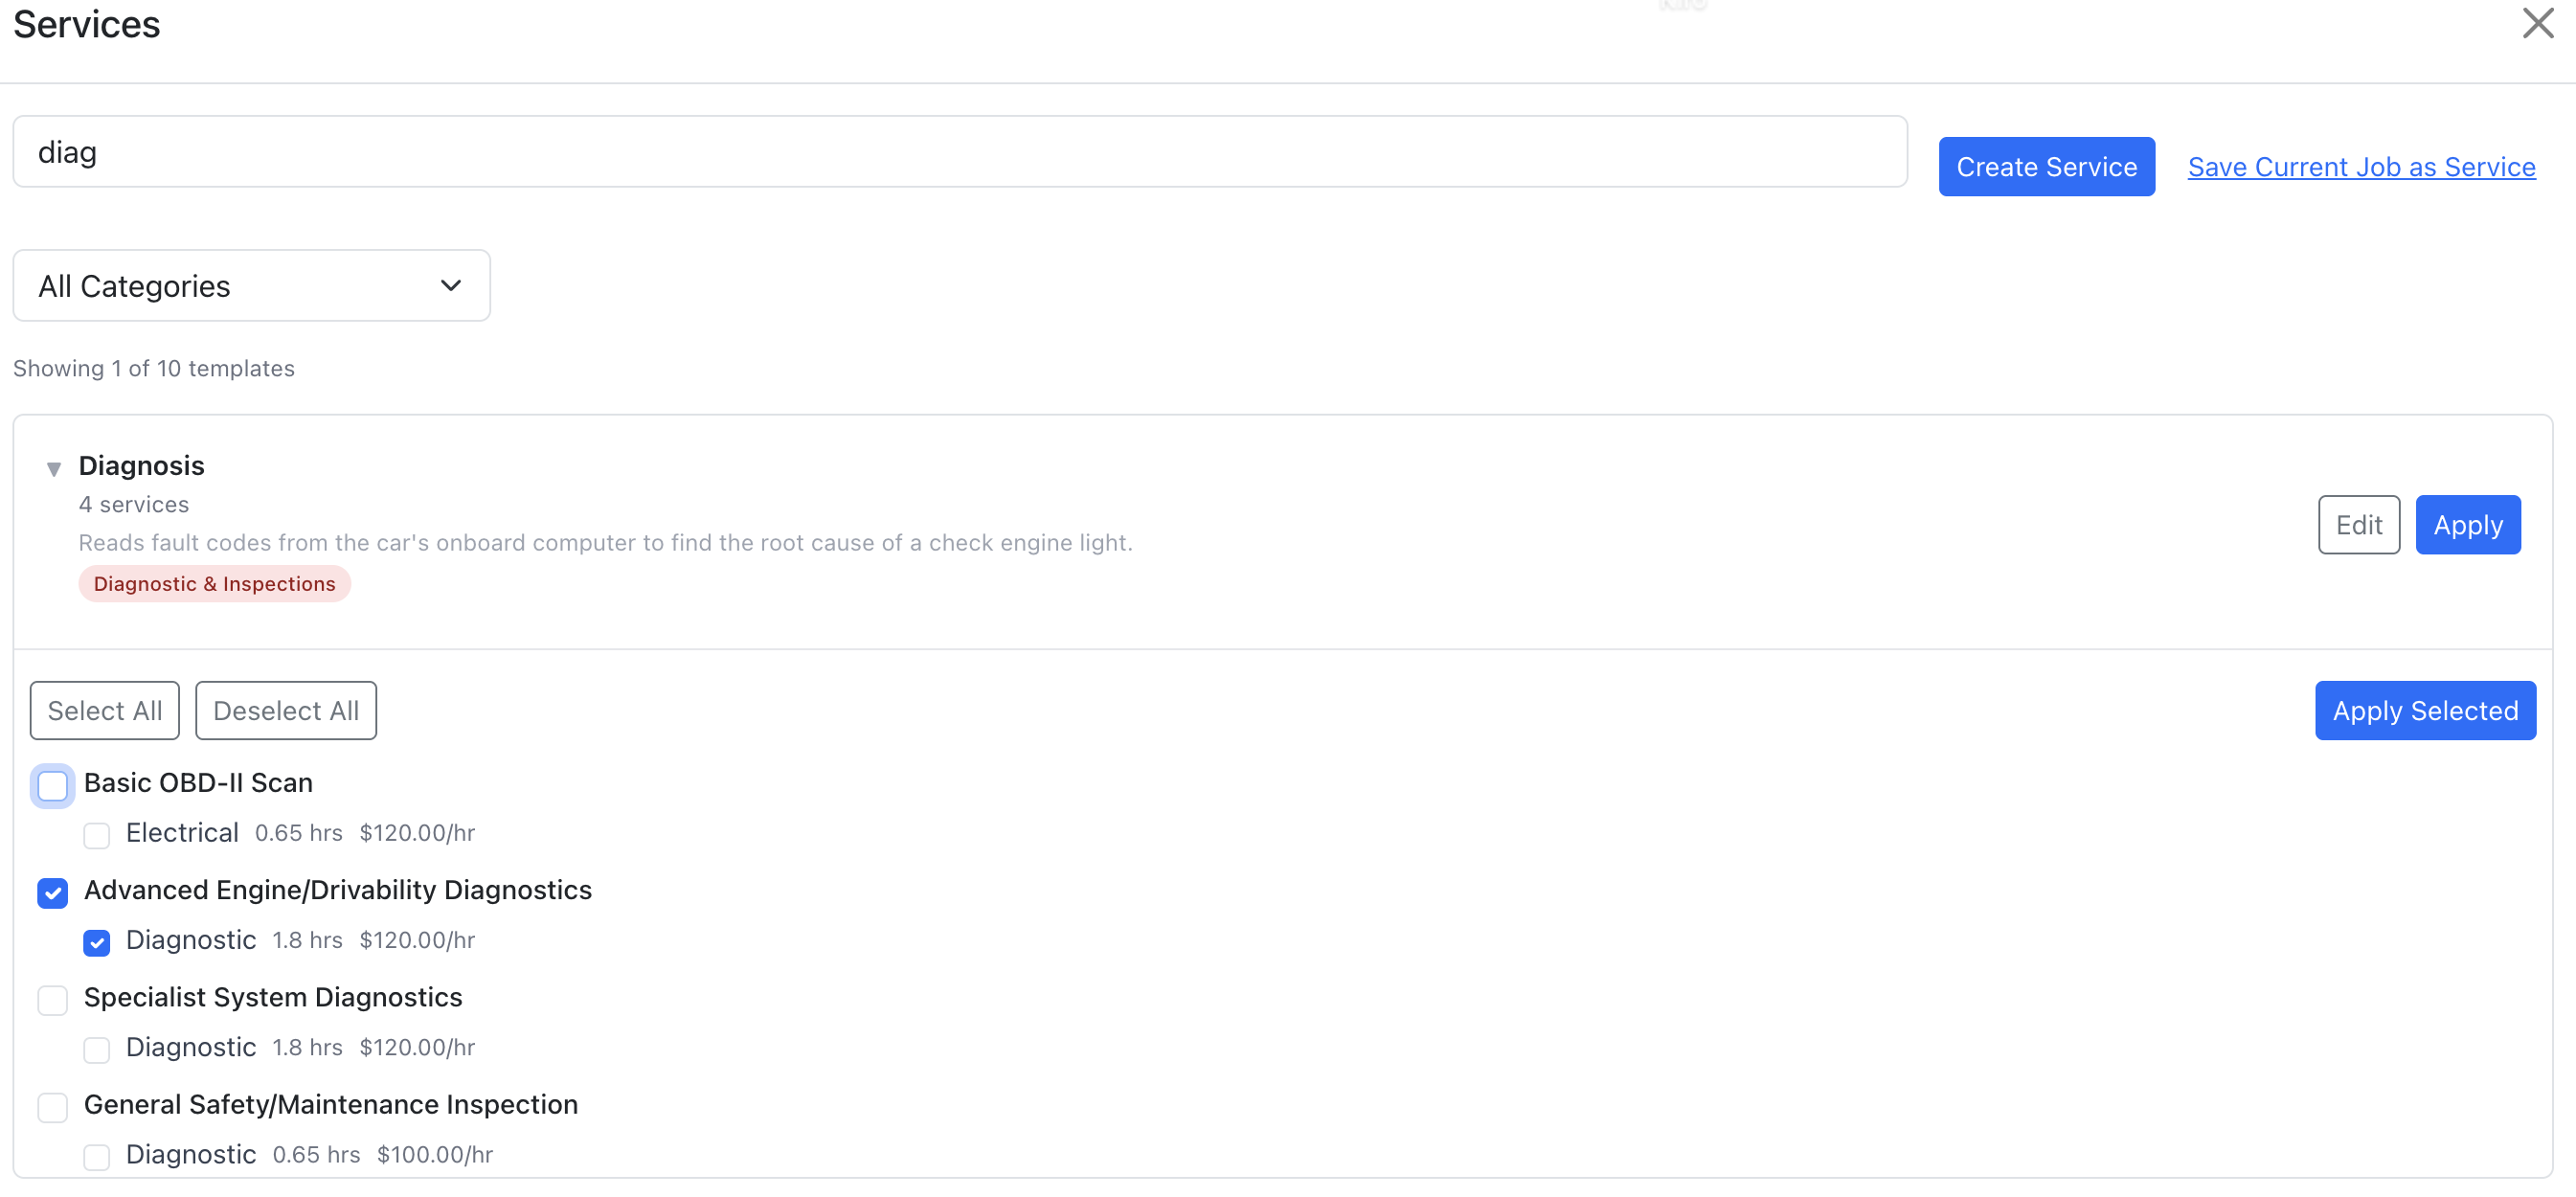
Overview: Don't need the entire service? The selection panel lets you pick exactly which line items, parts, and labor entries to apply. This gives you fine-grained control without creating a separate template for every variation.
- In the services modal, click on the body of a service card (not the Apply button).
- A selection panel expands below the card showing a checkbox tree of all line items, parts, and labor.
- Everything starts checked by default. Deselect items you don't want.
- Click "Apply Selected" to add only the checked items to the job.
Checkbox Behavior
- Deselect a line item — all of its parts and labor are automatically deselected too.
- Select a line item — all of its parts and labor are automatically selected.
- Select a part or labor on a deselected line item — the parent line item is automatically selected (the line item must exist for children to be created).
- Deselect a part or labor — the parent line item stays selected; only that specific child is excluded.
Select All / Deselect All
Use the "Select All" and "Deselect All" buttons at the top of the panel to quickly check or uncheck everything.
The "Apply Selected" button is disabled until at least one line item is checked.
Creating a Service
Overview: Create a new service template from scratch to define a reusable package of line items, parts, and labor.
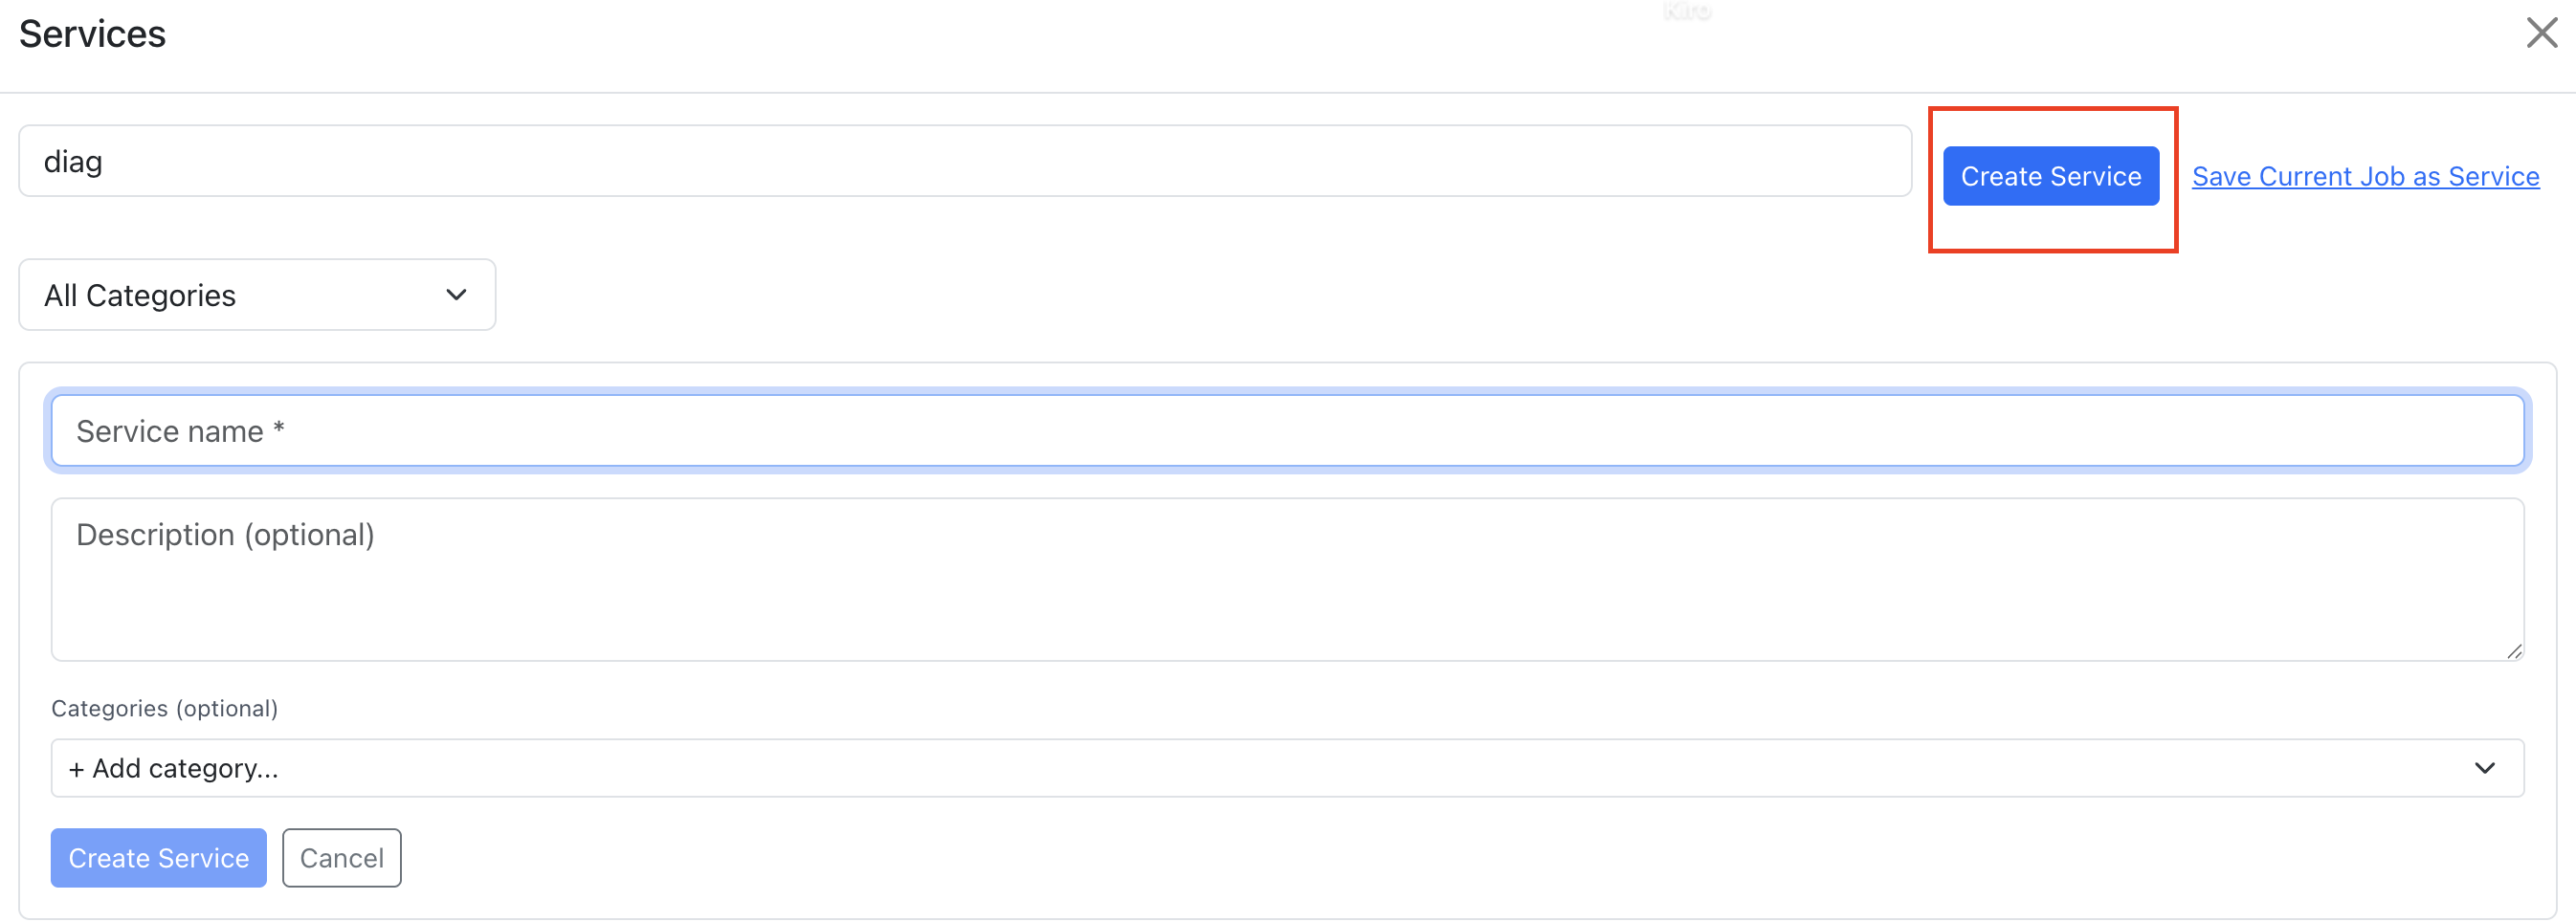
- Open the services modal from the line items toolbar.
- Click "Create New Template" at the top of the list.
- Enter a name (required, up to 255 characters) and optional description (up to 1000 characters).
- Choose a pricing mode: Itemized (default) or Flat Price. See Pricing Mode below for details.
- Optionally assign categories for organization.
- Click "Create". The new template is created and you're taken to the detail view to add line items.
Adding Line Items
- In the template detail view, click "Add Line Item".
- Enter a description for the line item (e.g., "Oil Filter Replacement").
- Add parts to the line item — part description, part number, quantity, and cost.
- Add labor to the line item — labor type, hours, and hourly rate.
- Repeat for additional line items.
You can have multiple templates with the same name. Line items are ordered by their sort order, which you can rearrange.
Pricing Mode
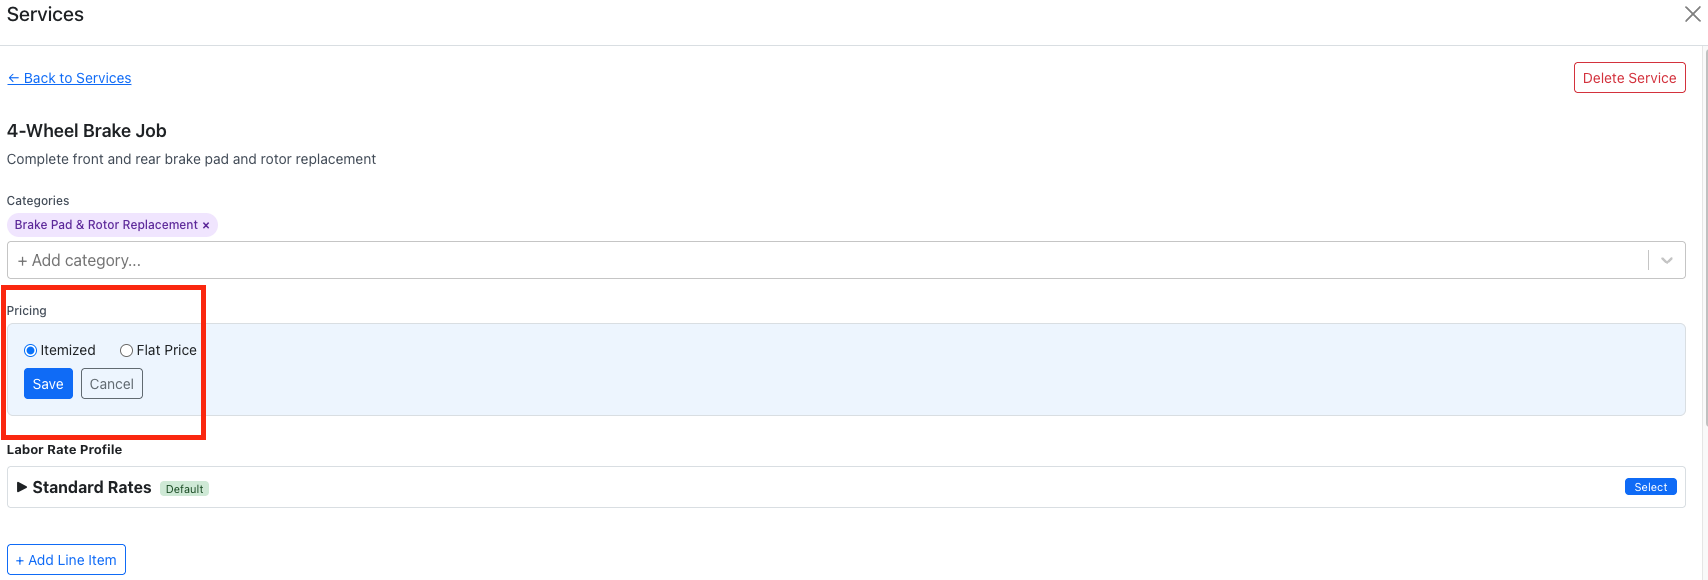
Overview: Each service template has a pricing mode that determines how the customer is charged when the service is applied to a job.
Itemized (Default)
The total price is the sum of all parts and labor on the line items. The customer sees individual part prices, labor hours, and rates on their estimate and invoice. This is the standard mode for most services.
Flat Price
The service has a single all-inclusive price. The customer sees one price on their estimate and invoice. Parts and labor within the template are still tracked internally for cost analysis, but their individual amounts don't determine the customer-facing total.
When creating or editing a template, select "Flat Price" and configure:
- Flat Price — The fixed amount the customer pays (required, must be greater than zero).
- Taxable — Whether tax should be applied to the flat price.
- Accounting Category (optional) — Determines which QBO product/service this posts to when synced in lump-sum mode. See the QuickBooks Flat Price Sync Mode section for details.
What Happens When Applied
- Itemized service — Line items are added to the job with their parts and labor as normal. Totals are calculated from individual items.
- Flat price service — Line items are added to the job with a flat price set on the line item. A purple "Flat Price" indicator shows the fixed amount. Parts and labor below it are marked as internal-only.
Changing Pricing Mode
You can switch a template between Itemized and Flat Price at any time from the template detail view. Click the pricing mode display to open the editor. Changing the mode on a template does not affect jobs where the service was already applied.
For more details on how flat price works at the line-item level (editing, clearing, and how it affects totals), see the Flat Price section in the Line Items guide.
Create from Job (Save as Template)
Overview: Turn an existing job's line items into a reusable service template. This is the fastest way to create a template based on work you've already done.
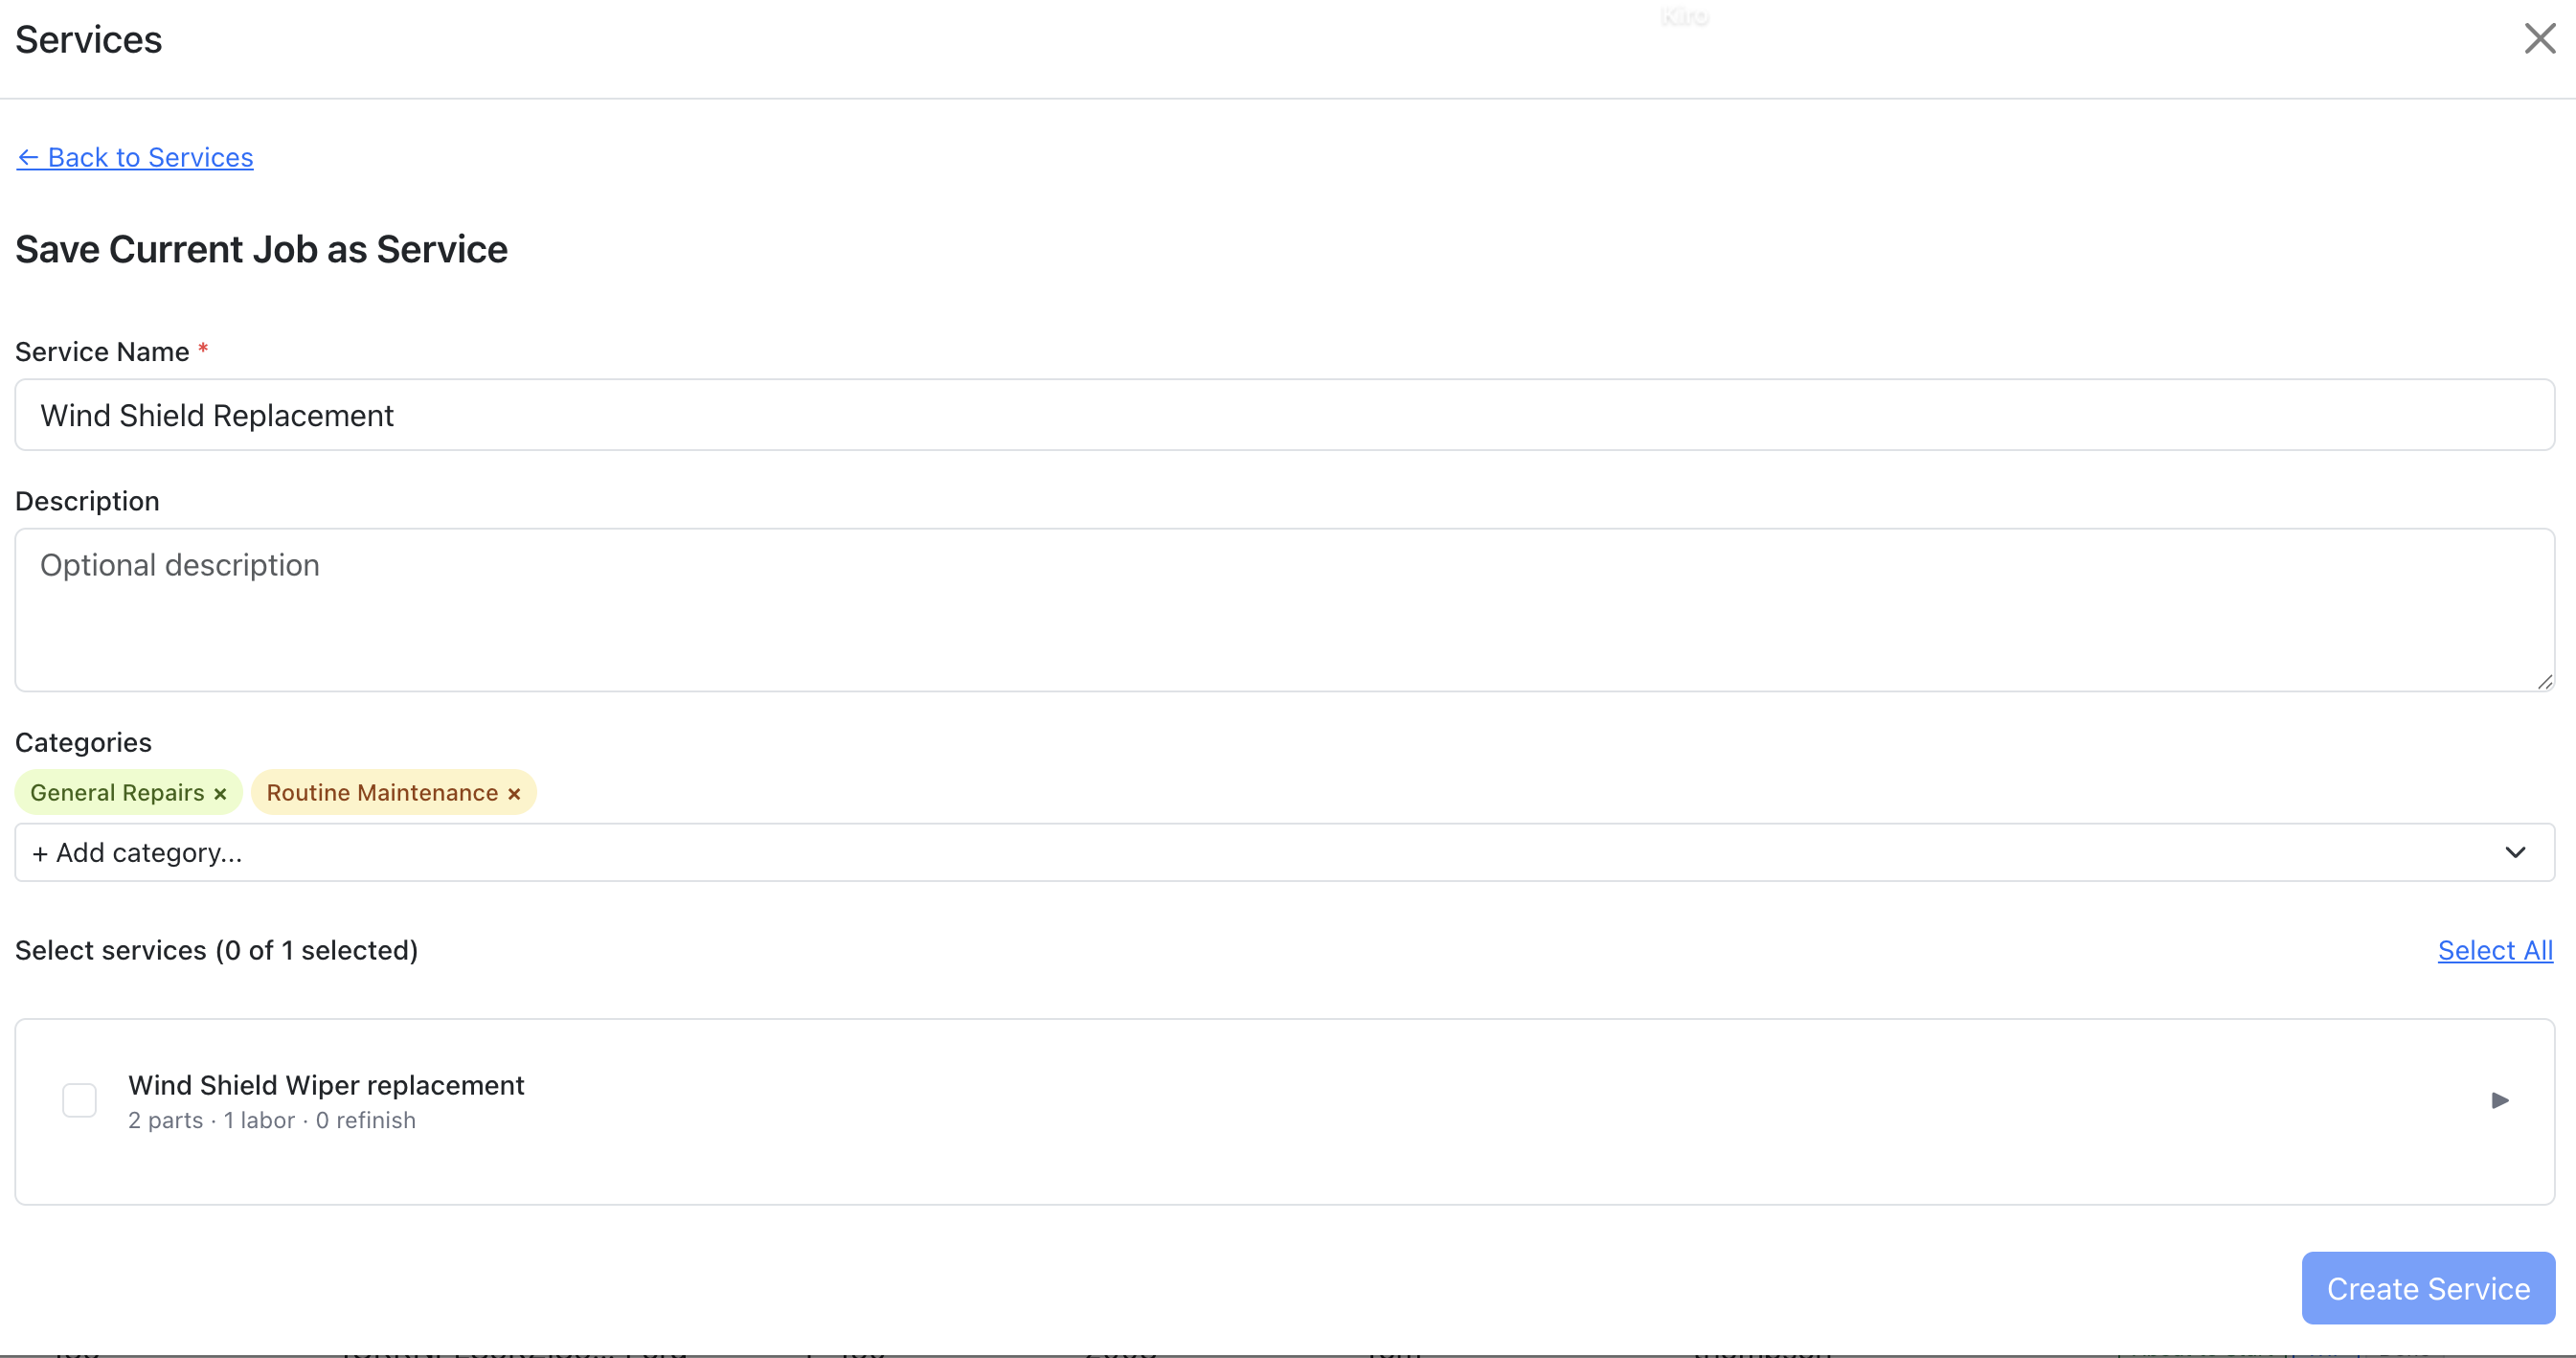
- Open the services modal from a job's line items toolbar.
- Click "Save Current Job as Template".
- A selection view appears showing all line items on the current job with checkboxes.
- Check the line items you want to include in the template (at least one required).
- Enter a template name and optional description.
- Click "Create Template".
The new template copies the selected line items along with all their parts (description, part number, quantity, cost) and labor entries (type, hours, rate). Refinish labor is also included as labor entries.
After creation, the template appears in your services list and can be applied to future jobs.
Editing a Service
Overview: Keep your service templates up to date by editing their line items, parts, labor, and pricing. Changes to a template only affect future applications — jobs that already had the template applied are not modified.
Opening the Editor
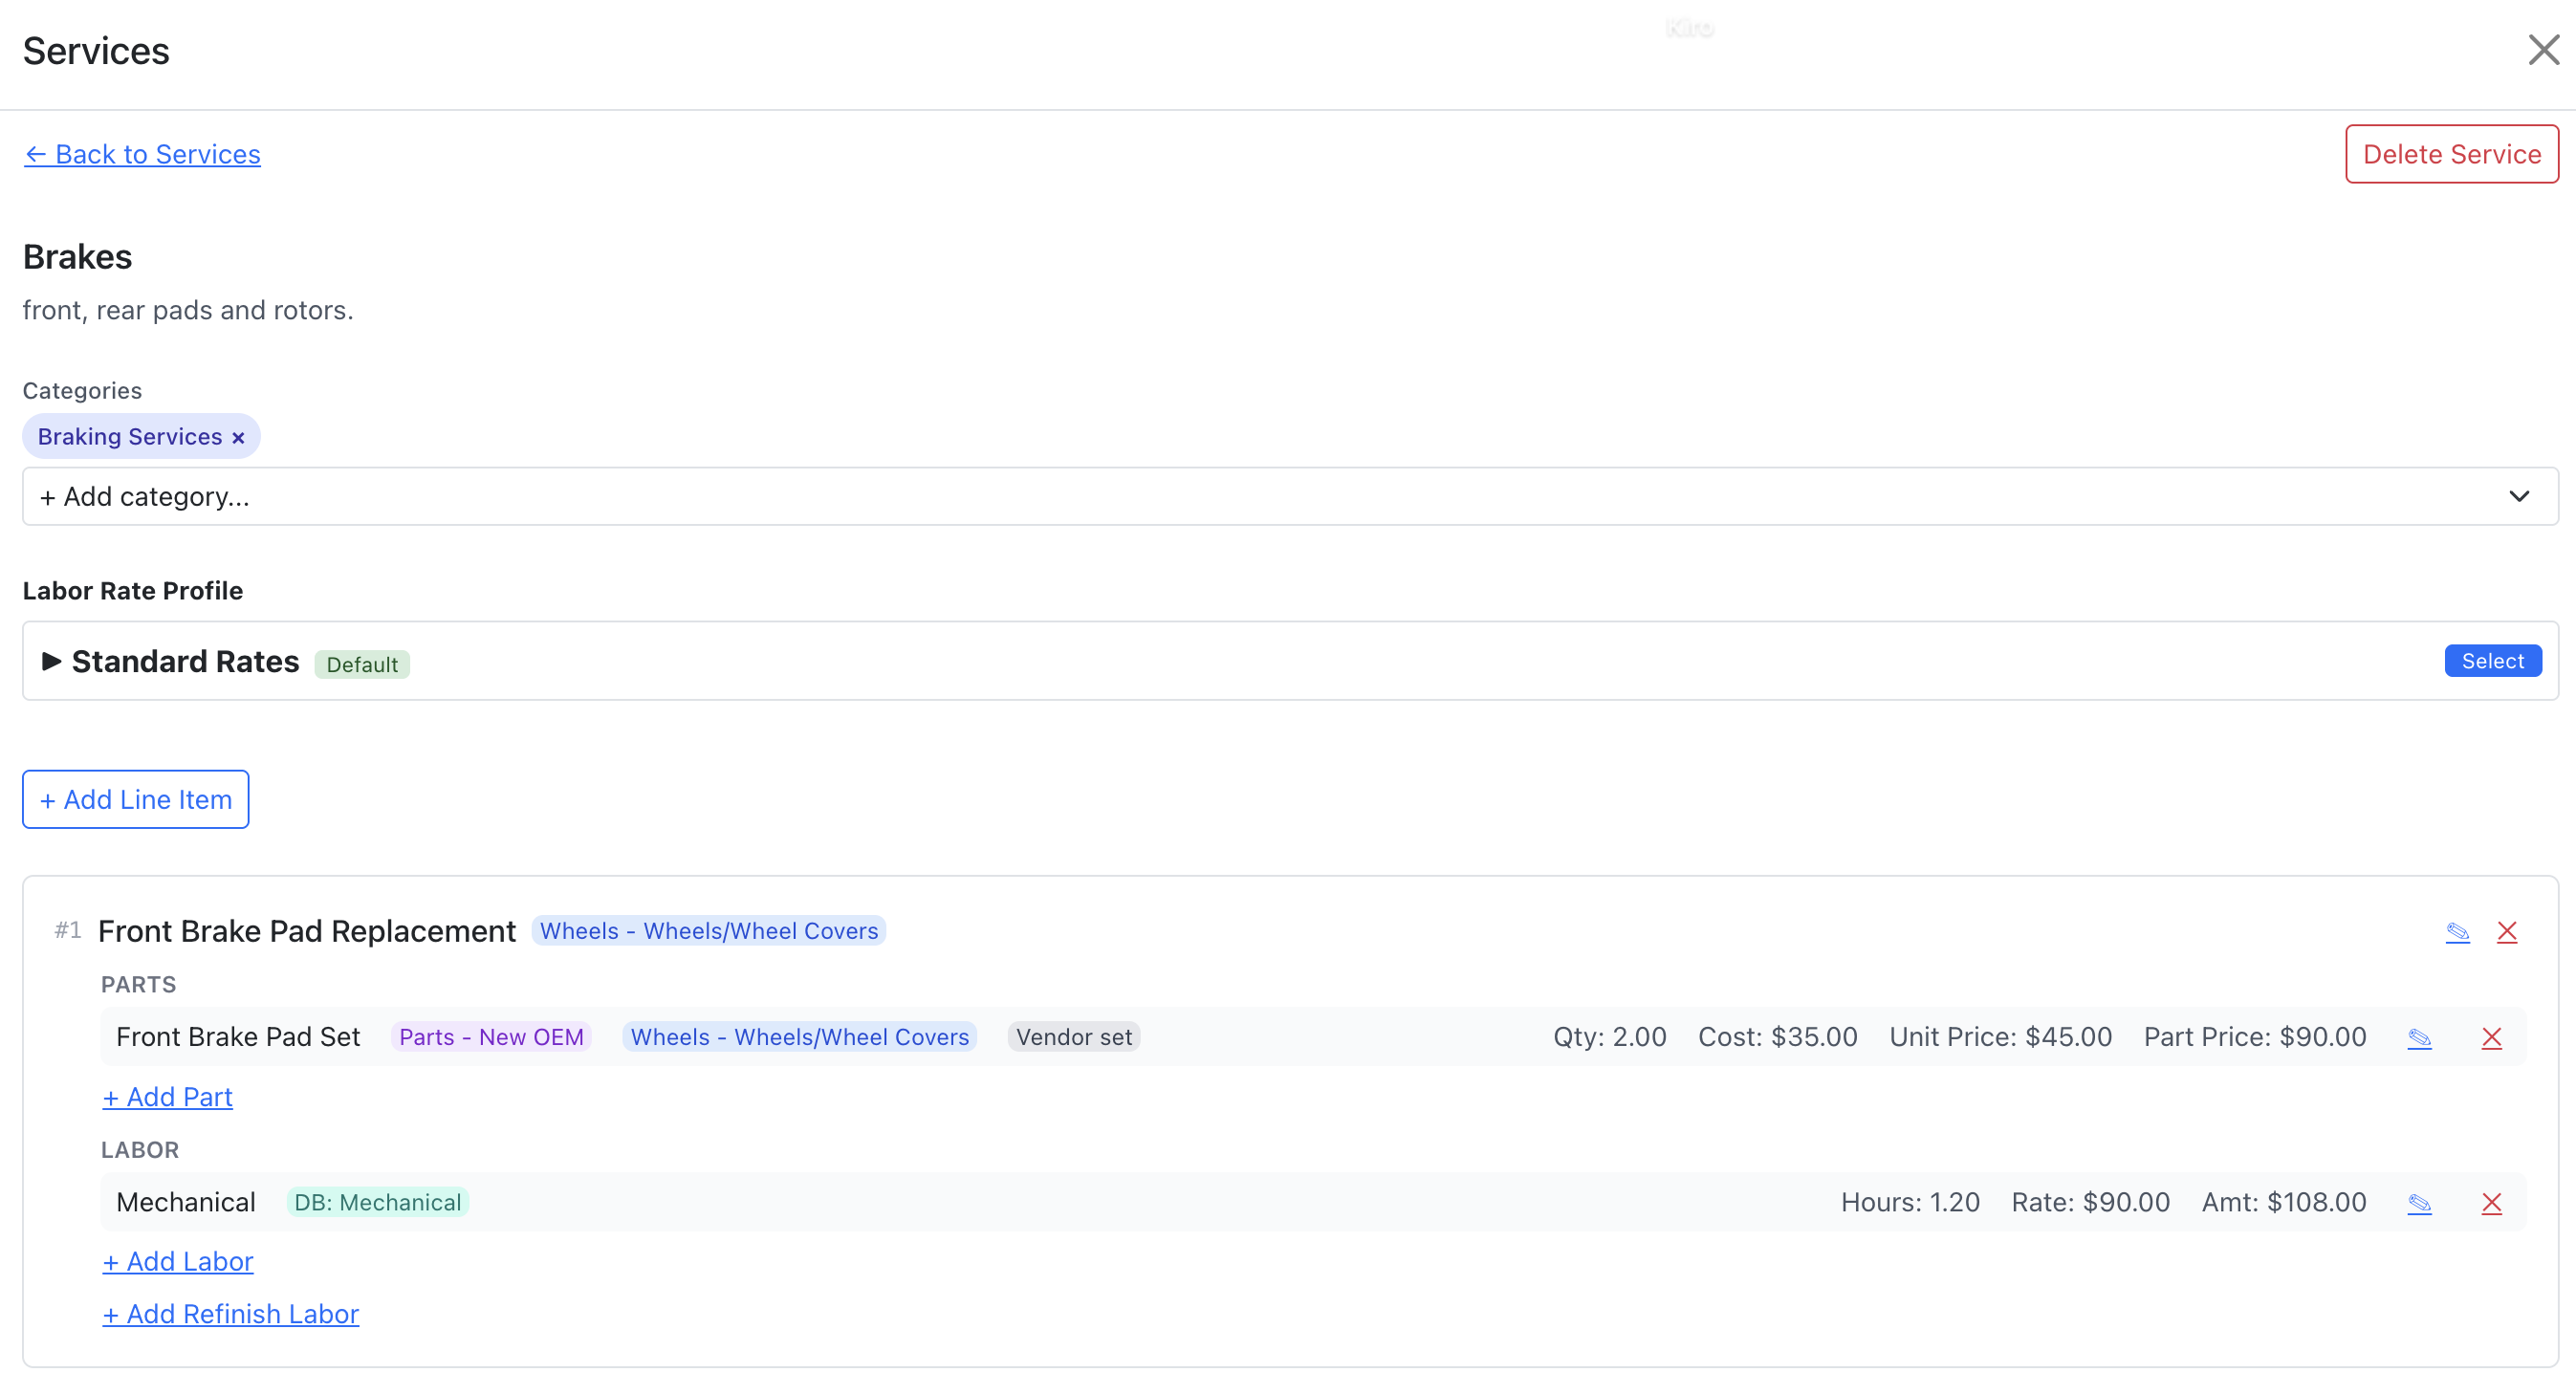
- In the services modal, click the "Edit" button on a service card.
- The template detail view opens showing all line items with their parts and labor.
Editing Template Name & Description
Click the template name or description at the top of the detail view to edit them inline. Save your changes.
Editing Line Items
- Click a line item description to edit it inline.
- Change the sort order to rearrange line items.
Editing Parts
- Click any part field (description, part number, quantity, cost) to edit it inline.
- Add new parts to existing line items with the "Add Part" action.
- Remove a part by clicking its delete button.
Editing Labor
- Click any labor field (type, hours, hourly rate) to edit it inline.
- Add new labor entries with the "Add Labor" action.
- Remove a labor entry by clicking its delete button.
All edits are saved individually. You don't need to save the entire template at once — each field change persists when you confirm it.
Deleting Services
Overview: Remove templates or individual entries that are no longer needed.
Delete an Entire Template
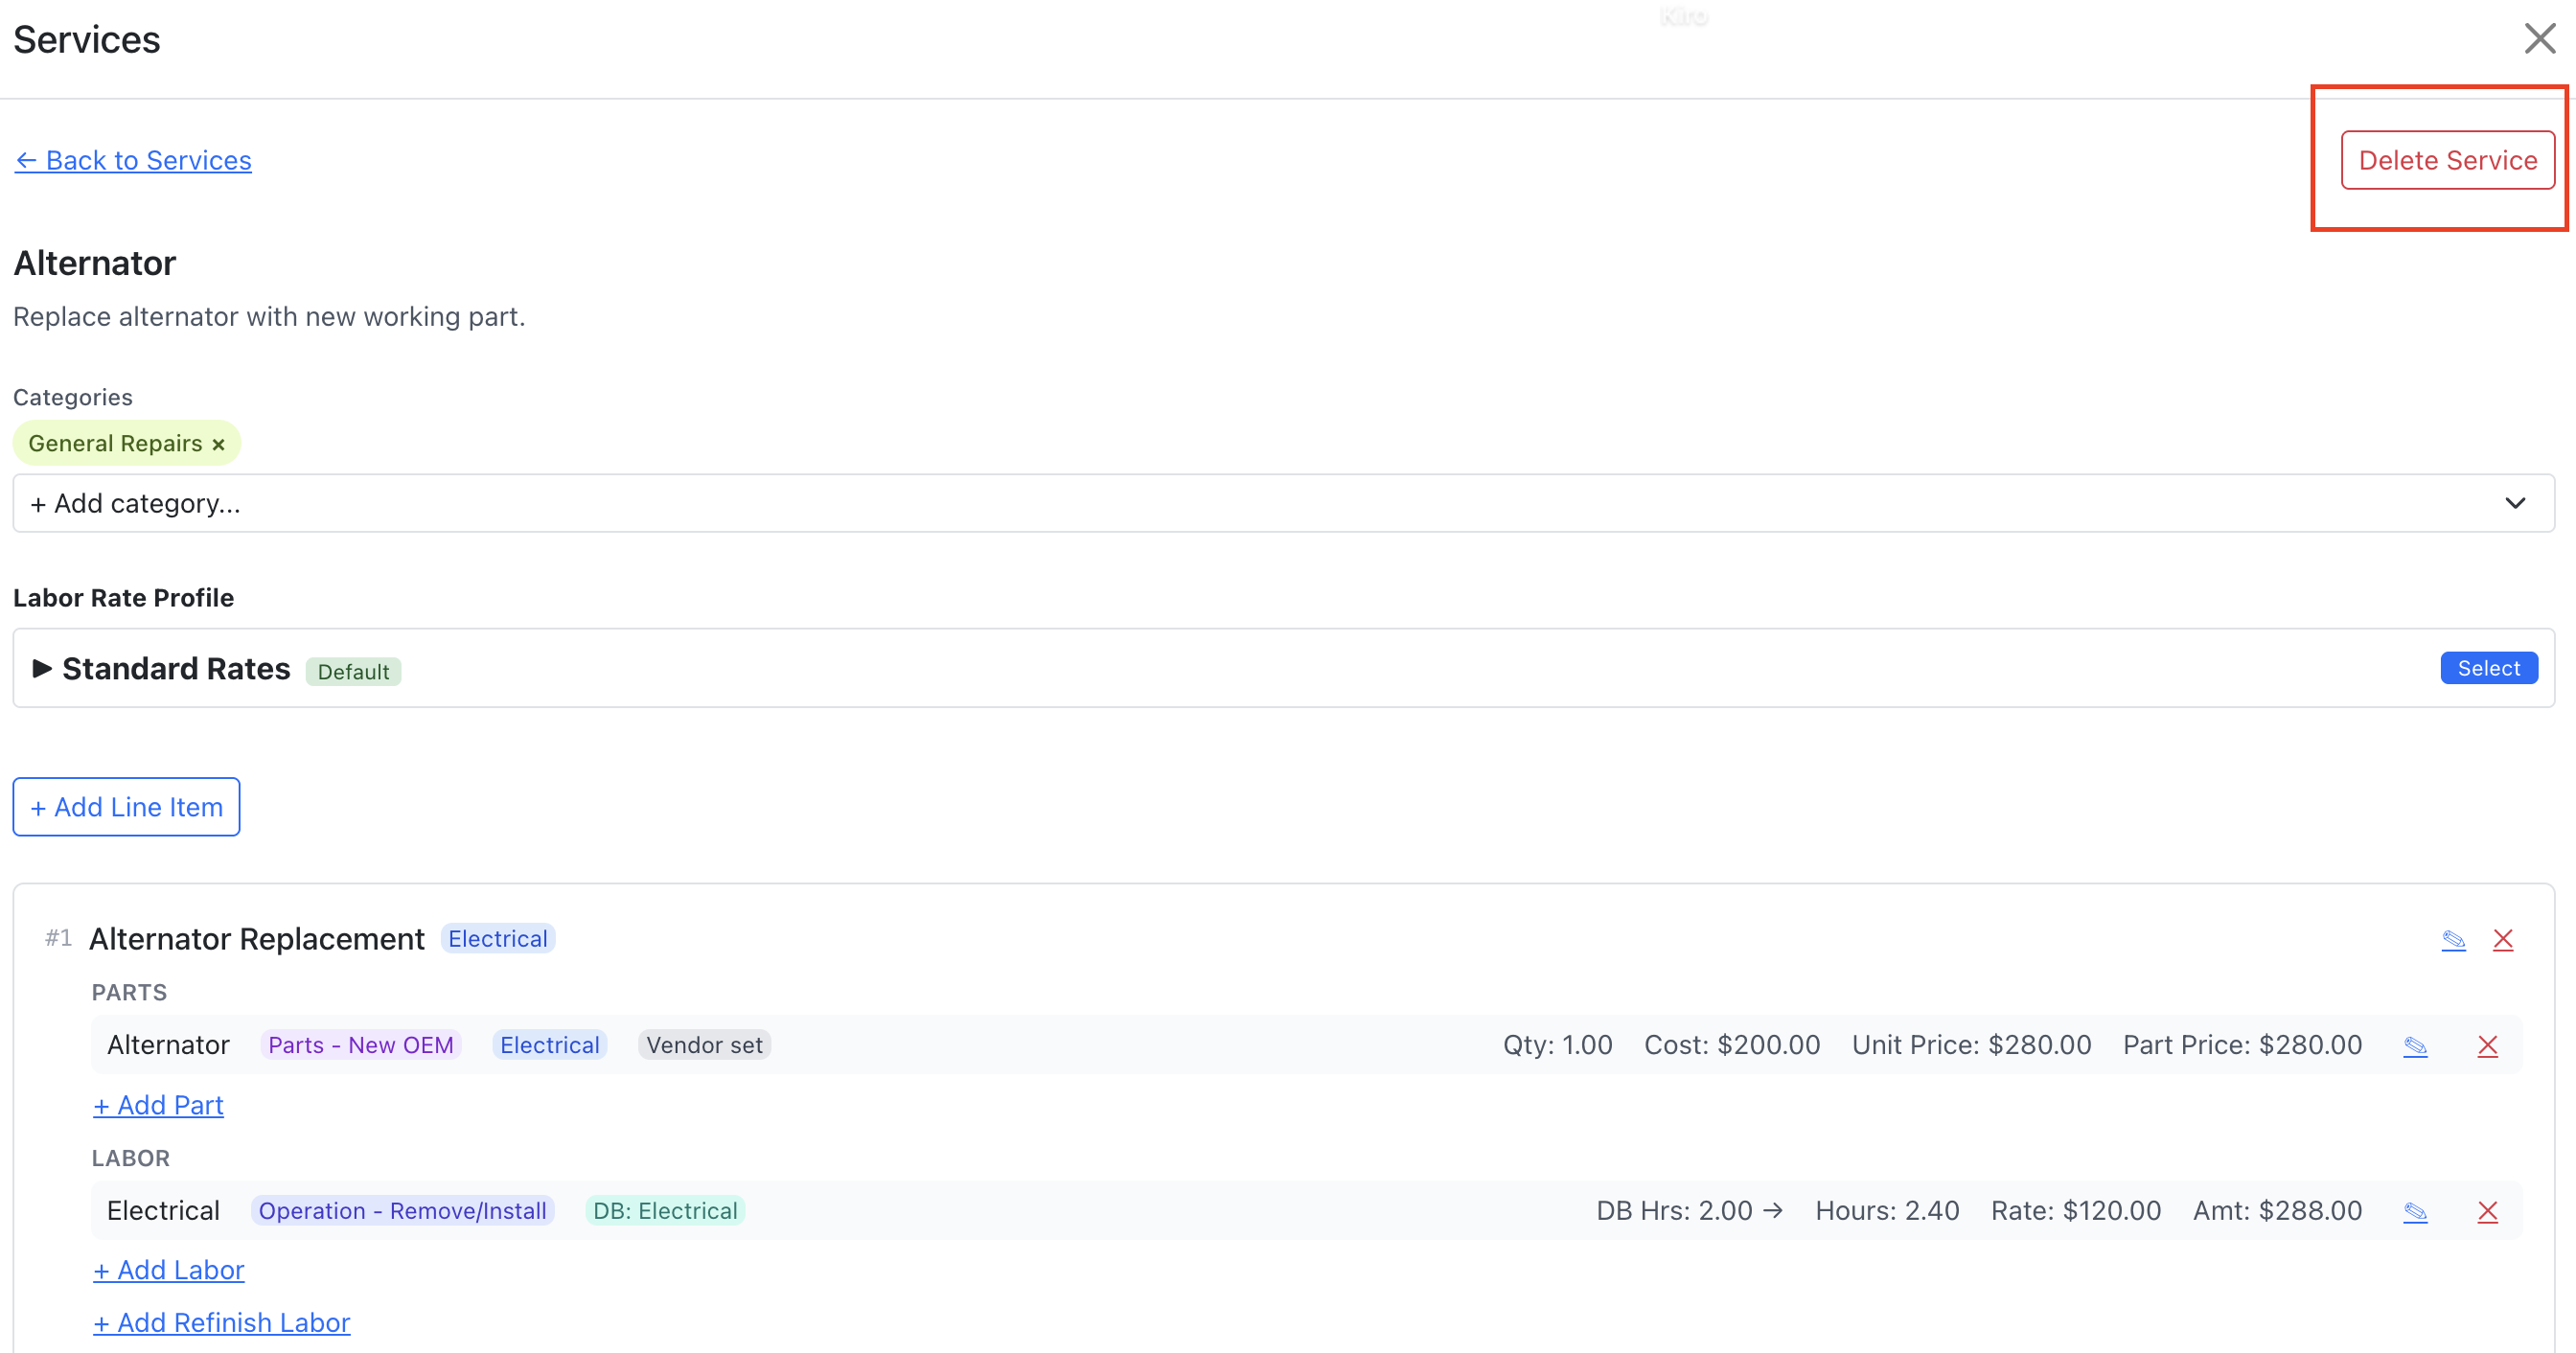
- Open the template detail view by clicking "Edit" on a service card.
- Click the "Delete Template" button.
- Confirm the deletion in the confirmation dialog.
Deleting a template removes it and all of its line items, parts, and labor permanently. Jobs that previously had this template applied are not affected.
Delete Individual Entries
- Delete a line item — removes the line item and all its associated parts and labor (cascade).
- Delete a part — removes just that part from the line item.
- Delete a labor entry — removes just that labor from the line item.
Vehicle Applicability
Overview: Assign vehicle make, model, and year range information to your service templates so they can be filtered by vehicle. When a technician opens the services modal on a job that has a vehicle assigned, the system can suggest relevant services and filter the list to show only templates that apply to that vehicle.
Adding Vehicle Fitment to a Service
- Open the template detail view by clicking "Edit" on a service card.
- Scroll to the "Vehicle Applicability" section.
- Click "Add Vehicle".
- Use the make picker to search and select a vehicle make (required).
- Optionally select a model using the model picker (filters based on selected make).
- Optionally enter a year range (start year, end year, or both) to limit which model years the service applies to.
- Optionally enter engine type and notes for more specific fitment.
- Click "Save".
You can add multiple vehicle applicability entries to a single service. For example, an "Oil Change — Synthetic" service might apply to multiple makes and models.
Year Range Behavior
- Both years specified — applies to model years within that range (inclusive).
- Start year only — applies from that year forward (e.g., "2015+" means 2015 and newer).
- End year only — applies up to that year (e.g., "up to 2020").
- Neither — applies to all model years of that make/model.
Vehicle-Based Suggestions
When a repair order has a vehicle with make and model information, the system automatically suggests matching services. These suggestions appear in a "Suggested Services" panel on the job, letting technicians quickly apply relevant templates without searching manually.
Filtering by Vehicle
In the services modal, if the current job has a vehicle assigned, the template list can be filtered to show only services that match the vehicle's make, model, and year. This makes it easy to find the right service for the car on the lift.
Editing & Removing Fitment
- Click the edit icon on any vehicle applicability entry to modify its make, model, or year range.
- Click the remove icon and confirm to delete a fitment entry.

Service Categories
Overview: Service categories let you organize templates into named groups for easier browsing and filtering. When you have many templates, categories help technicians find the right service quickly.
Setting Up Categories
Categories are managed in Company Settings → Service Categories.
- Navigate to Company Settings → Service Categories.
- Enter a category name and click "Add".
- Repeat for each category you need (e.g., "Oil Changes", "Brake Services", "Body Work", "Inspections").
Assigning Categories to Services
When creating or editing a service template, select a category to assign it to. Templates can belong to one category at a time.
Filtering by Category
In the services modal, the category dropdown lets you filter the template list to show only services in a specific category. This is especially helpful when your shop has dozens of templates.
Notes
- Category names must be unique per company (case-insensitive).
- Category names are limited to 100 characters.
- Deleting a category removes it from associated templates but does not delete the templates themselves — they just become uncategorized.