Purchase Orders
Overview
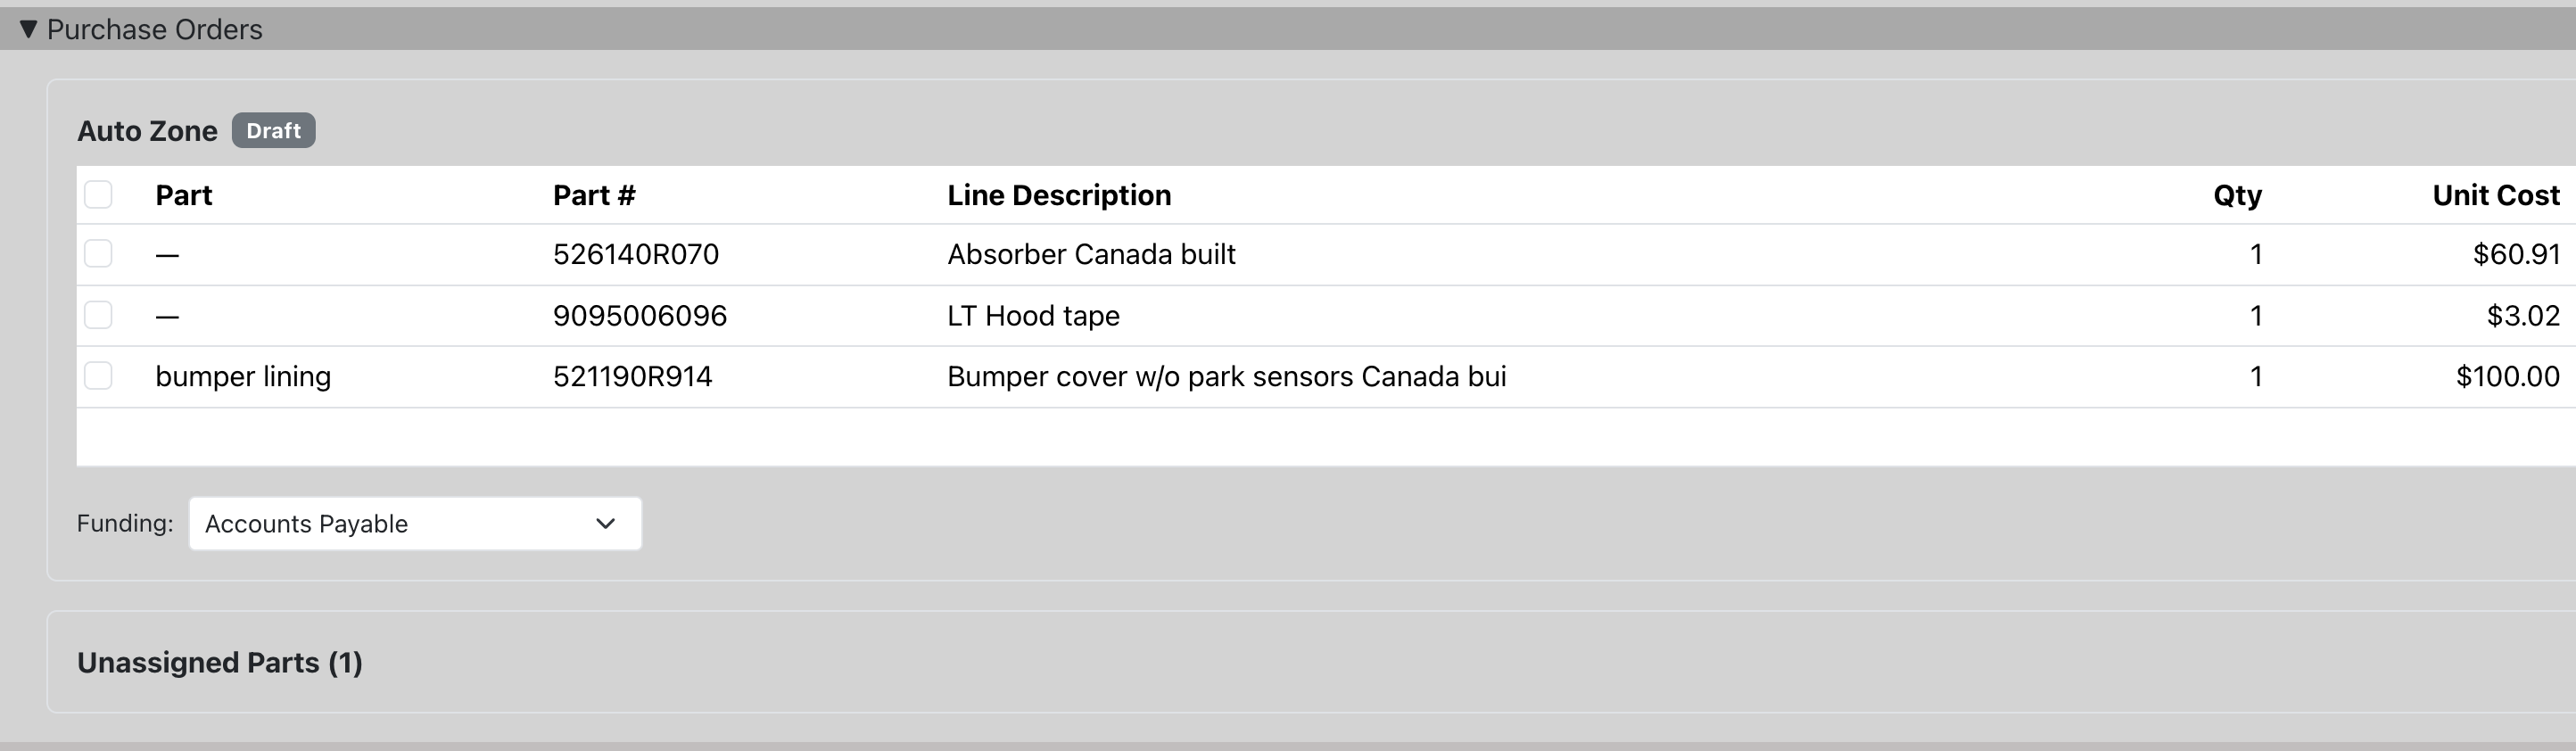
Purchase Orders (POs) in Repair Bay Evolution track the parts you order from vendors for each job. The system automatically creates draft POs when you move parts to "Ordered" status, and gives you full control to organize, split, and manage those POs before finalizing them.
Key capabilities:
- Automatic PO creation — When you order a part, the system places it on a draft PO for that vendor automatically.
- PO selection — Choose which existing PO to add a part to, or create a new one.
- Manual PO creation — Create empty POs and assign parts to them.
- Line item moves — Move parts between draft POs to reorganize purchases.
- Bulk moves — Select multiple parts and move them all at once.
- PO deletion — Remove draft POs you no longer need.
- QuickBooks sync — Finalized POs sync to QBO as expenses or bills.
Access purchase orders from within any job by navigating to the Purchase Orders tab.
PO Lifecycle
Every purchase order goes through these stages:
| Status | Meaning |
|---|---|
| Draft | PO is being built. Line items can be added, moved, or removed. Funding source can be changed. |
| Finalized | PO has been confirmed. No further edits. Ready for QBO sync. |
| Stale | Draft PO is over 30 days old without being finalized. A reminder to take action. |
Only draft POs support editing — moving line items, changing funding, adding parts, or deleting. Once finalized, changes are managed through QuickBooks.
Automatic PO Creation
When you move a part to "Ordered" status on the Parts Board and no draft PO exists for that vendor on the job, the system automatically creates one:
- Change a part's status to Ordered.
- The system checks if a draft PO already exists for the same vendor on this job.
- If no existing PO is found, a new draft PO is created and the part is added as a line item.
- If an existing draft PO for the same vendor is found, you'll be prompted to choose (see next section).
The funding source (credit card, accounts payable, etc.) is resolved automatically based on the vendor's payment profile.
Choose PO When Ordering
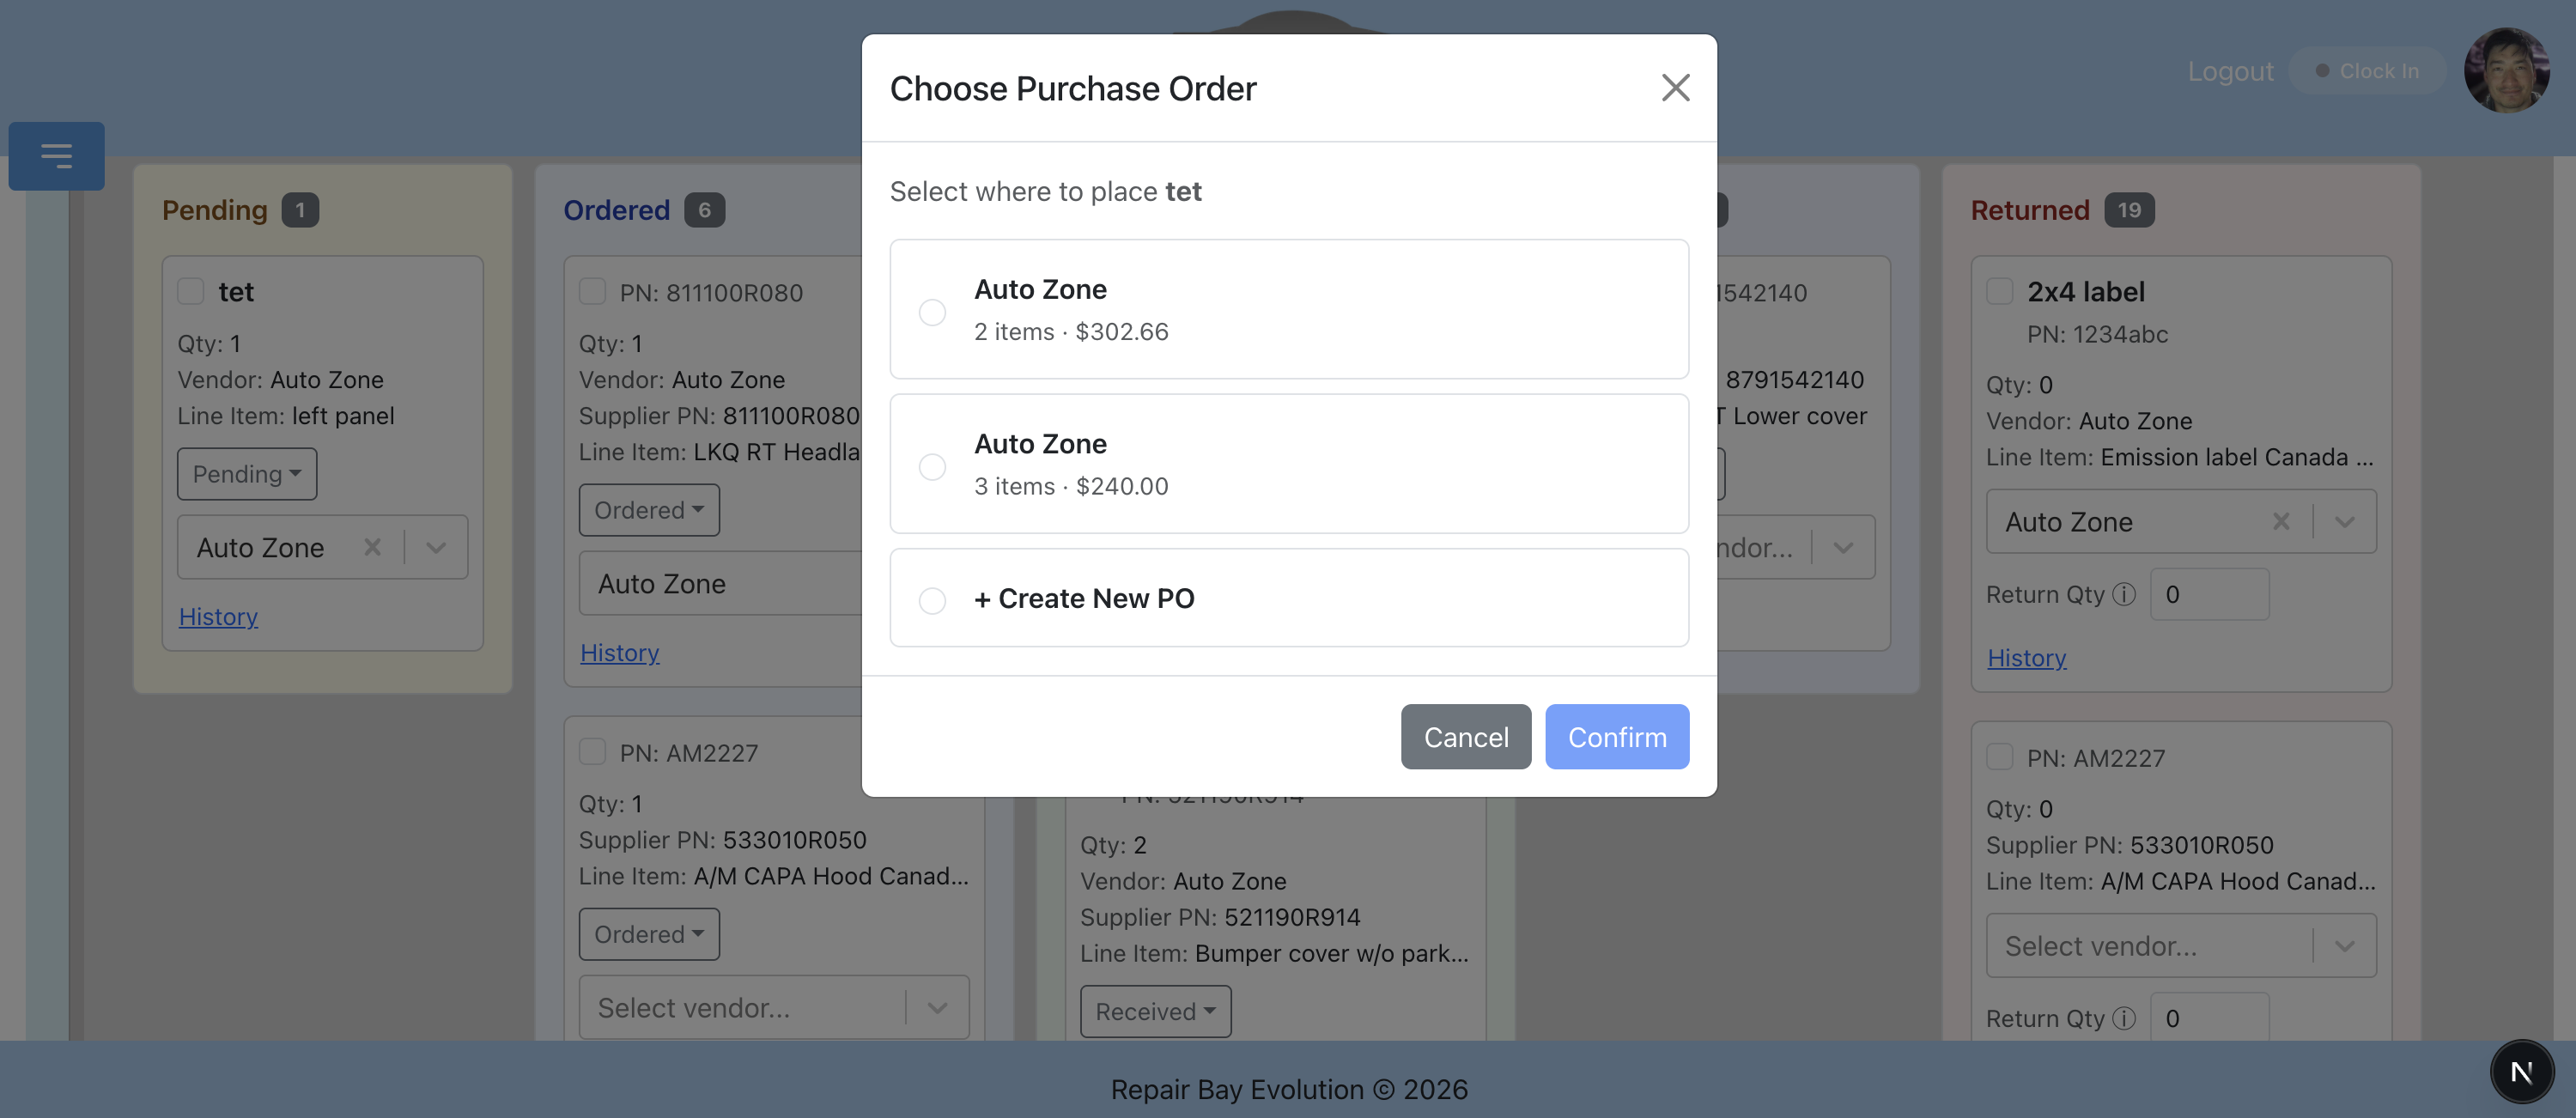
When you order a part and one or more draft POs already exist for that vendor on the job, a selection dialog appears letting you decide where to place the part:
- Change a part's status to Ordered (from the Parts Board or line item detail).
- If draft POs exist for the same vendor, a "Choose Purchase Order" dialog opens.
- Each existing PO shows its vendor name, number of items, and total cost.
- Select an existing PO to add the part to it, or choose "+ Create New PO" to start a separate order.
- Click Confirm to complete the status change and place the part.
If you close the dialog without making a selection, the status change is cancelled and the part stays in its current status.
This is useful when you want to keep separate orders — for example, splitting urgent parts onto their own PO while routine parts stay on another.
Create a PO Manually
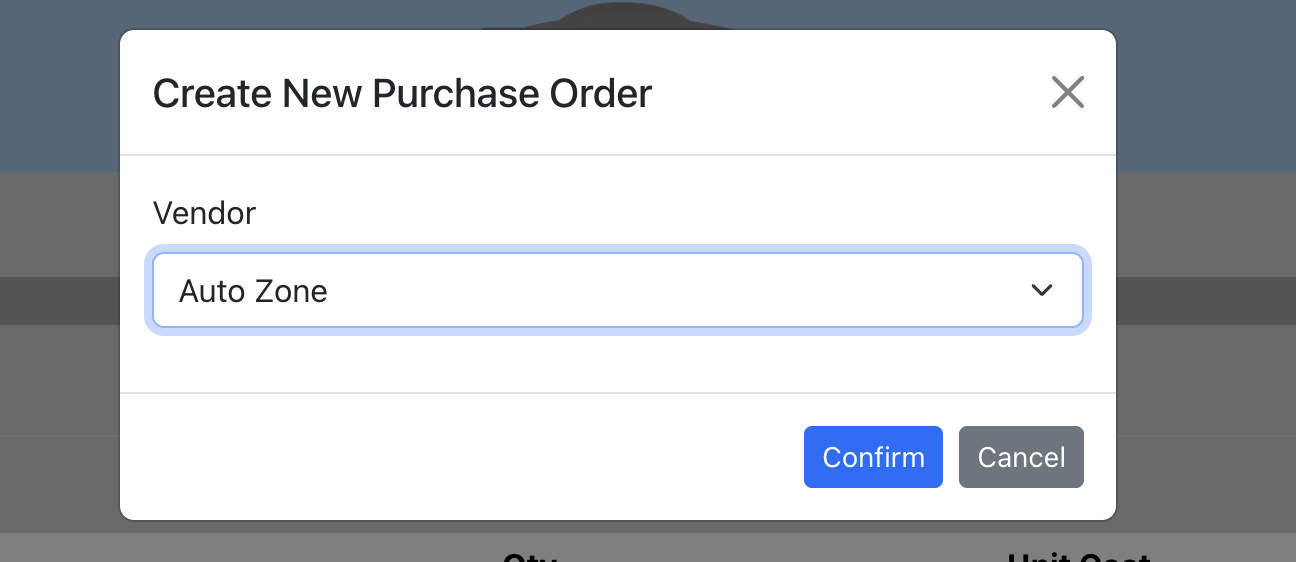
You can create an empty draft PO at any time, then assign parts to it later:
- Open the job's Purchase Orders tab.
- Click the "Create New PO" button.
- Select a vendor from the dropdown.
- Click Confirm.
The new PO starts as an empty draft. You can add parts to it from the Unassigned Parts section (see below), or parts will land on it when you order them and select it in the PO chooser.
The funding source is automatically resolved based on the vendor's configured payment profile.
Move Parts Between POs
After a part has been placed on a draft PO, you can move it to a different draft PO for the same vendor:
- In the Purchase Orders tab, find the part you want to move.
- Click the "Move" link in the Actions column.
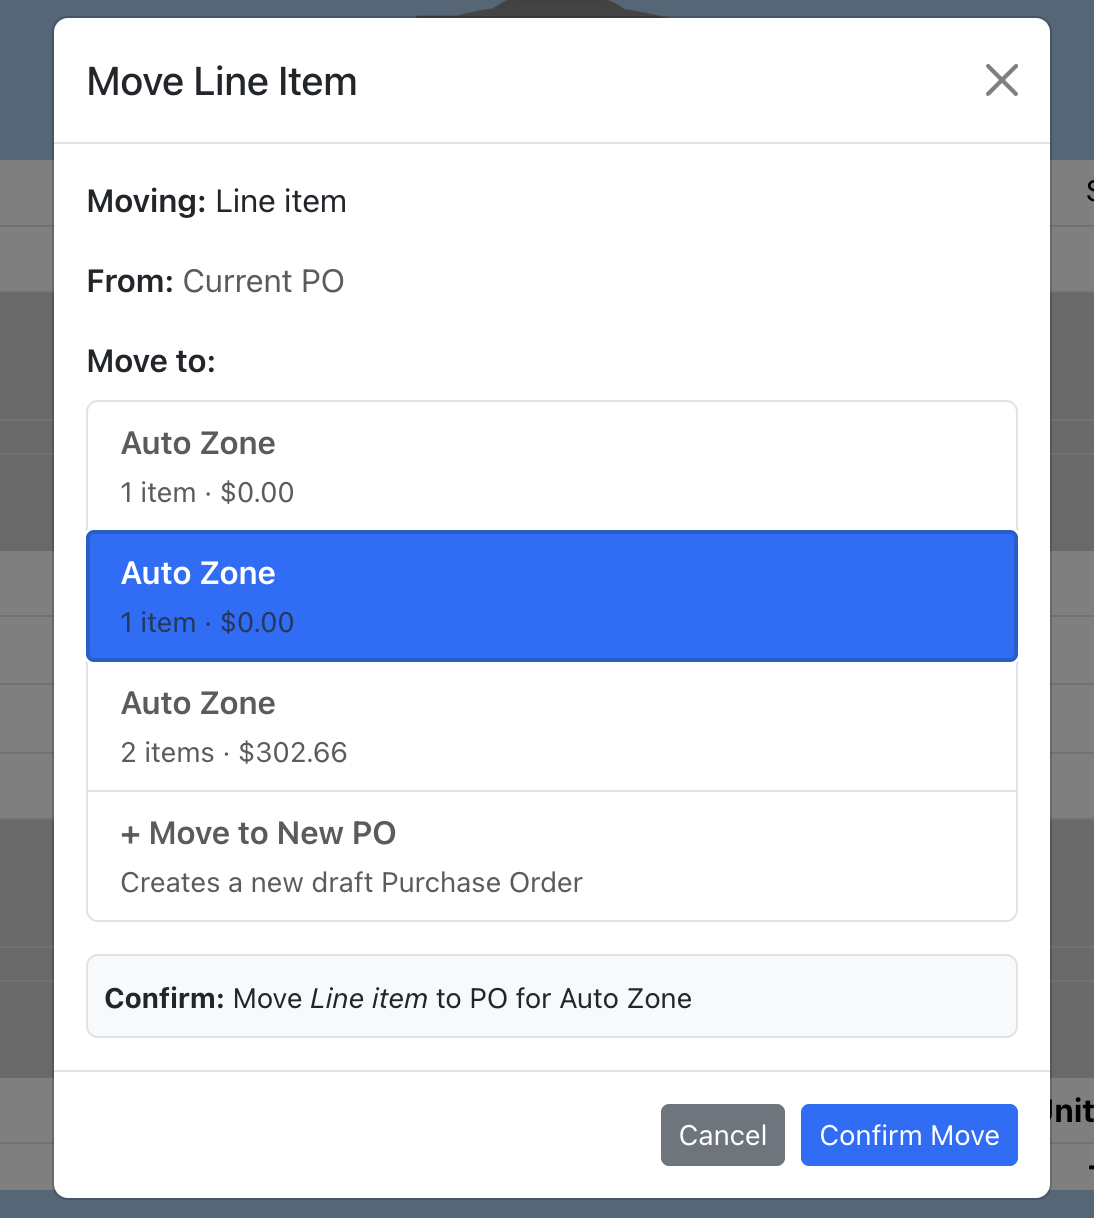
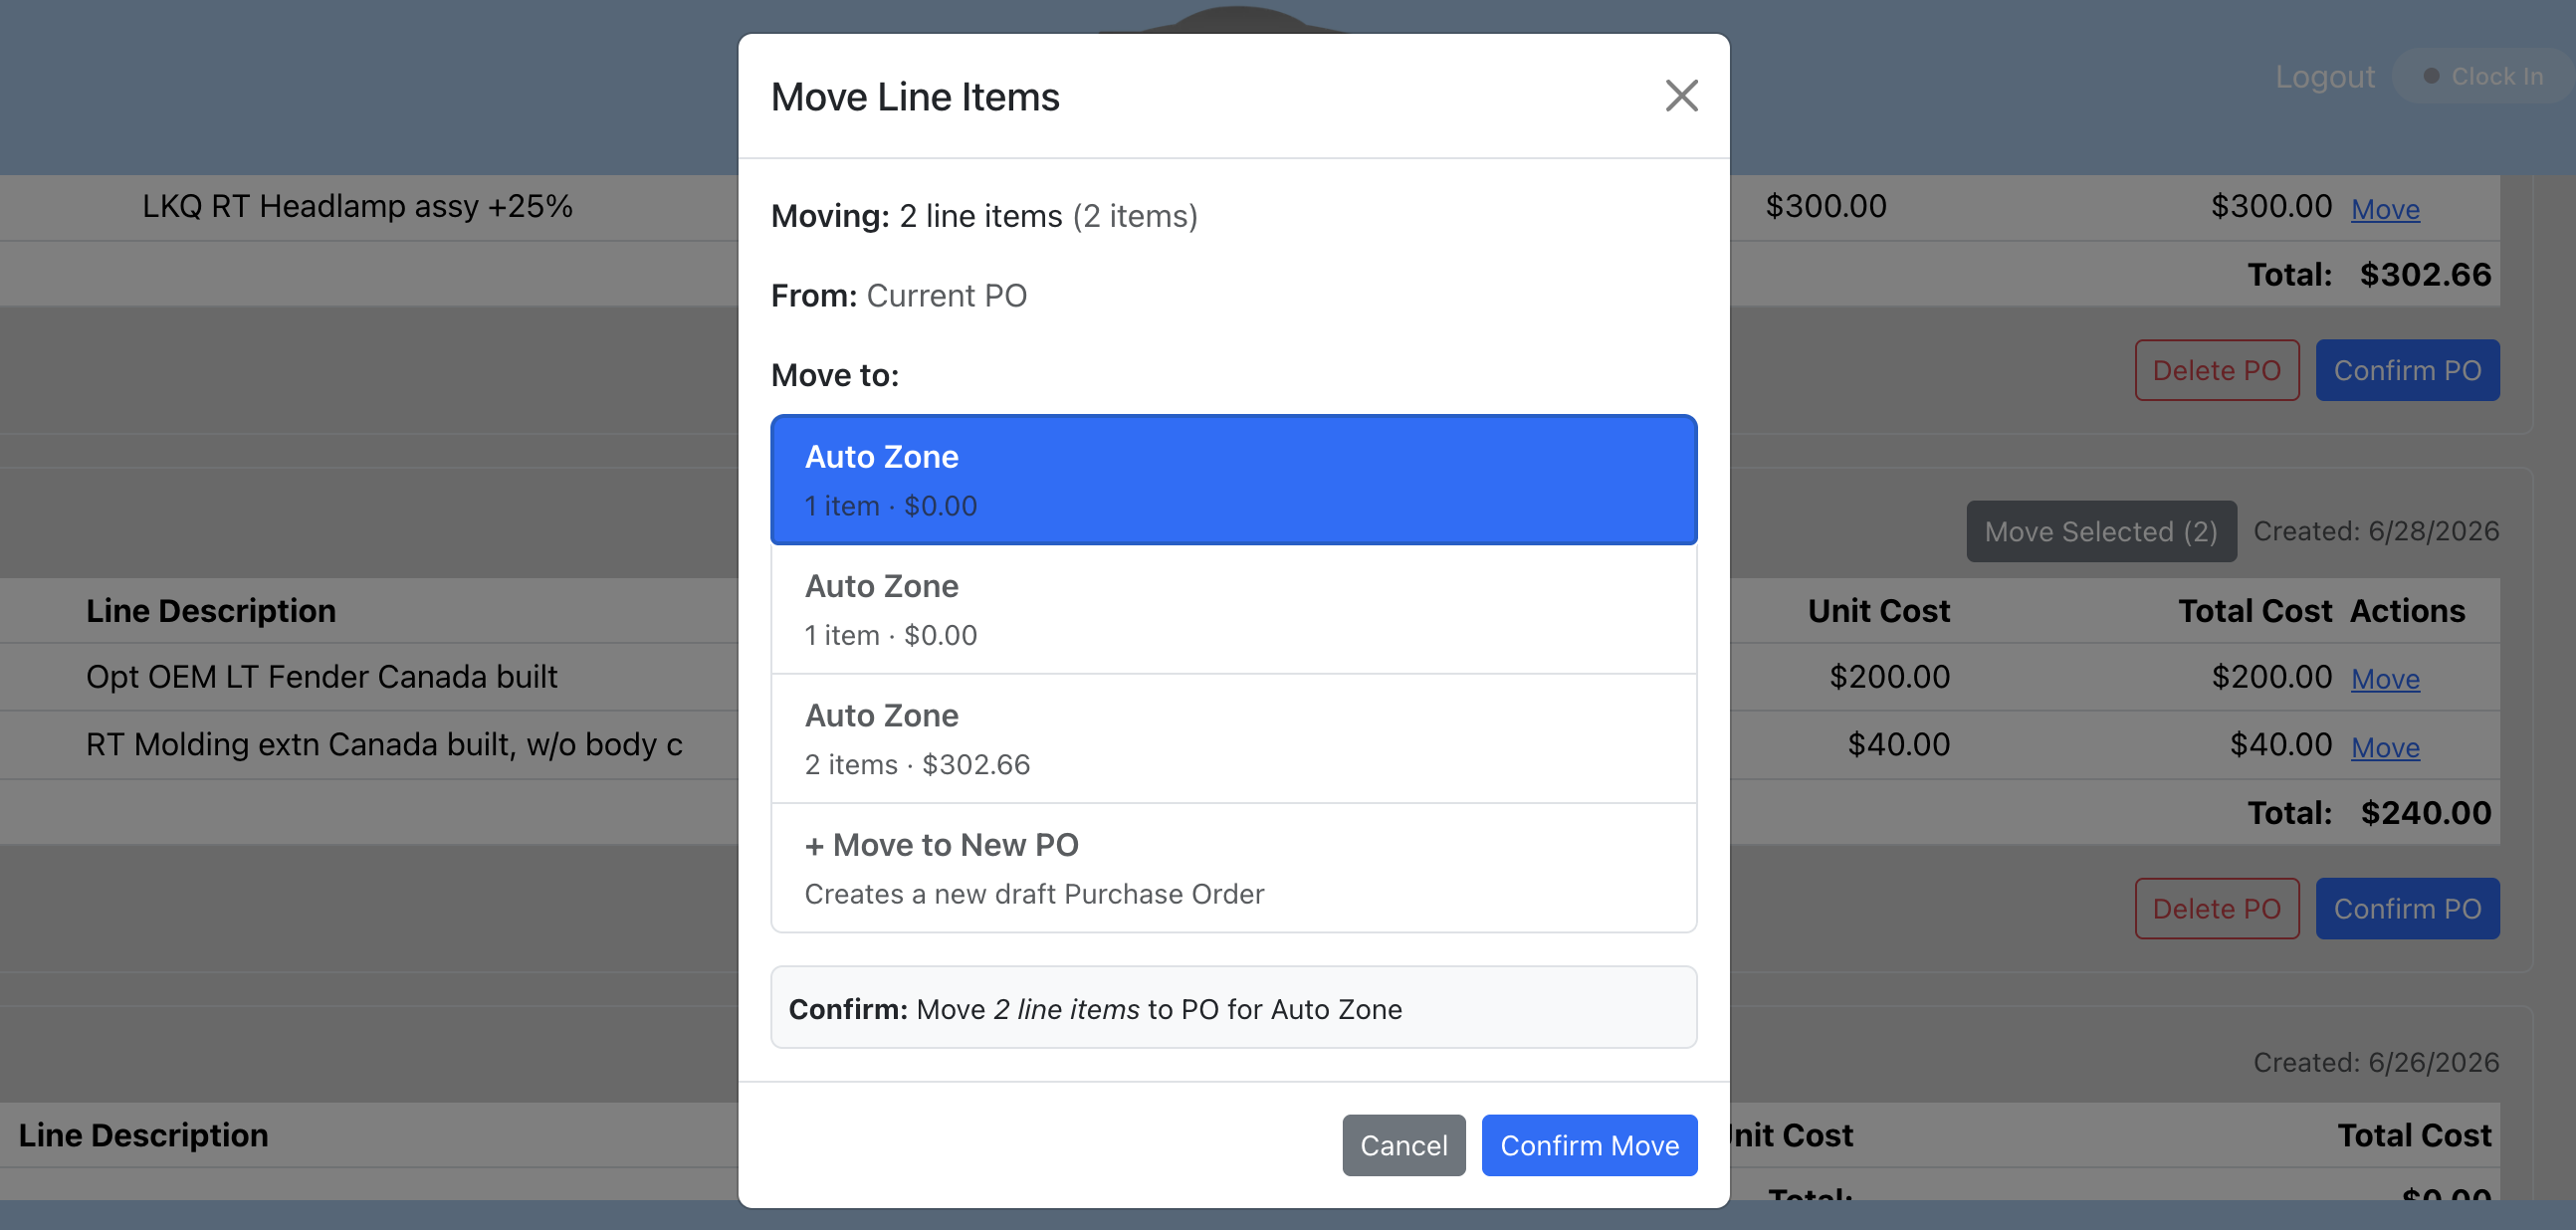
- A dialog shows available target POs — other draft POs for the same vendor on this job.
- Select a target PO, or choose "+ Move to New PO" to create a fresh PO and move the part there.
- Review the confirmation summary, then click Confirm Move.
After the move:
- The part appears on the target PO with its quantity, unit cost, and received quantity preserved.
- Both PO totals are recalculated automatically.
- If the source PO has zero remaining line items after the move, it is automatically deleted.
Moves are restricted to POs within the same job and same vendor.
Bulk Move
Need to move multiple parts at once? Use the checkbox selection:
- On a draft PO, use the checkboxes to select one or more line items. You can also use the header checkbox to select all.
- A "Move Selected (N)" button appears in the PO header.
- Click it to open the move dialog.
- Choose a target PO or "Move to New PO" — the same options as a single move.
- Click Confirm Move to move all selected items at once.
The bulk move is all-or-nothing — if any item fails validation, none are moved. This keeps your POs consistent.
Unassigned Parts
Unassigned parts are parts in "Ordered" or "Backordered" status that are not currently on any draft PO. This can happen when:
- A PO is deleted (its parts become unassigned).
- A part was ordered before the PO system was in place.
- Parts were manually set to ordered status outside the normal workflow.
The Unassigned Parts section appears below your PO list when unassigned parts exist:
- Click the section header to expand it.
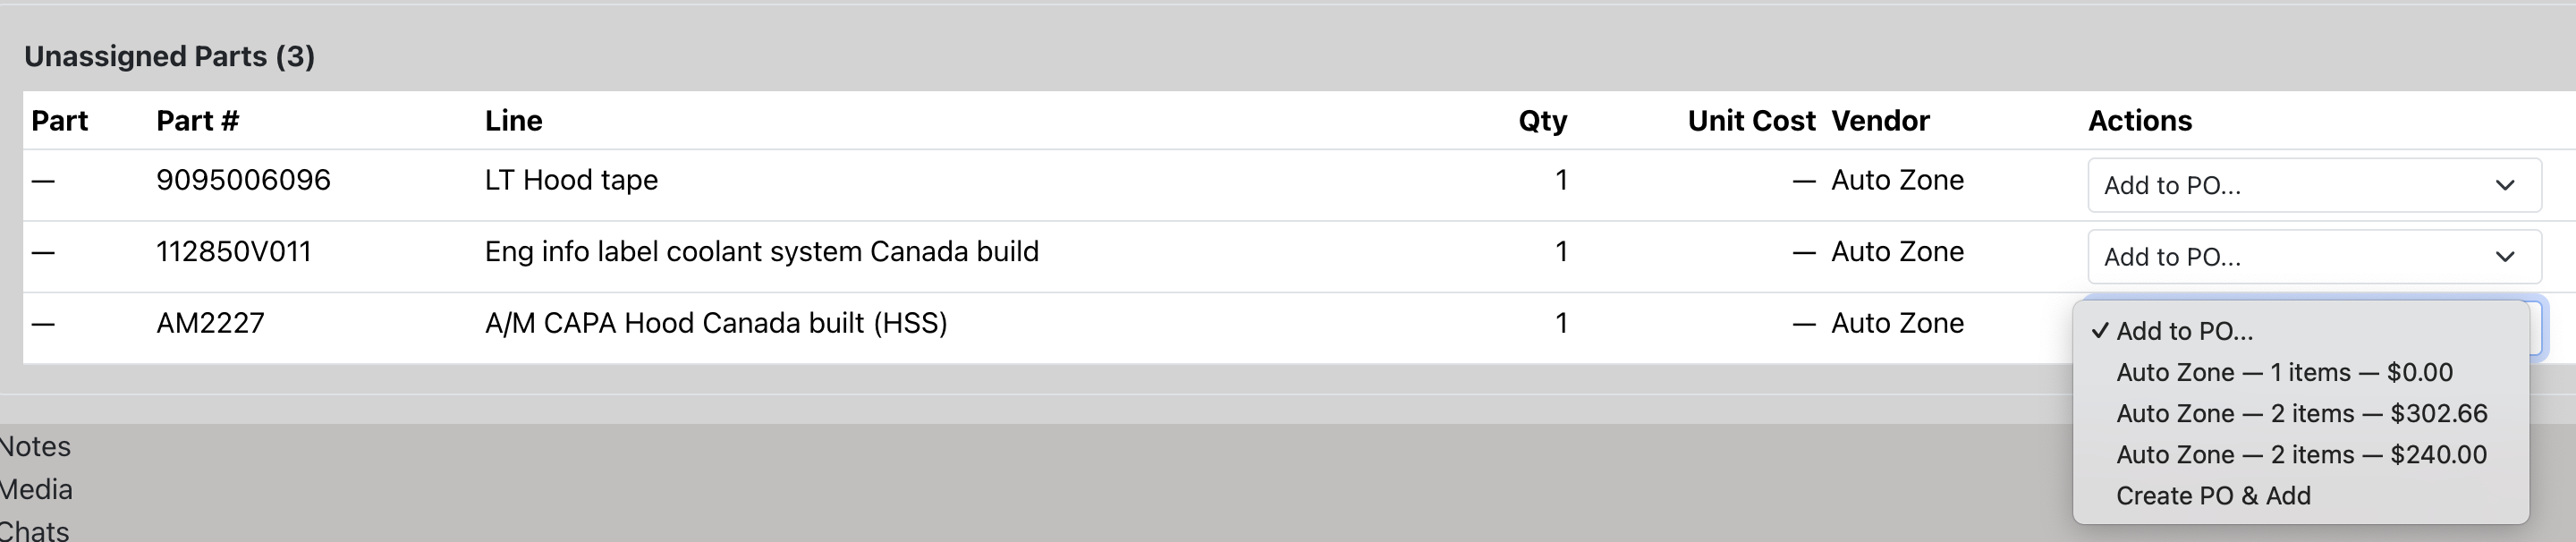
- A table shows each unassigned part with its description, part number, quantity, unit cost, and vendor.
- For each part, the Actions column provides options:
- If compatible draft POs exist (same vendor), a dropdown lets you add the part to any of them or create a new PO.
- If no compatible PO exists, a "Create PO & Add" button creates a new PO for that vendor and adds the part.
Delete a PO
You can delete a draft PO that is no longer needed — for example, if you've corrected things manually in QuickBooks and want the app to match:
- On the draft PO card, click the "Delete PO" button.
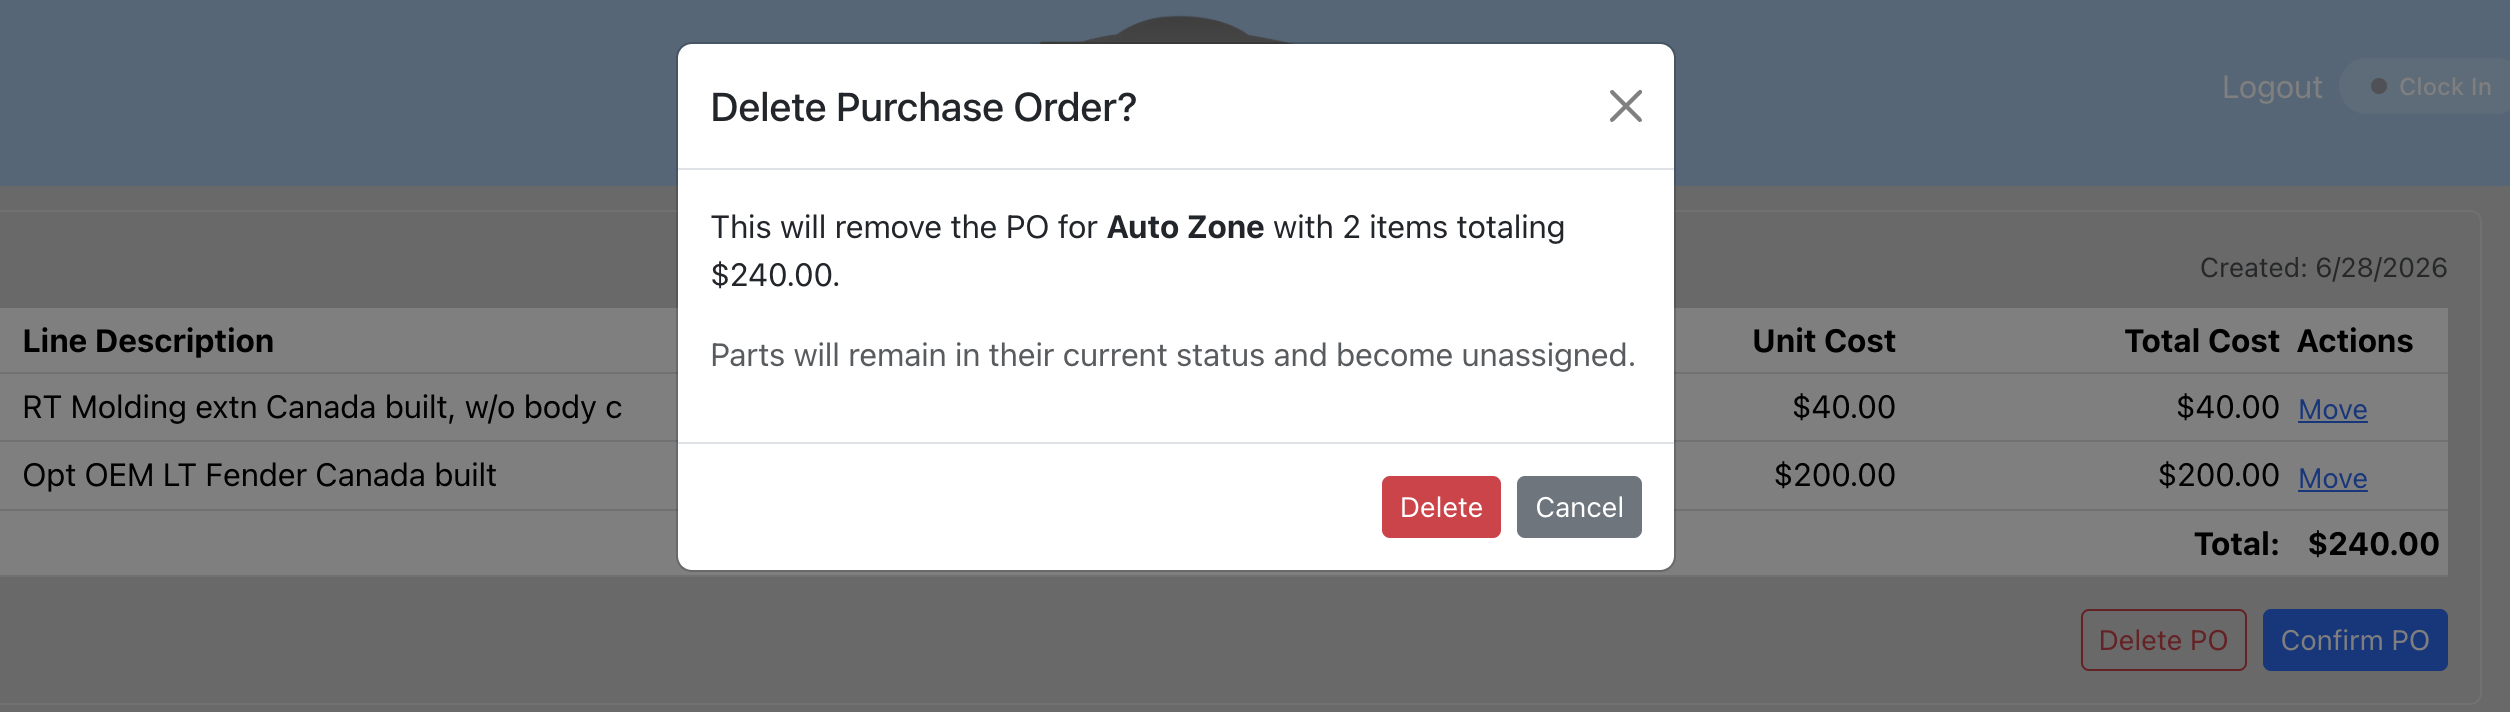
- A confirmation dialog shows the vendor name, number of line items, and total cost.
- If the PO was previously synced to QuickBooks, a warning reminds you to void or delete the corresponding transaction in QBO manually.
- Click Delete to confirm.
Important notes:
- Deleting a PO does not change the status of its parts — they remain in their current status (ordered, backordered, etc.) and become "unassigned parts."
- Only draft POs can be deleted. Finalized POs must be voided through the QuickBooks void flow.
Funding Source
Each PO has a funding source that determines how it syncs to QuickBooks:
| Funding Type | QBO Result |
|---|---|
| Accounts Payable | Syncs as a Bill in QBO. |
| Payment Account (credit card or bank) | Syncs as an Expense in QBO. |
| Manual / Select Later | PO cannot be synced until a funding source is selected. |
To change the funding source on a draft PO:
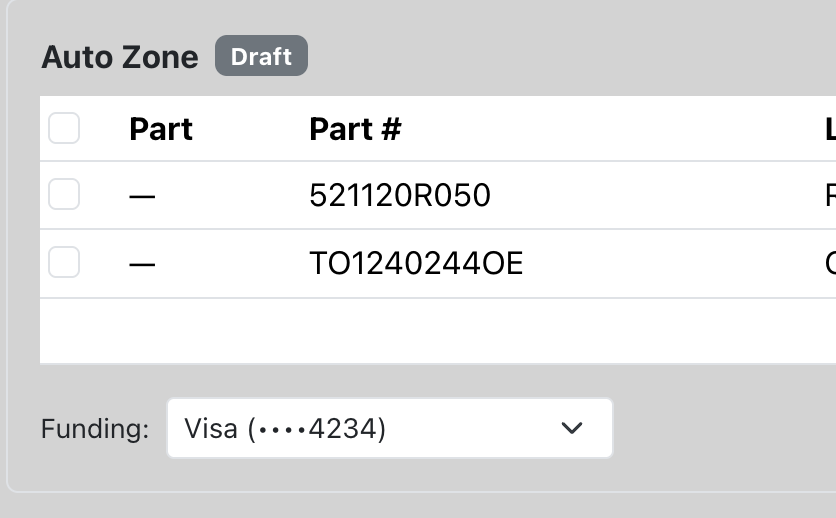
- Use the Funding dropdown at the bottom of the PO card.
- Choose between Accounts Payable, Manual, or any of your configured payment accounts.
If the funding source was changed from the automatic default, an "Overridden" badge appears as a reminder.
Some POs may show a warning: "This order requires manual funding source selection before confirming." This means the vendor's payment profile couldn't be resolved automatically and you need to pick one.
Confirm & Finalize
Once a draft PO is complete and all parts have costs entered, you can finalize it:
- Review all line items — make sure unit costs are filled in. Items with missing costs are highlighted in red.
- Verify the funding source is correct.
- Click "Confirm PO".
After confirmation:
- The PO status changes to Finalized.
- Line items can no longer be moved or edited.
- The PO becomes eligible for QuickBooks sync.
You cannot confirm a PO if any line items have a missing or zero unit cost — the button will be disabled with a warning message.
QuickBooks Sync
Once a PO is finalized, it can be synced to QuickBooks Online. This requires the QuickBooks integration to be connected (see the QuickBooks Integration guide).
Sync actions available on finalized POs:
- Sync to QBO — Creates the expense or bill in QuickBooks for the first time.
- Update in QBO — Updates an existing QBO transaction if the PO total has changed (e.g., a stale PO that was edited before the feature was finalized).
- Void in QBO — Voids the corresponding transaction in QuickBooks.
A sync status badge appears on each PO showing whether it's pending, synced, failed, or voided.
For detailed QuickBooks setup and configuration, see the QuickBooks Integration guide.