Inventory Management
Overview
The Inventory Management system lets you maintain an on-hand parts catalog with tracked stock levels. Instead of ordering every part from a vendor, technicians can fulfill commonly-stocked items (filters, fluids, fasteners, etc.) directly from shop inventory. This provides a faster workflow and integrates with the parts board, line items, purchase orders, profitability reports, and QuickBooks Online.
Key capabilities include:
- Maintain a catalog of parts you keep in stock with SKUs, costs, and reorder points
- Track stock levels across multiple storage locations
- Fulfill parts on jobs directly from inventory (bypasses vendor ordering)
- Reserve inventory for scheduled jobs so stock isn't claimed by others
- Replenish stock manually or via replenishment purchase orders
- Low-stock alerts with configurable thresholds and "on the way" tracking
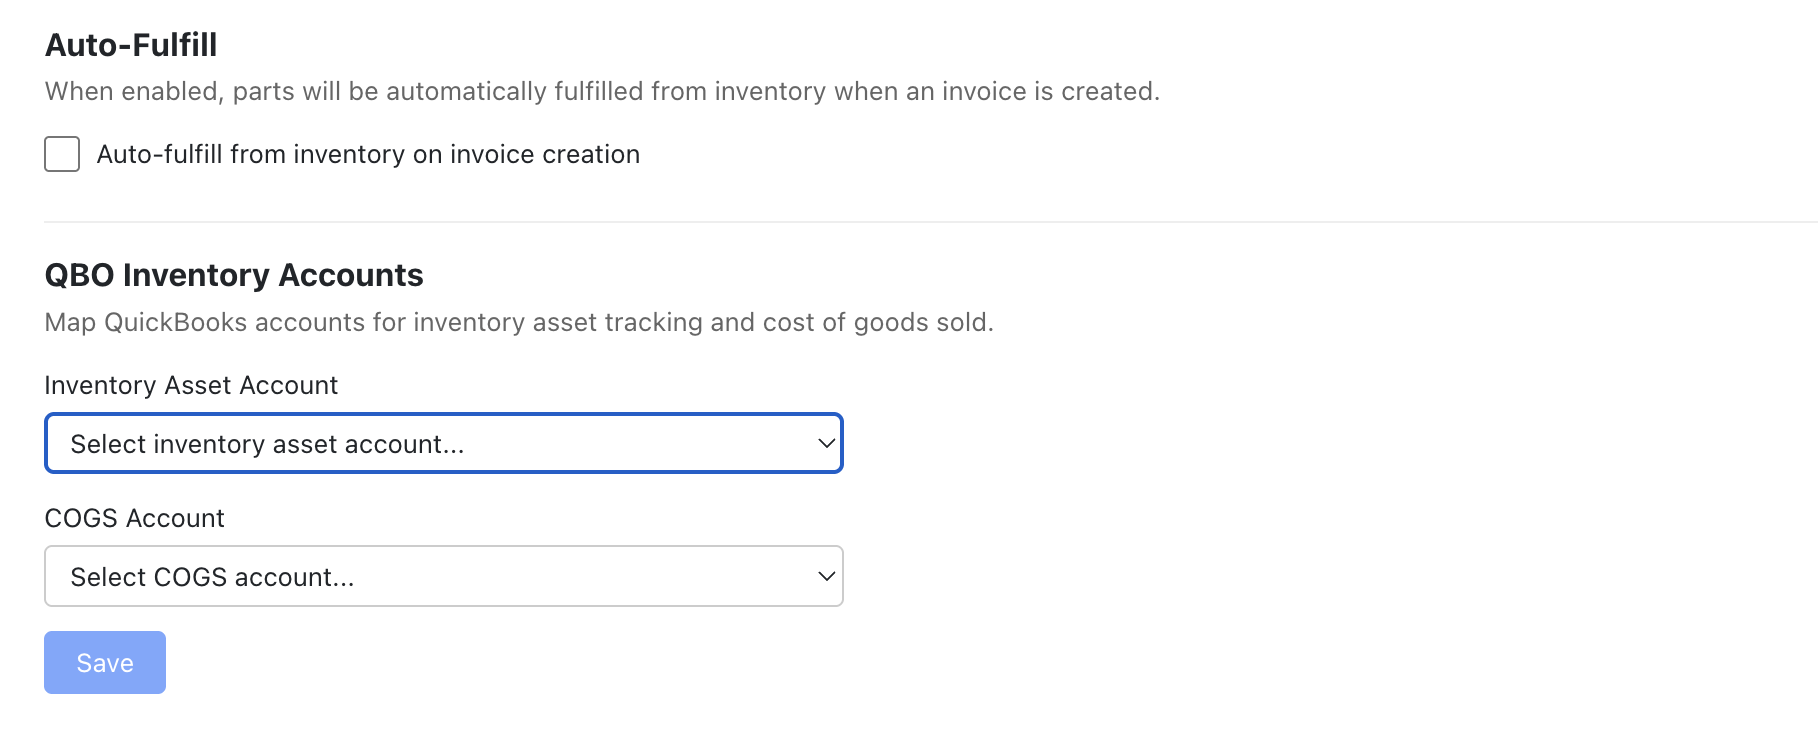
- Auto-fulfill inventory parts when creating invoices
- Barcode/SKU scanning for fast lookup (hardware scanner or phone camera)
- Printable shelf labels with barcodes (single or bulk, Dymo and Avery formats)
- QuickBooks journal entries for Inventory Asset and COGS
Inventory Catalog
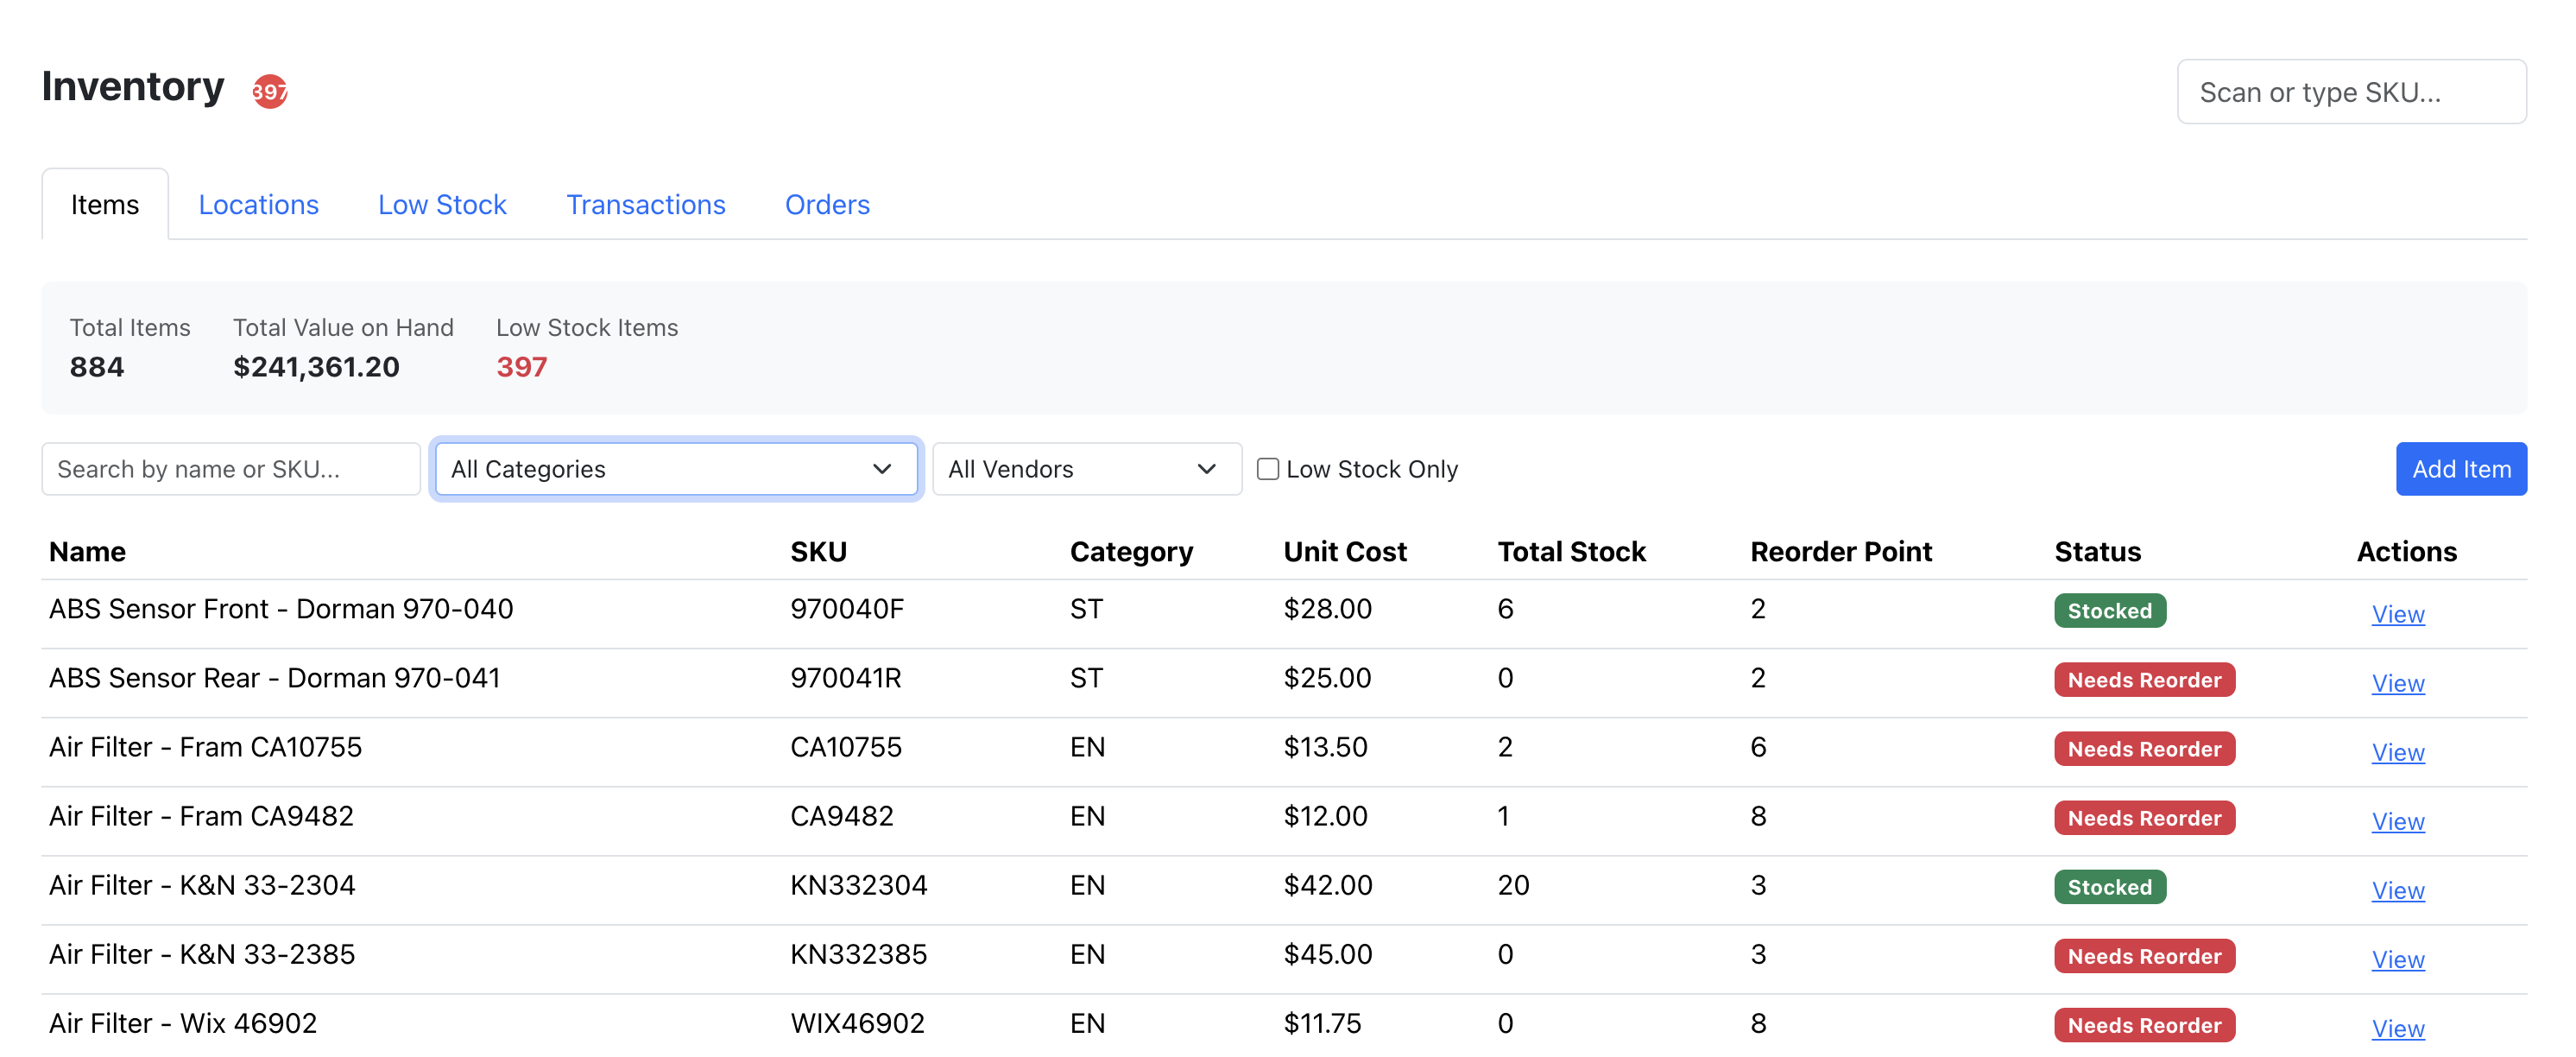
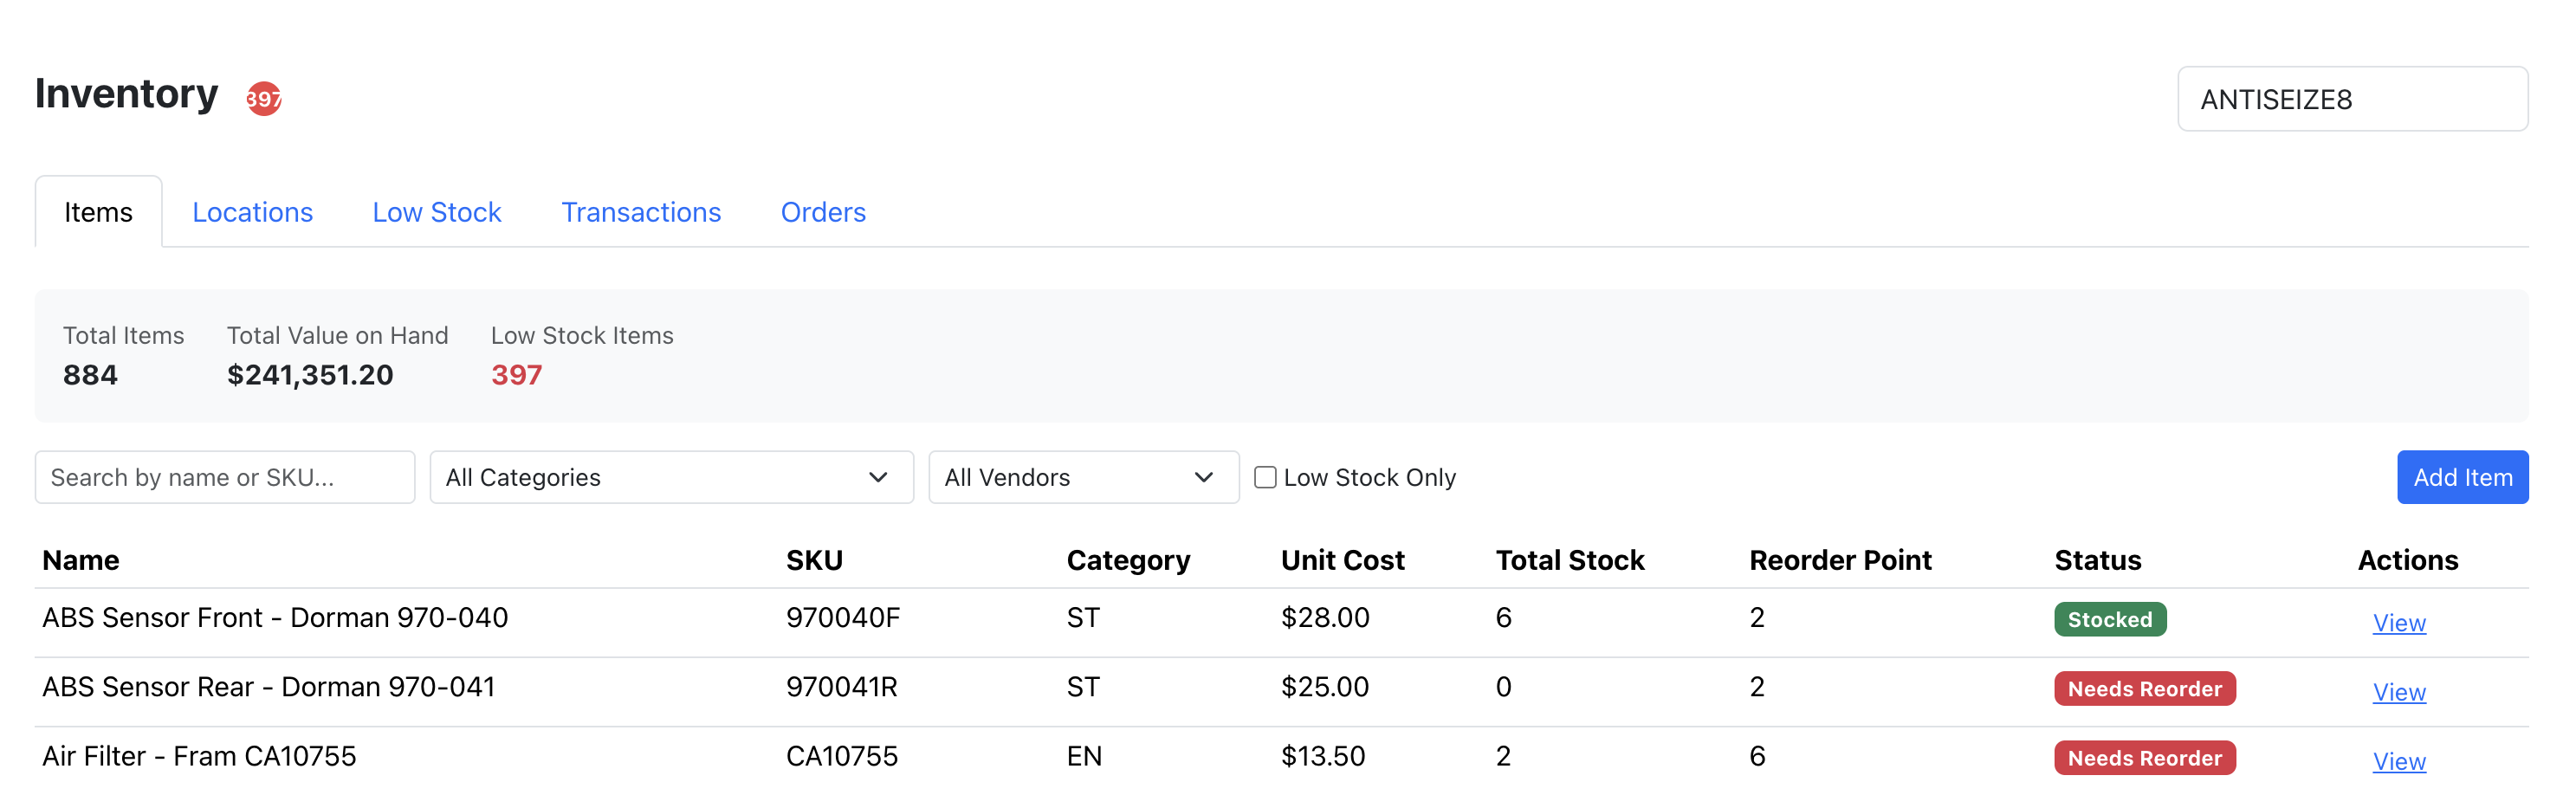
Overview: The inventory catalog is where you manage all the parts your shop keeps in stock. Each item has a name, optional SKU, unit cost, default sell price, reorder point, preferred vendor, and category.
Adding an Inventory Item
- Navigate to the Inventory section from the side menu.
- Click "Add Item".
- Fill in the item details:
- Name (required) — descriptive name for the part.
- SKU (optional) — unique part number for barcode lookup.
- Unit Cost (required) — your acquisition cost, used for profitability calculations.
- Default Sell Price (optional) — suggested price to charge on jobs.
- Reorder Point (optional) — quantity threshold that triggers low-stock alerts.
- Preferred Vendor (optional) — the vendor you typically order this from.
- Category (optional) — maps to line item categories for filtering.
- Click "Save".
Editing & Archiving
Click any item to edit its details. To remove an item from active use without losing history, click "Archive". Archived items no longer appear in fulfillment searches but their transaction history is preserved.
SKUs must be unique within your company. If you try to use a SKU that's already taken, you'll get an error.
Locations
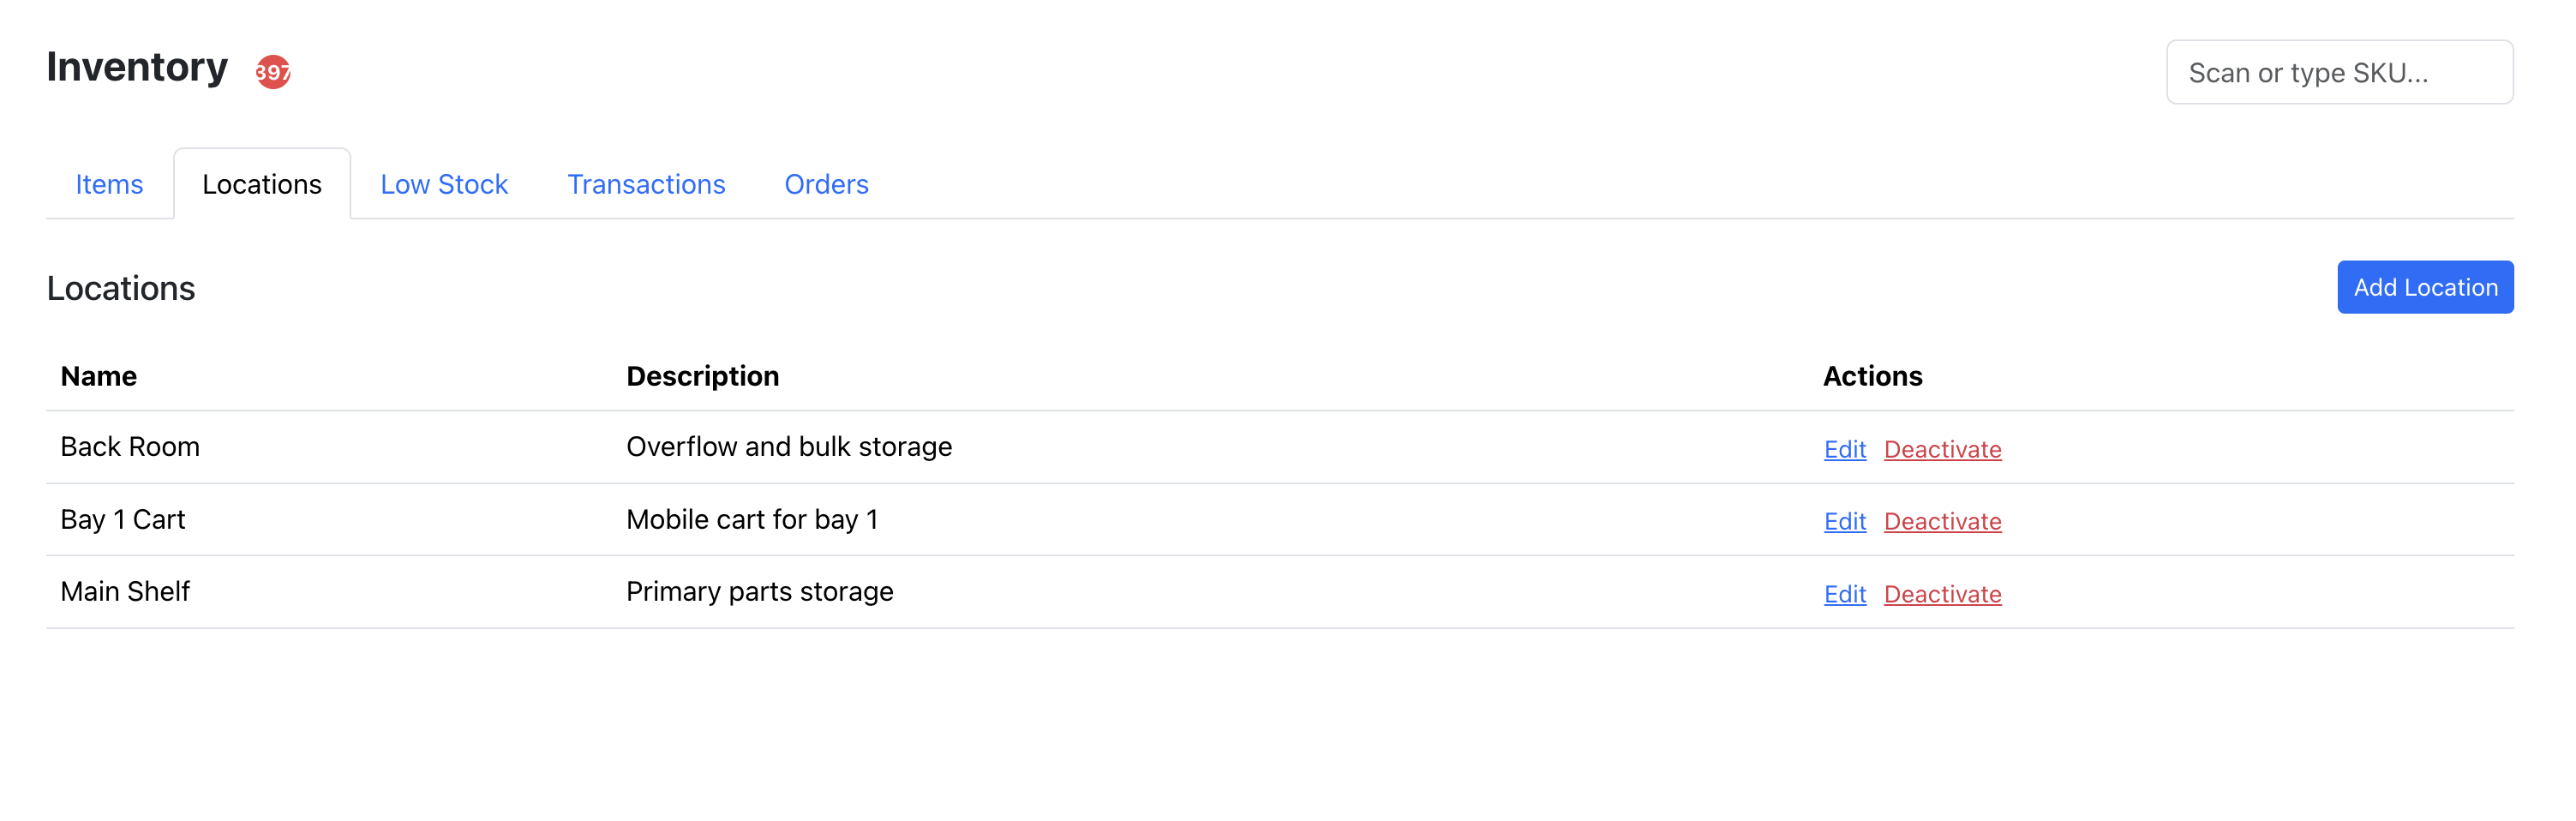
Overview: Locations represent physical storage areas within your shop (e.g., "Main Shelf", "Back Warehouse", "Van #1"). Stock levels are tracked per item per location, so you always know where parts are stored.
- Navigate to Inventory → Locations.
- Click "Add Location".
- Enter a name and optional description.
- Click "Save".
A default location named "Default" is created automatically when you add your first inventory item. Location names must be unique (case-insensitive). You cannot deactivate a location that still has stock — transfer or adjust stock to zero first.
Stock Levels
Overview: Stock levels show the current quantity on hand and quantity reserved for each item at each location. The available quantity is calculated as on-hand minus reserved.
| Field | Meaning |
|---|---|
| Quantity On Hand | Total physical stock at this location. |
| Quantity Reserved | Stock set aside for scheduled jobs (not yet consumed). |
| Available Quantity | On Hand minus Reserved — what's actually free to use. |
| Total Stock | Sum of on-hand across all locations for the item. |
The system uses optimistic locking to handle concurrent updates. If two people try to modify the same stock at the same time, the second operation will be asked to retry.
Fulfill from Inventory
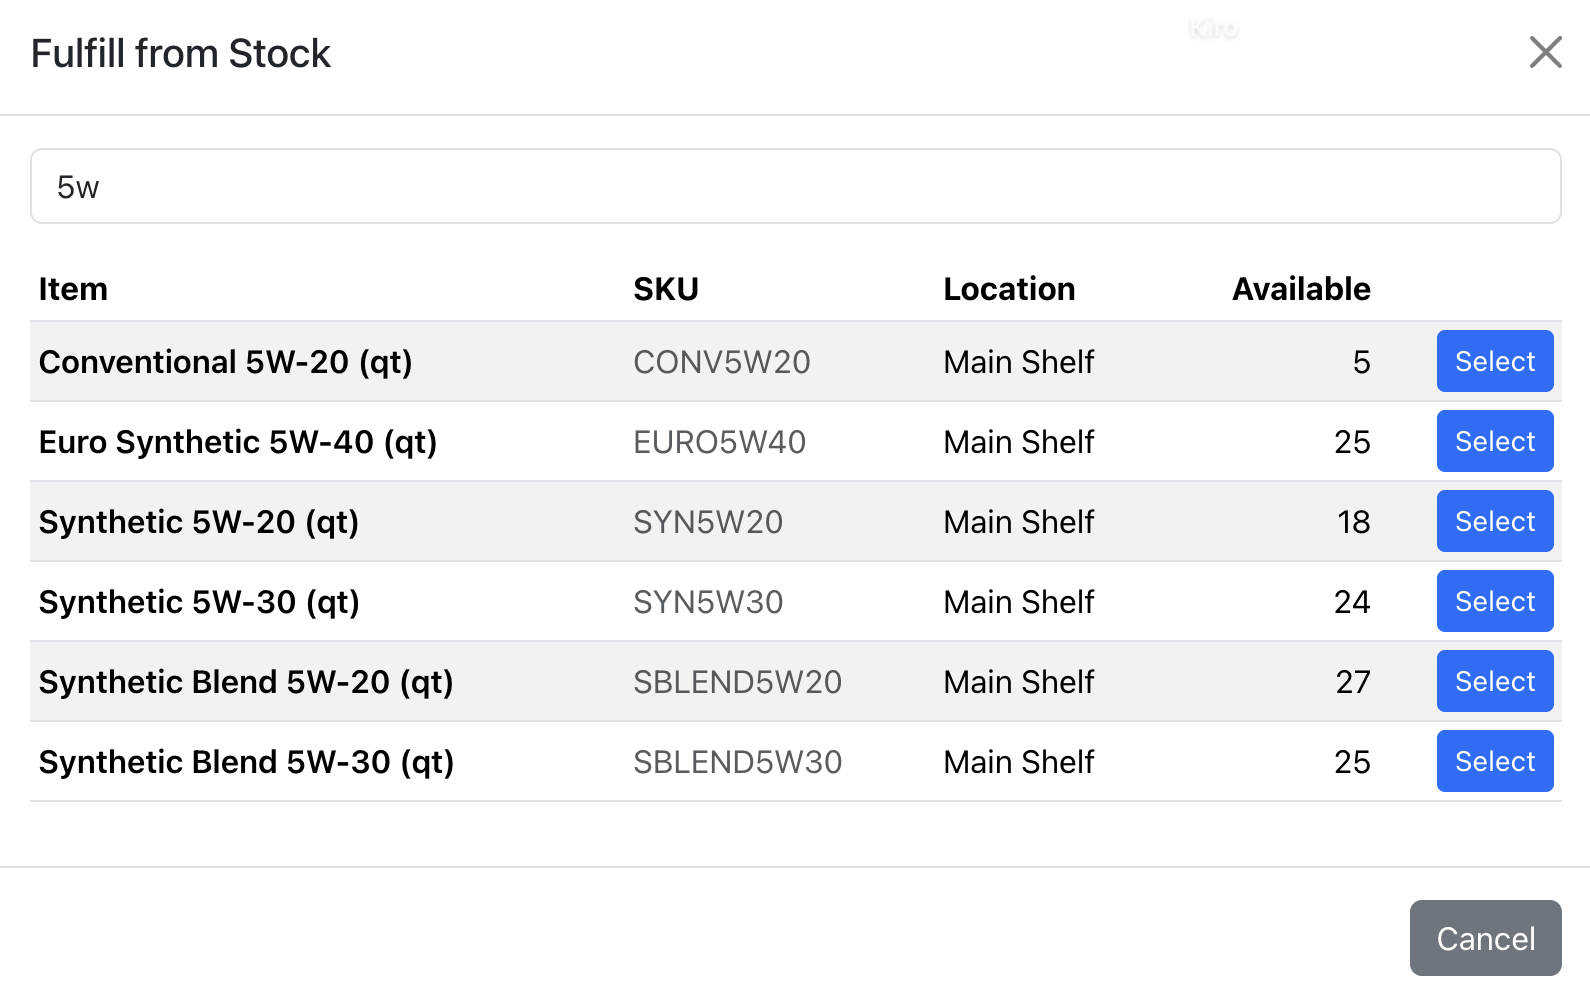
Overview: When a part on a job can be fulfilled from stock instead of ordered from a vendor, you can consume it directly from inventory. This transitions the part from "Pending" to "Fulfilled from Stock", bypassing the entire ordering workflow.
From the Parts Board
- Find the part in the "Pending" column on the Parts Board.
- Click the status dropdown and select "Fulfilled from Stock".
- A dialog appears asking you to select an inventory item and location.
- Choose the matching item (the system suggests matches based on SKU or category).
- Confirm. Stock is deducted and the part moves to the "From Stock" column.
From Line Items
- Expand a line item and find the part in the Parts subsection.
- Change the part status to "Fulfilled from Stock".
- Select the inventory item and location in the fulfillment dialog.
The part's cost is automatically set to the inventory item's unit cost at the time of fulfillment. This cost is locked in — if you later update the inventory item's cost, previously fulfilled parts keep their original cost for accurate profitability reporting.
Returns
If a part fulfilled from inventory needs to be returned, transition it to "Returned" status. The returned quantity is added back to the original stock location automatically.
Reservations
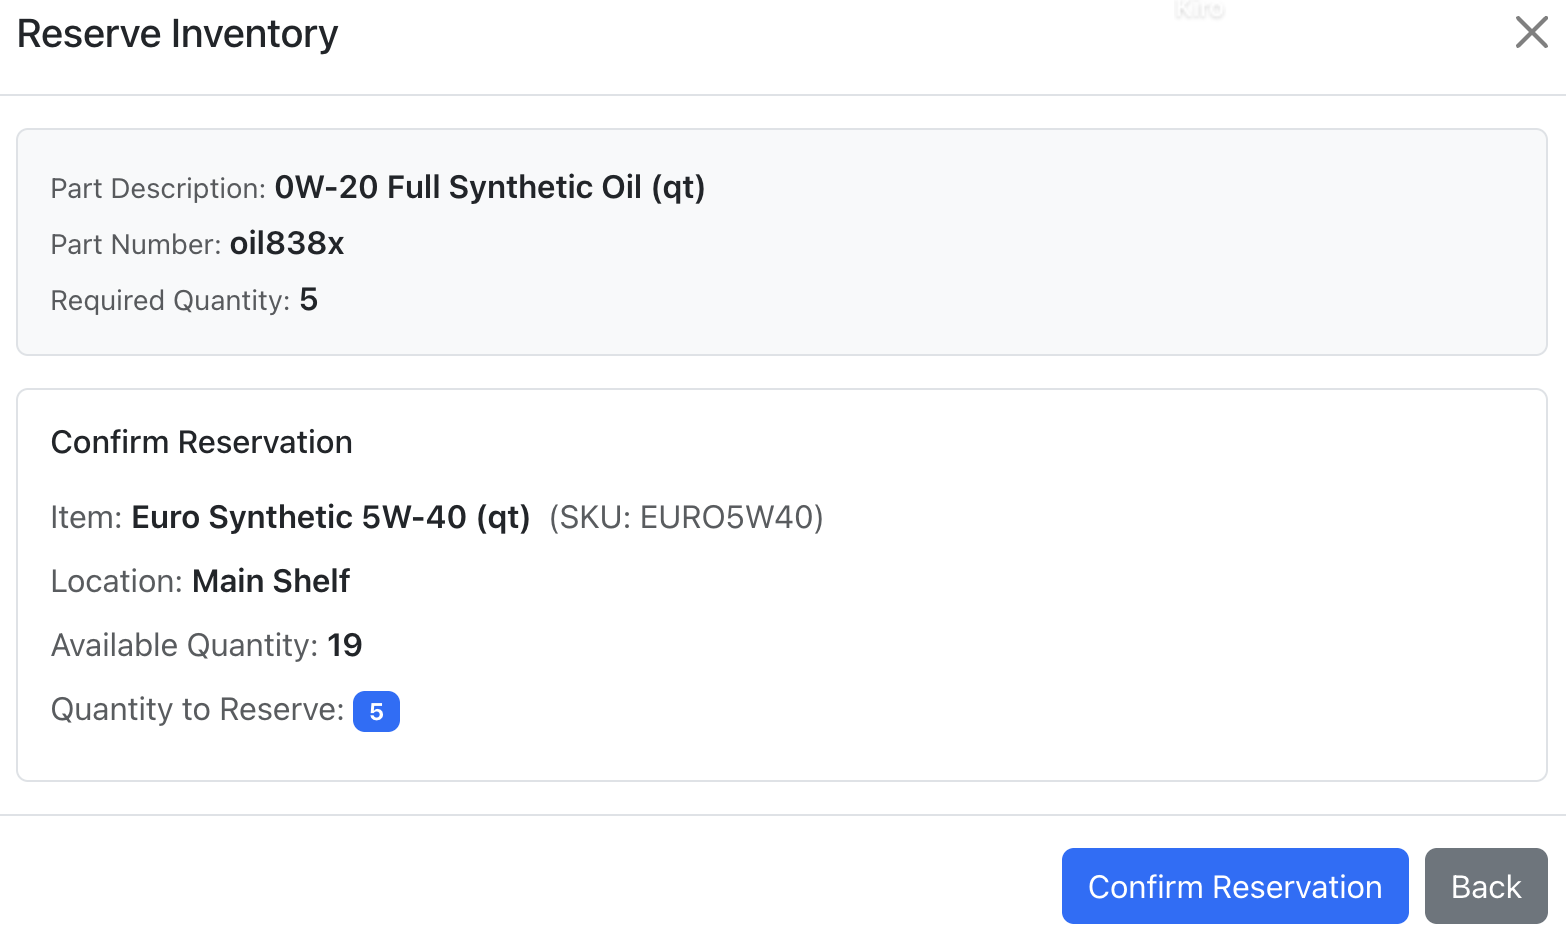
Overview: Reserve inventory for a scheduled job to guarantee stock is available when the technician needs it. Reservations set aside quantity without actually consuming it — the stock stays on hand but can't be claimed by other jobs.
Reserve a Single Part
- On a job's parts board or line items, find a pending part.
- Click "Reserve from Inventory".
- Select the inventory item and location.
- Confirm. The part's quantity is added to "Reserved" at that location.
Reserve All for an Order
Use the "Reserve All" action on a repair order to automatically attempt reservations for all pending parts that match inventory items (by SKU or category). The system returns a summary showing which parts were reserved and which were skipped due to insufficient stock.
What Happens Next
- Fulfill — When you fulfill the reserved part from inventory, both on-hand and reserved quantities are decremented together.
- Release — If the part is removed from the job or cancelled, the reservation is automatically released and the reserved quantity goes back to available.
Replenishment
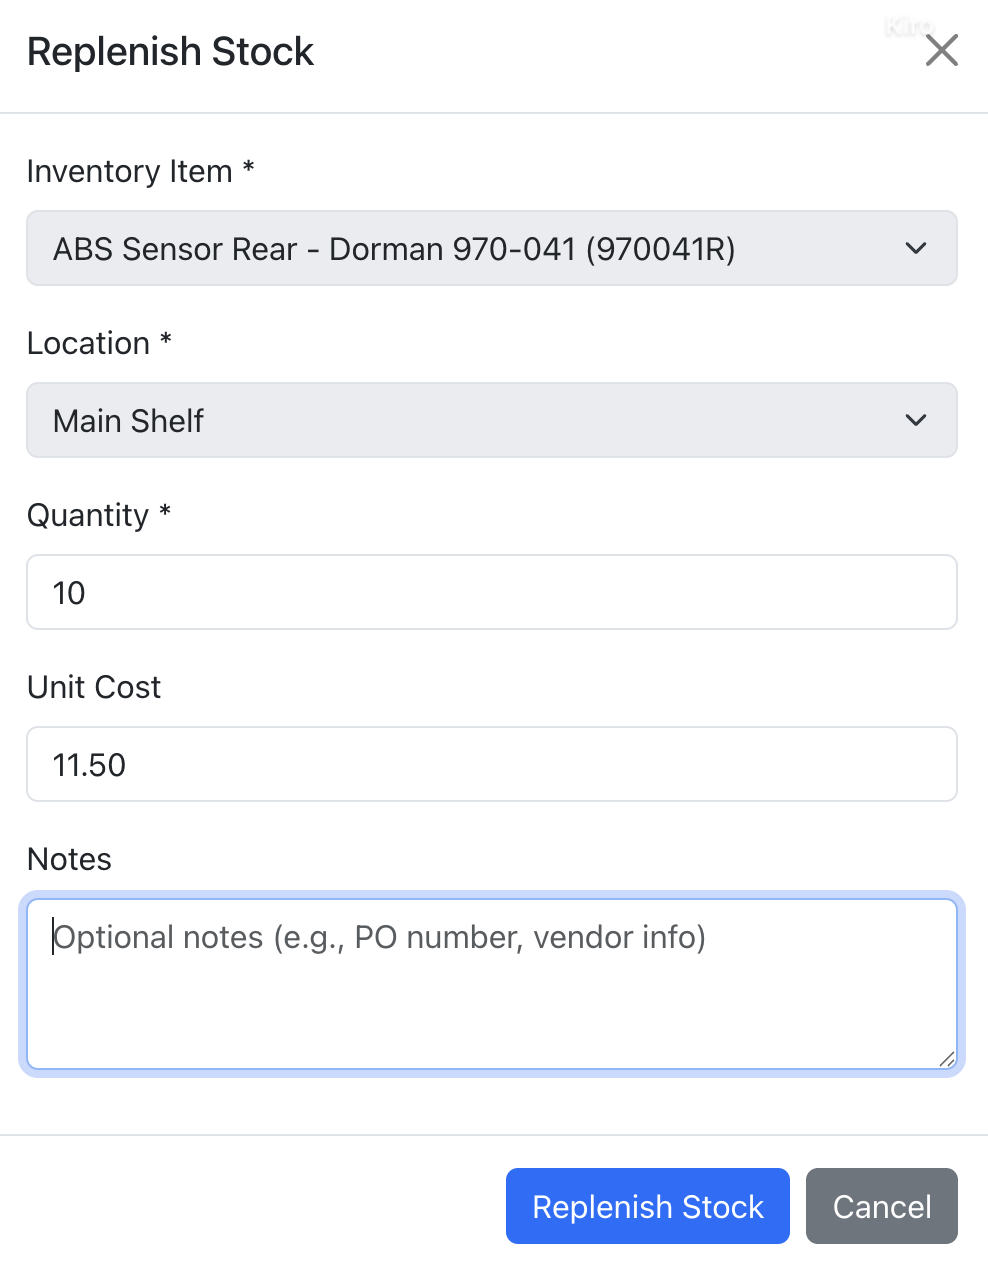
Overview: When you receive new stock, record it as a replenishment to keep stock levels accurate.
Manual Replenishment
- Navigate to the inventory item detail page.
- Click "Replenish Stock".
- Select the location, enter the quantity received, and optionally update the unit cost.
- Add optional notes (e.g., vendor invoice number).
- Click "Save". Stock on hand increases immediately.
Bulk Replenishment
Received a shipment with multiple items? Use bulk replenish to record up to 50 items in a single action. If any item fails validation, the entire batch is rejected to keep your data consistent.
When you include a new unit cost with a replenishment, the inventory item's cost is updated to reflect your latest acquisition price. This new cost applies only to future fulfillments — previously fulfilled parts keep their original cost.
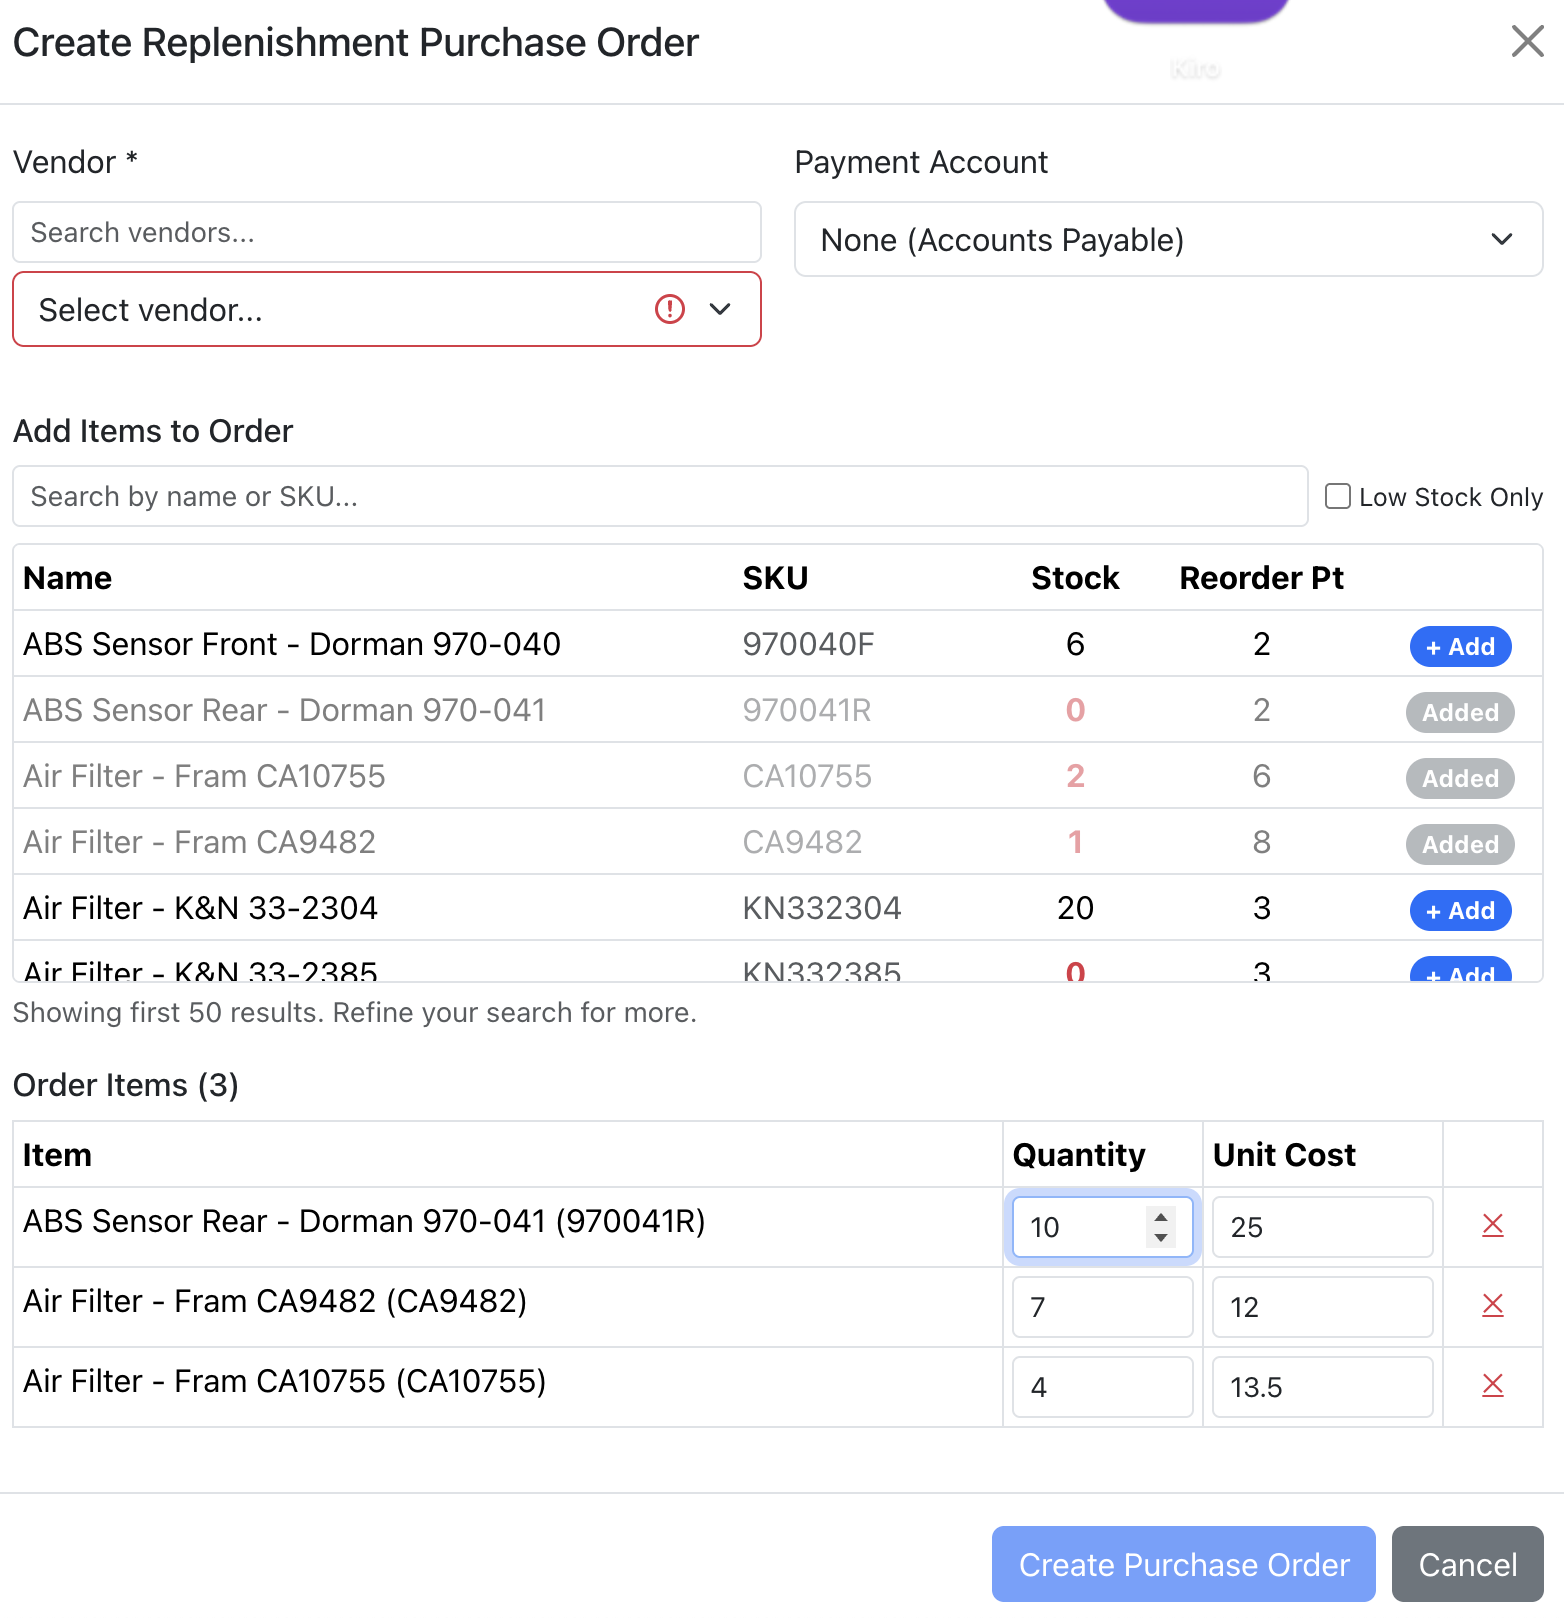
Replenishment Purchase Orders
Overview: For larger restocking, create replenishment purchase orders that are not tied to any specific repair order. These work just like job-linked POs but exist purely for restocking your inventory.
- Navigate to Inventory → Replenishment POs.
- Click "Create Replenishment PO".
- Select a vendor and add line items from your inventory catalog (up to 50).
- Finalize the PO when ready to order.
- When items arrive, click "Receive" and enter the received quantities and locations.
Key Details
- Stock is only updated when you explicitly receive items — finalizing the PO alone doesn't change stock levels.
- Partial receiving is supported. You can receive a subset of items and come back later for the rest.
- Over-receipts are allowed and recorded with a discrepancy quantity for auditing.
- The PO must be finalized before you can receive against it.
- QBO sync works the same as job-linked POs — expenses are synced based on the funding source.
Stock Adjustments
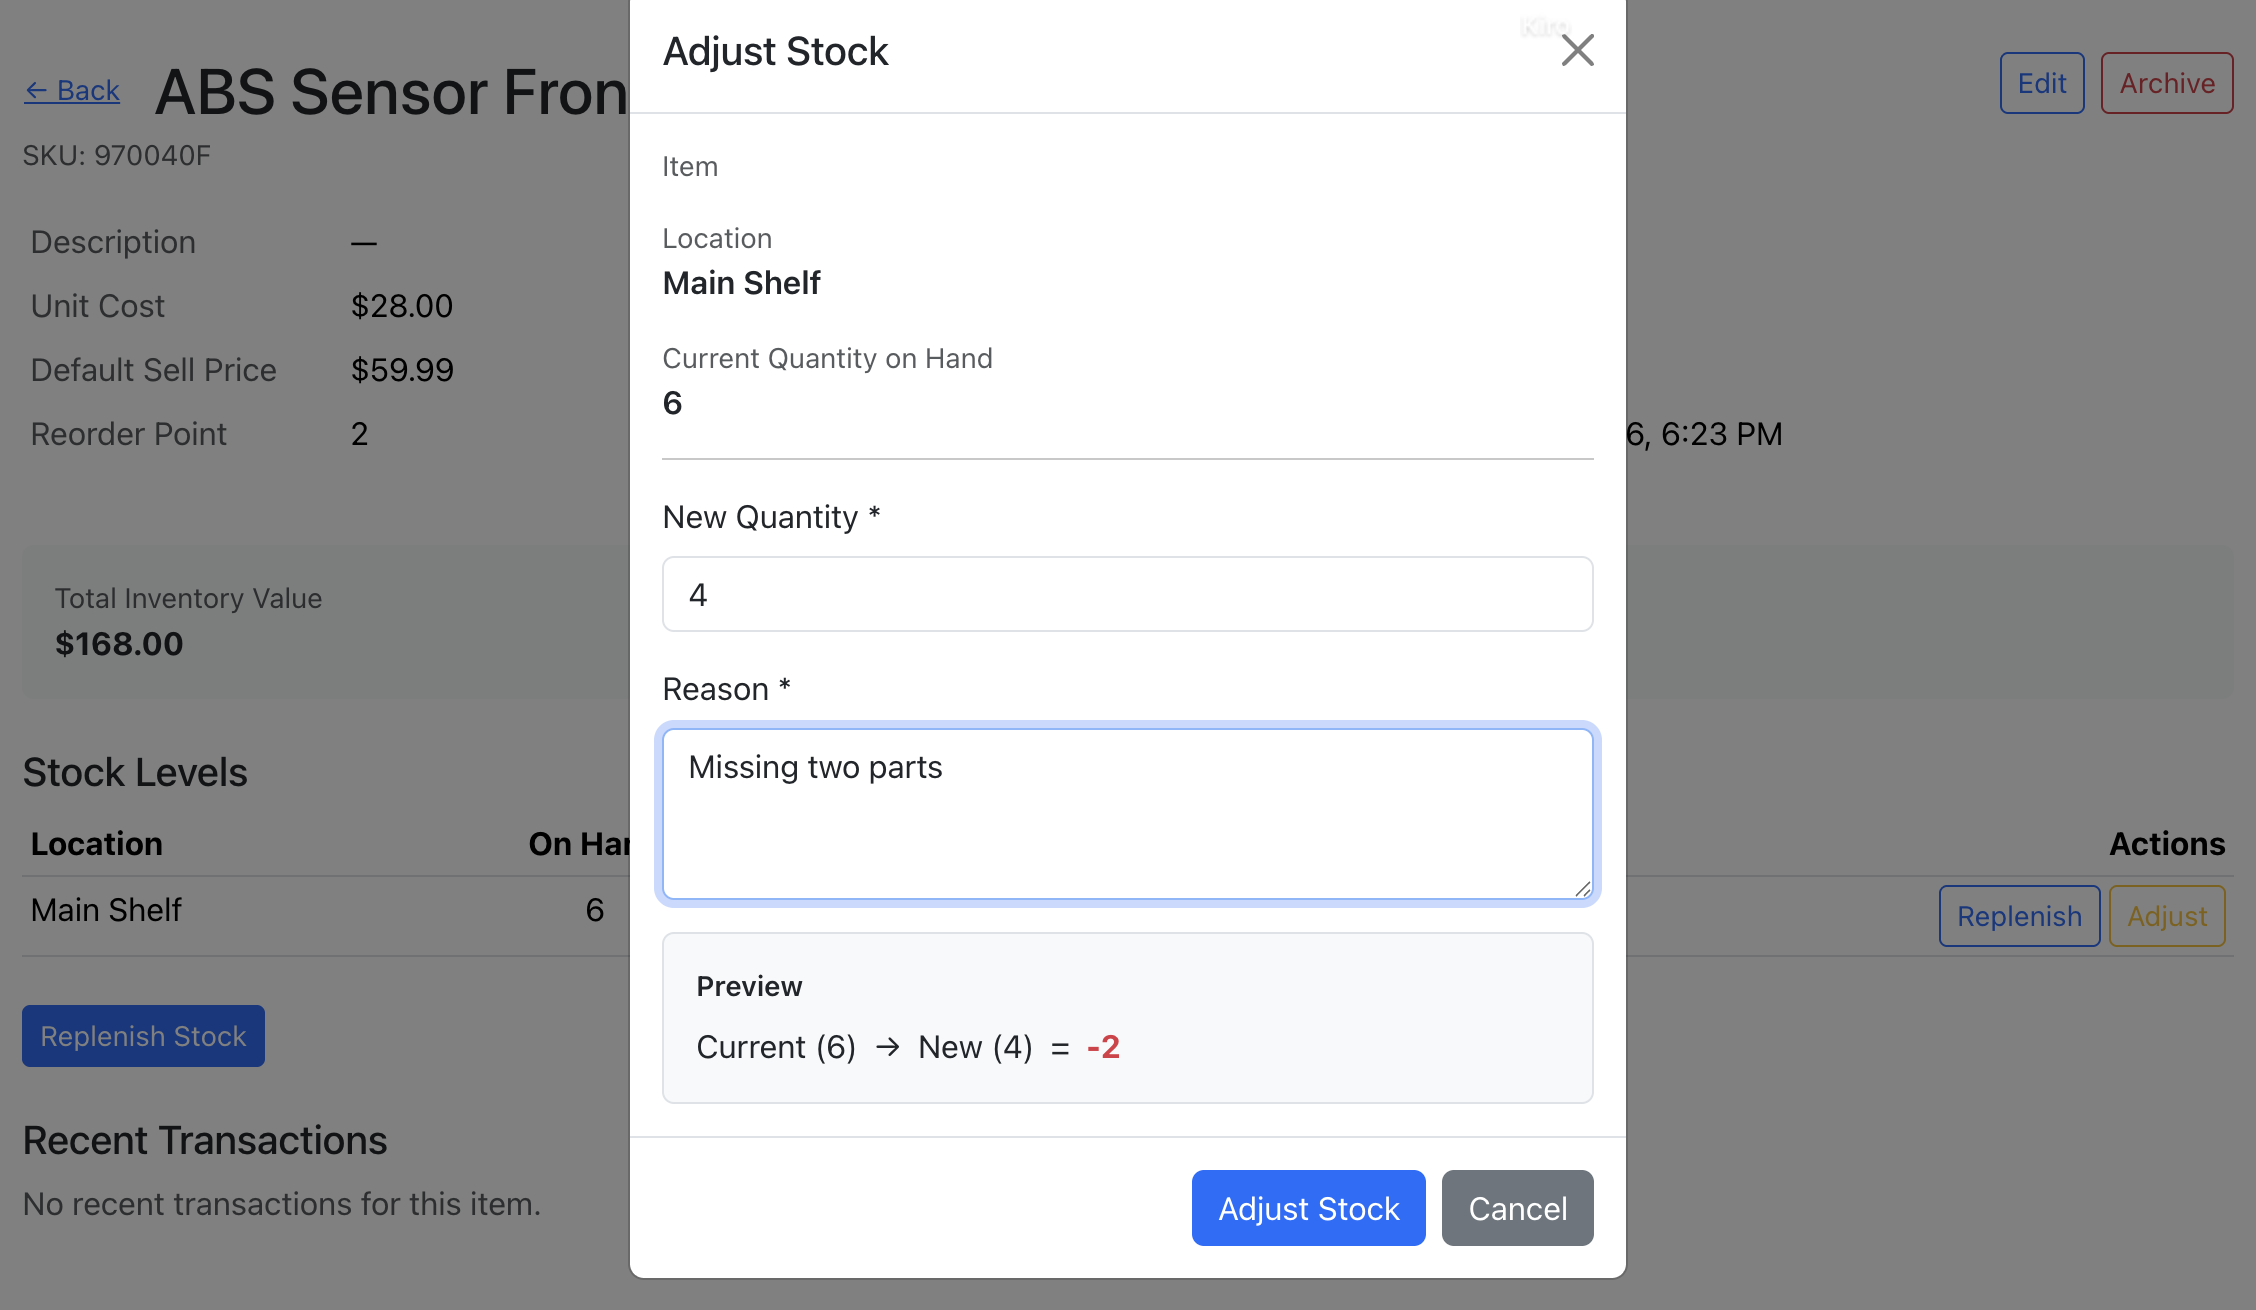
Overview: Adjust stock quantities to match physical counts, account for damaged goods, or correct discrepancies.
- Navigate to the inventory item detail page.
- Click "Adjust Stock" on the relevant location.
- Enter the new quantity (what you actually counted).
- Provide a reason (required, minimum 5 characters) — e.g., "Physical count discrepancy" or "Damaged goods removed".
- Click "Save".
Adjustments cannot set the quantity below the reserved amount. If parts are reserved at a location, you'll need to release reservations before adjusting below that threshold.
Every adjustment is recorded in the transaction ledger with both the previous and new quantities, the reason, and who performed it.
Low-Stock Alerts
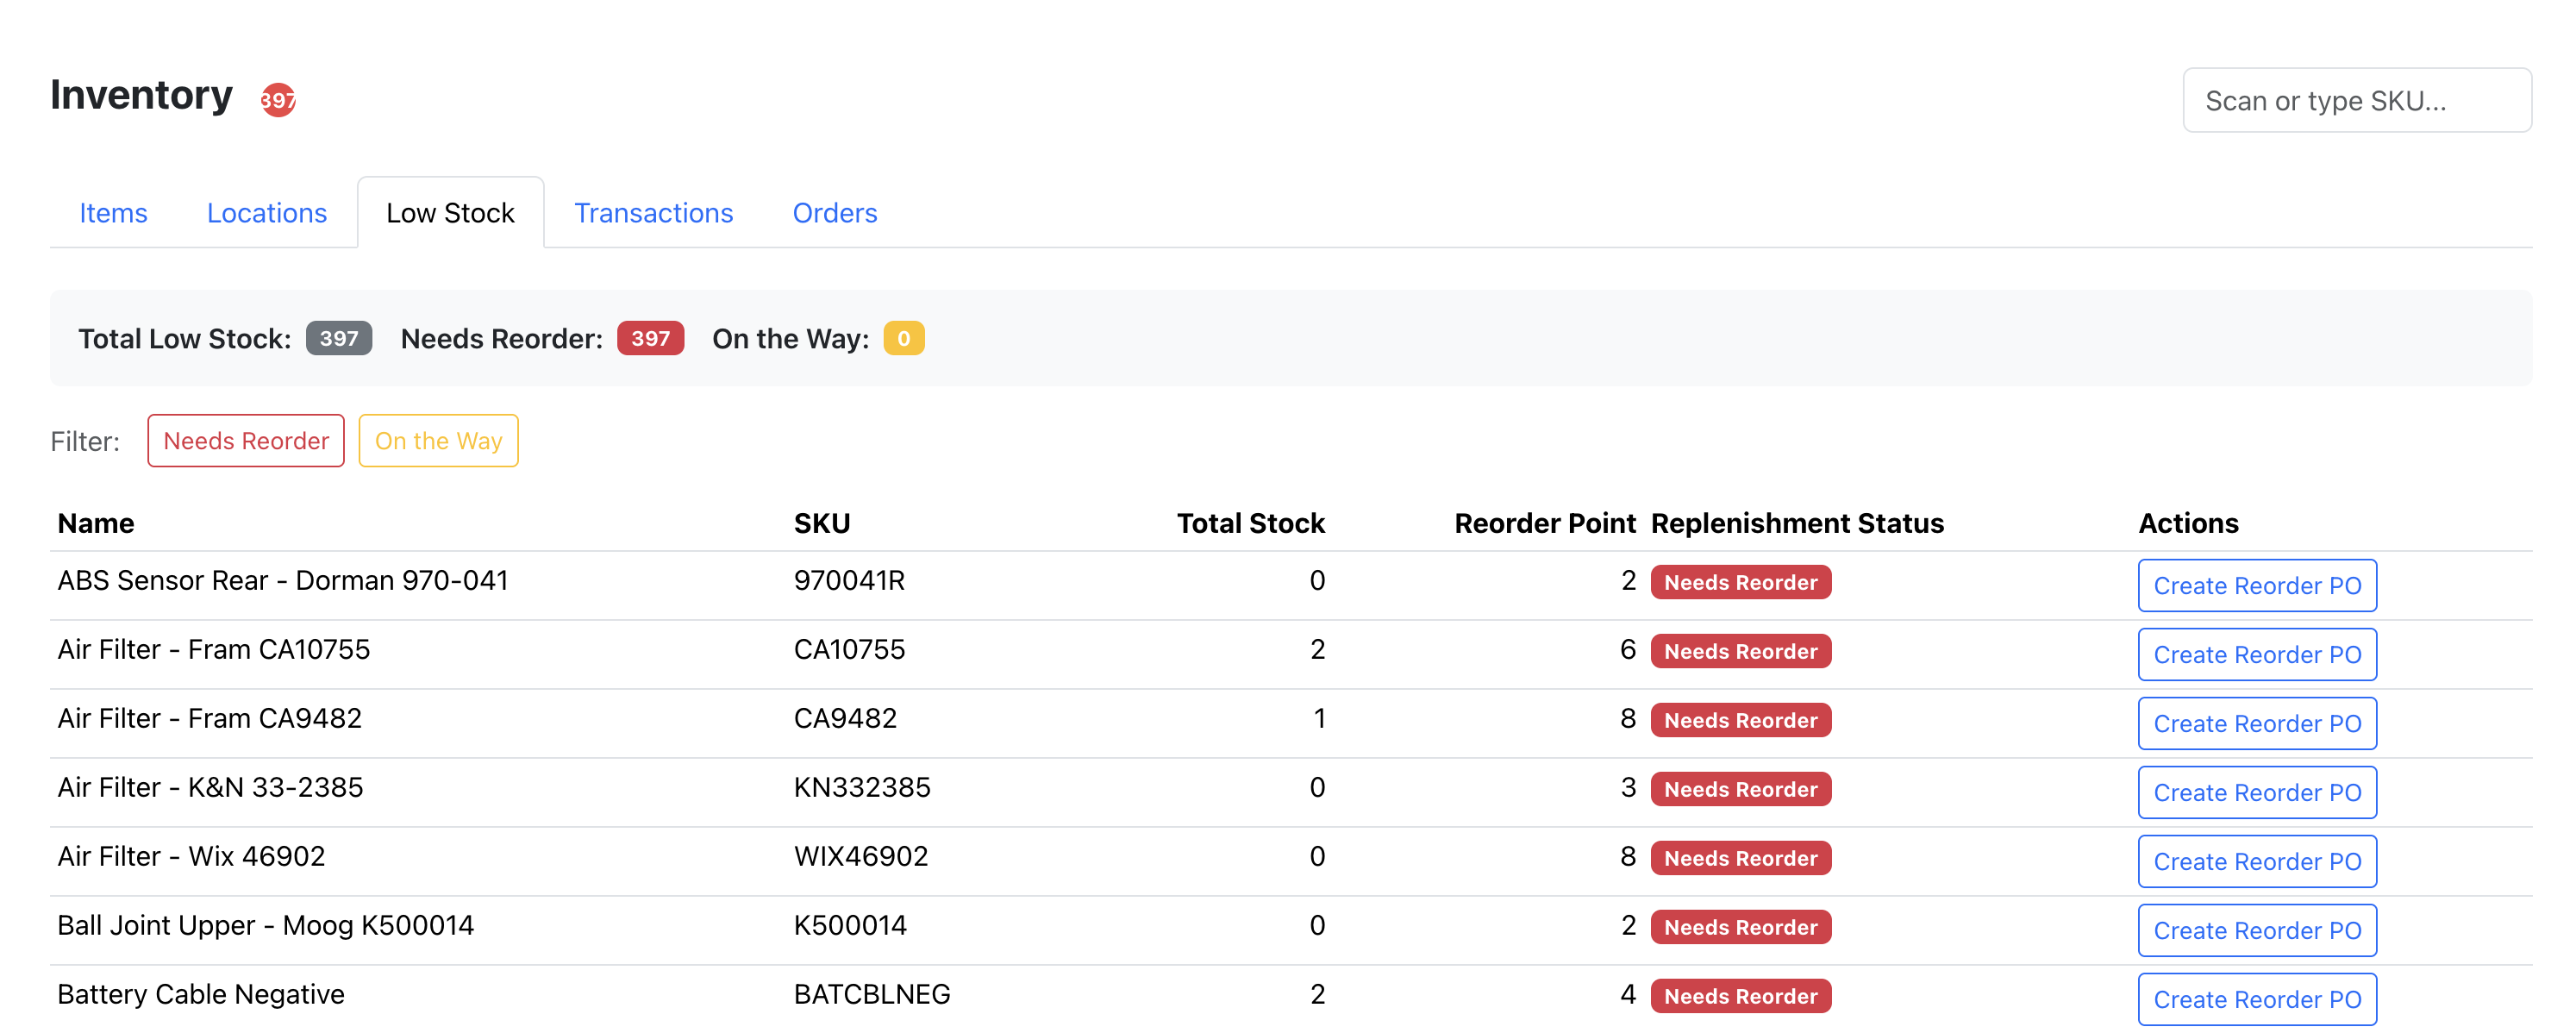
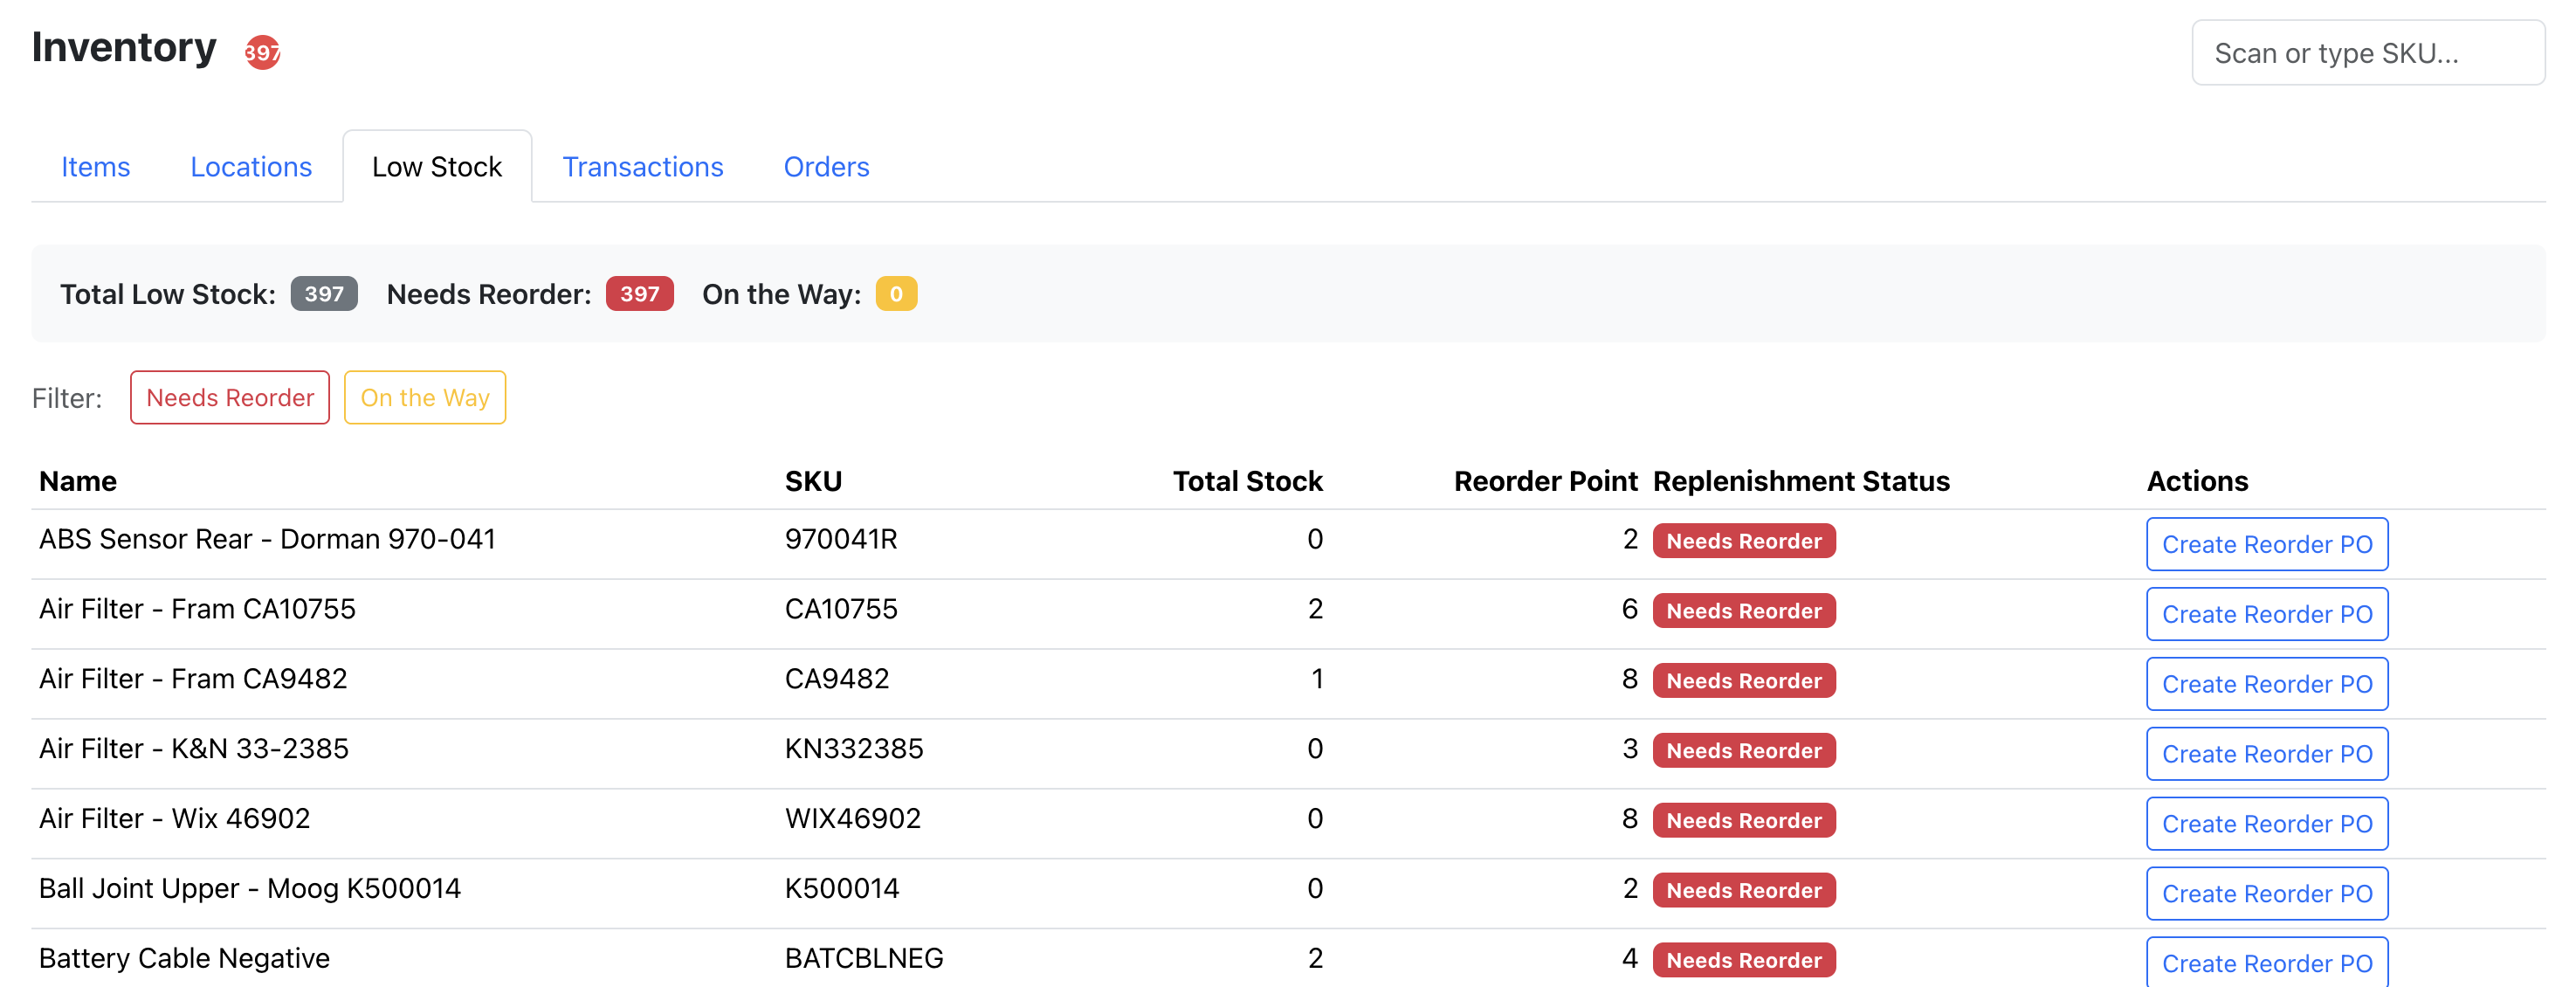
Overview: Configure reorder points on inventory items so you know when stock is running low. The system flags items as "low stock" when their total on-hand quantity falls at or below the threshold.
How It Works
- Set a Reorder Point on any inventory item (e.g., 5 means you want to be alerted when total stock drops to 5 or below).
- The low-stock flag is automatically evaluated after every consumption, replenishment, return, and adjustment.
- Items with a reorder point of 0 are excluded from low-stock alerts.
Replenishment Status
Low-stock items show one of two statuses to help you prioritize:
| Status | Meaning |
|---|---|
| Needs Reorder | Item is low and no replenishment PO is in progress. |
| On the Way | Item is low but a replenishment PO already exists for it. |
A badge on the Inventory section shows the count of low-stock items so you can spot issues at a glance.
Auto-Fulfill on Invoice
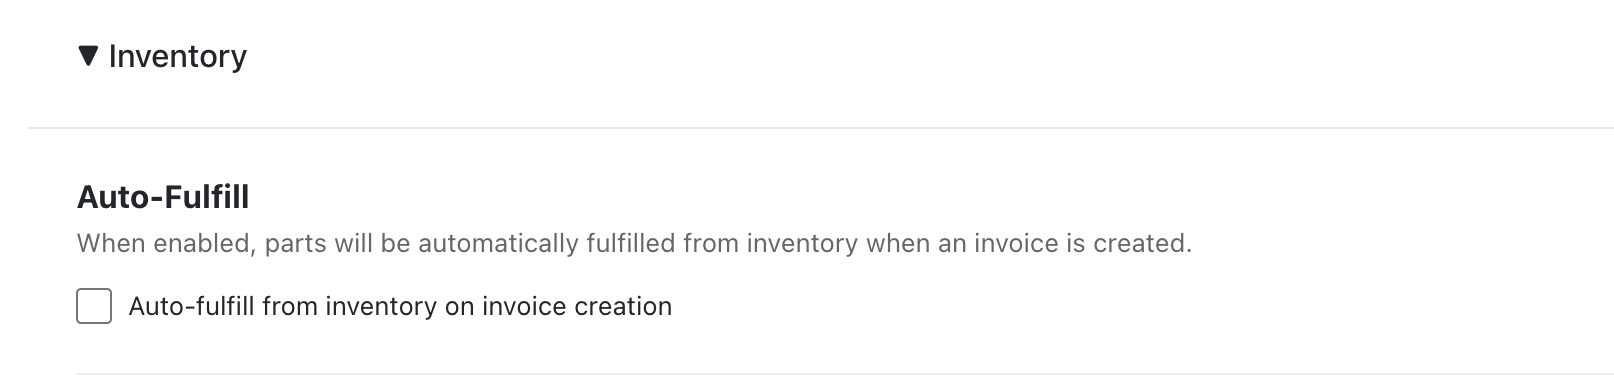
Overview: Enable automatic inventory fulfillment so that when you create an invoice, matching inventory parts are automatically deducted from stock without manual intervention.
Enabling Auto-Fulfill
- Navigate to Inventory → Settings.
- Toggle "Auto-Fulfill on Invoice" to enabled.
How It Works
- When an invoice is created, the system scans all pending parts on the invoice's line items.
- Parts are matched to inventory items by SKU (exact match).
- For each match with sufficient stock, the part is automatically fulfilled from the location with the highest available quantity.
- If a part can't be auto-fulfilled (no match or insufficient stock), it's skipped and left in "Pending" status. Invoice creation is never blocked.
After auto-fulfill runs, you'll see a summary showing how many parts were fulfilled and how many were skipped.
When disabled (the default), inventory fulfillment is entirely manual.
Quick-Save from Orders
Overview: See a part on a job that you'd like to start stocking? Save it to your inventory catalog with one click.
- On a job's line items, find the part you want to add to inventory.
- Click the "Add to Inventory" action on the part.
- Choose a location and optionally set an initial quantity on hand.
- Click "Save".
The system creates an inventory item using the part's existing data (description becomes name, part number becomes SKU, cost, vendor, and category are carried over). If an item with the same SKU already exists, the existing item is returned instead of creating a duplicate — and if you provided an initial quantity, it's added to the existing item's stock.

Barcode / SKU Lookup
Overview: Scan a barcode or type a part number to instantly find the matching inventory item. This is the fastest way to identify and fulfill parts from stock.
Input Methods
- Type a SKU — type the part number into the search field and press Enter.
- USB/Bluetooth barcode scanner — any scanner that emits keyboard input works out of the box. Point, scan, done.
- Camera scan — tap the 📷 button next to any SKU input to open the camera. Point your phone at the barcode on the part or package. Supports UPC, EAN, Code 128, Code 39, ITF, and QR codes. No server call needed — decoding happens instantly on the device.
If exactly one active item matches and has available stock, it's returned immediately — ready to fulfill. If no match is found, the system returns nothing, allowing you to fall back to manual search.
The camera scan button appears in the Fulfill from Stock dialog and anywhere the barcode scanner input is used. The SKU field is what barcodes resolve against, so make sure your items have accurate SKUs.
Recommended Scanners
For shops that want a dedicated hardware scanner instead of (or in addition to) the phone camera:
- Budget — any Bluetooth 2D imager ($30–$50) pairs directly to a phone or tablet. Brands like Tera, NADAMOO, and Inateck work well.
- Shop-grade — the Zebra CS60 ($200–$250) is IP65-rated, has a 14-hour battery, and handles damaged labels. Ideal for dusty or greasy shop environments.
Both the camera and hardware scanner paths use the same SKU lookup — no configuration needed.
Shelf Labels
Overview: Print barcode labels for your parts bins and shelves. Technicians can then scan the label to instantly look up or fulfill a part without knowing the SKU.
Printing a Single Label
- Open any inventory item's detail view.
- Click "🏷️ Print Label".
- Preview the label (barcode + item name, centered).
- Select your label format:
- Dymo 30336 (2.125" × 1") — for Dymo LabelWriter printers, prints one label at a time.
- Avery 5160 (2.63" × 1") — for any standard printer, 30 labels per sheet.
- Set the number of copies if needed.
- Click "Print".
Items without a SKU cannot have labels printed. Add a SKU first.
Bulk Printing Labels
- Navigate to the Inventory tab.
- Use the filters to narrow items (search by name, filter by category, vendor, or low-stock).
- Click "🏷️ Print Labels" in the toolbar.
- The modal fetches all items matching your filter (not just the current page).
- All items with a SKU are pre-selected. Use the checkboxes, "Select All", or "Deselect All" to fine-tune.
- Choose format (Avery 5160 or Dymo 30336).
- For Avery sheets: set the "Start at position" if you're using a partially-used sheet. Click the ? icon to see a visual grid showing which label positions will be skipped.
- Click "Print".
Items without a SKU are automatically excluded with a note showing how many were skipped.
Label Format Tips
| Format | Best For | Printer |
|---|---|---|
| Dymo 30336 | Printing individual labels as items come in | Dymo LabelWriter (~$70–$100) |
| Avery 5160 | Batch printing a full shelf's worth of labels at once | Any inkjet or laser printer |
Each label shows a Code 128 barcode (encoding the SKU) and the item name centered below it. The barcode is readable by both phone cameras and hardware scanners.
Transaction Ledger
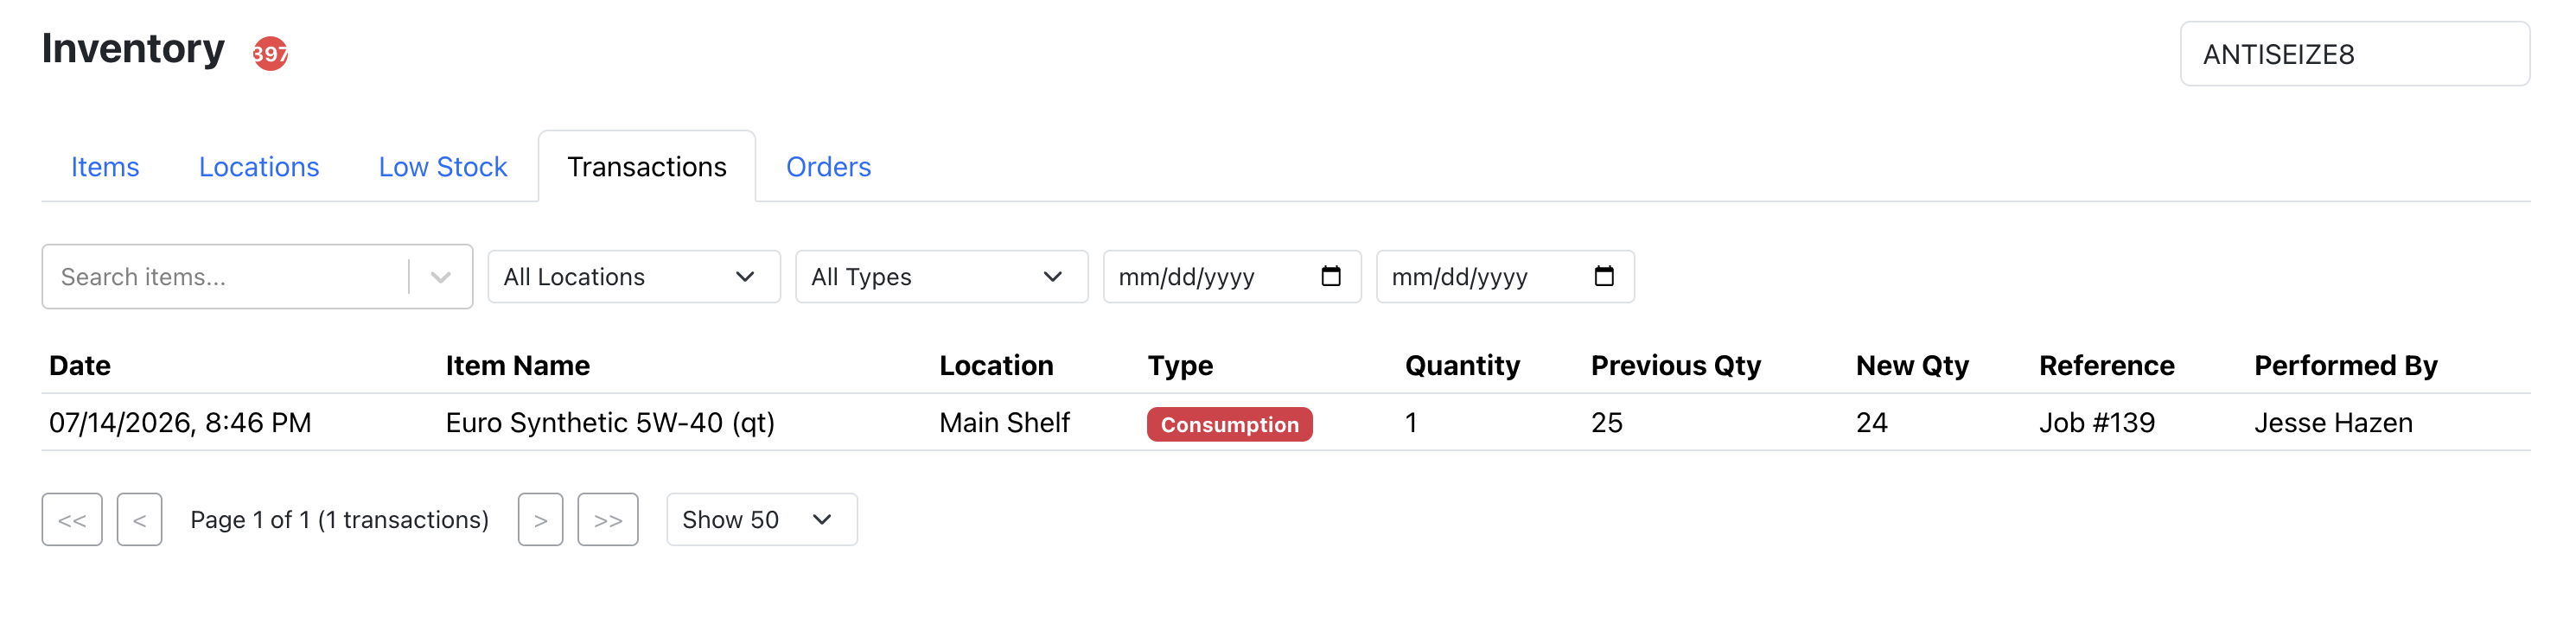
Overview: Every stock change is recorded as an immutable transaction. The ledger provides a complete audit trail for any inventory item.
| Transaction Type | Meaning |
|---|---|
| Consumption | Stock was deducted to fulfill a part on a job. |
| Replenishment | Stock was added (manual receive or PO receiving). |
| Adjustment | Stock was manually adjusted (physical count, damage, etc.). |
| Return | A previously fulfilled part was returned to stock. |
Each transaction records: what changed, how much, previous and new quantities, who did it, when, and a reference to the related entity (part, PO, etc.).
You can filter transactions by item, location, type, and date range. Use the transaction summary to see totals for consumption, replenishment, adjustments, and returns over a given period.
Transactions cannot be edited or deleted — they serve as a permanent audit trail.
Vehicle Applicability
Overview: Associate inventory items with specific vehicle make, model, and year range combinations so technicians can quickly find which parts fit a given vehicle. When a job has a vehicle assigned, the system suggests matching inventory parts and lets you search your catalog by vehicle fitment.
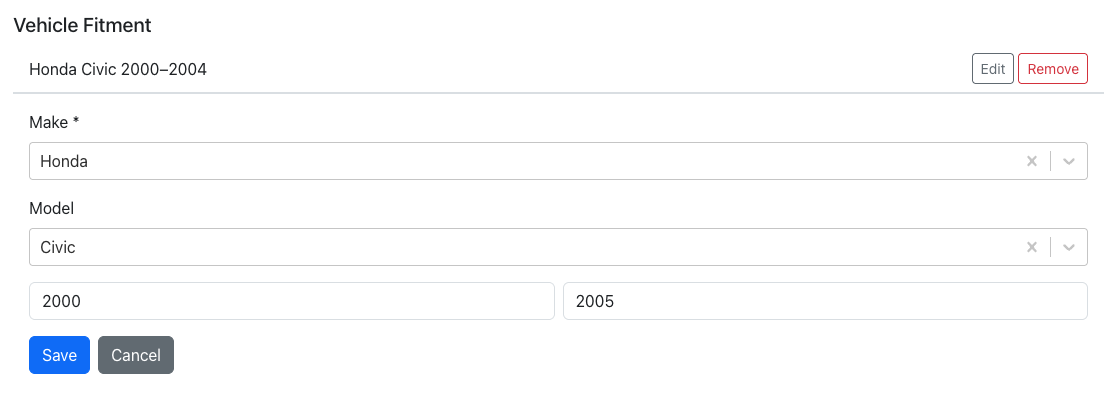
Adding Vehicle Fitment to an Inventory Item
- Open the detail view for an inventory item.
- Scroll to the "Vehicle Applicability" section.
- Click "Add Vehicle".
- Use the make picker to search and select a vehicle make (required).
- Optionally select a model using the model picker (filters based on selected make).
- Optionally enter a year range (start year, end year, or both) to limit which model years the part fits.
- Optionally enter engine type and notes for more specific fitment (e.g., "3.5L V6", "AWD only").
- Click "Save".
You can add as many vehicle applicability entries as needed per item. For example, an oil filter might fit dozens of different vehicle combinations.
Year Range Behavior
- Both years specified — part fits model years within that range (inclusive).
- Start year only — fits from that year forward (e.g., "2015+" means 2015 and newer).
- End year only — fits up to that year (e.g., "up to 2020").
- Neither — fits all model years of that make/model.
Bulk Vehicle Assignment
Need to tag multiple parts with the same vehicle fitment? Select up to 50 items from the inventory list, then click "Set Vehicle Fitment". A modal lets you configure the make, model, and year range once and apply it to all selected items in a single action.
Searching Inventory by Vehicle
Use the vehicle filter on the inventory items list to find all parts that fit a specific vehicle. Select a make, optionally a model, and optionally a year — the list filters to show only items with matching applicability entries.
Vehicle-Based Suggestions on Jobs
When a repair order has a vehicle with make and model information, the system automatically suggests matching inventory parts in a "Suggested Parts" panel. This lets technicians quickly see what's in stock for the vehicle they're working on, without manually searching the catalog.
Editing & Removing Fitment
- Click the edit icon on any vehicle applicability entry to modify its make, model, year range, engine, or notes.
- Click the remove icon and confirm to delete a fitment entry.
QuickBooks Integration
Overview: If you use QuickBooks Online, inventory transactions can automatically create journal entries to keep your balance sheet and P&L accurate.
Setup
- Navigate to Inventory → Settings → QuickBooks Accounts.
- Select your Inventory Asset account (balance sheet account for stock value).
- Select your COGS account (expense account for cost of goods sold).
- Click "Save".
What Gets Synced
| Event | Journal Entry |
|---|---|
| Part fulfilled from inventory | Debit COGS, Credit Inventory Asset |
| Stock replenished (via PO) | Debit Inventory Asset, Credit source account |
| Part returned to stock | Debit Inventory Asset, Credit COGS (reversal) |
If QBO accounts are not configured, inventory transactions proceed normally without creating journal entries. If QBO is temporarily disconnected, entries are queued and synced automatically when the connection is restored.
Each journal entry includes a memo referencing the transaction type, item name, and related order or PO for easy identification in QBO reports.